
User Manual

10 • ULTIMA 40 ACTIVE NG
Optional wireless or active subwoofer
The location of the subwoofer can be freely selected
and does not influence the other speakers.
• A location between the stereo speakers is often
ideal.
• However, do not set it up in the corner of the room
as this may result in uncontrollable frequency rises.
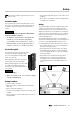
Optional rear wireless speakers
Position the rear speakers within the grey areas (see
graphic).
Version A: They are set up or hung at head height
(140 to 210 cm) to the side of the listener. The
distance to the rear wall should be no less than 50
cm.
Version B: You can also set up the rear speakers
behind the listener at a height of 140 to 210 cm.
Determine the best distance by experimenting with
different audio tests.
Connecting
CAUTION
Risk of injury/damage!
– Lay the cables so that they do not pose a
tripping hazard.
Connecting the passive speaker
1. Lay the speaker cable from the active speaker to
the passive speaker. For this, use the enclosed
speaker cable (6)or an equivalent dual core
speaker cable.
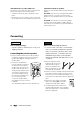
2. A connector terminal with
four pole clamps is located on
the back side of the passive
speaker. You can connect the
speaker cable directly here or
using pin plugs. Only the direct
connection is described here.
The contact bridges between
the connector terminals must
not be removed; you can
connect the speaker cables
accordingly to the top or bottom
terminals.
The terminals are marked in red (+) and black (-).
NOTICE
Make sure the polarity is correct!
– Connect each of the like coloured termi-
nals of your active and passive speaker
with one another; otherwise the sound
quality will suffer. To facilitate this, the
individual single wires of the speaker
cables are marked with different colours
or shapes.
3. Split the single wire down
by approx. 30mm on both
ends and remove approx.
10mm of insulation each.
Twist the single wire so that
no strands are protruding.
4. Turn the connector terminal counterclockwise until
loose. Run the stripped cable end into the now
visible hole. Close the terminal by turning it coun-
ter-clockwise. The cable has now been clamped in
place.
5. Connect the other end of the speaker
cable to the clamps (23) of the active
speaker in the exact same manner.
6. You can determine the position of the
speakers (right/left) later in the “Speaker”
menu (see menu “Posit. – Active Speaker
Position” on page 14).
(23)