
Installation Guide
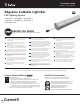


Tetra
®
EdgeLine Cuttable Light Bar Installation Guide
9
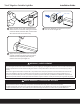
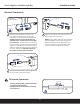
OPTIONAL
A Weather Box (GEXNWB2) may be used to
house and seal Class 2 connections.
A) Insert wire connectors into weather box. Fill
with electrical grade silicone and close box.
B) Secure the weather box using a #6 or #8
(M2 or M3) screw.
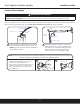
NOTE: All electrical connections should be suitably protected from mechanical damage and the environment.
Seal all connections in wet locations with electrical grade RTV silicone.
Weather box
can be painted
A B
Power
supply
To Light Bar
To power supply
Red (+)
White/Red stripe (+)
Red (+)
Black or blue (-)
Black or
blue (-)
White (-)
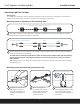
Run a wire from the power supply to the leader
cable connected to the rst light bar in the run.
NOTE: AC power connection must be contained in
an acceptable enclosure.
Using twist-on wire connectors, connect the
white/red stripe wire (+) from the light bar to
the red wire (+) of the power supply. Connect
the white wire (-) from the light bar to the
black or blue wire (-) of the power supply.
Must be used with a Class 2, 24 Volt DC Power Supply. Grounding and bonding must be done in accordance with National
Electrical Code (Article 600). Refer to the Power Supply Installation Instructions for more information.
Connect Power Supply
WARNING/AVERTISSEMENT
RISK OF ELECTRICAL SHOCK: Turn power OFF before inspection, installation or removal.
RISQUES DE CHOC ÉLECTRIQUE: Coupez l’alimentation électrique avant d’inspecter, d’installer ou de déplacer le luminaire.
1 2