
User Manual


8 Service and maintenance
17
- The measured values are indicated in °C and °F on the LC display.
8 Service and maintenance
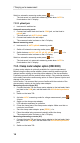
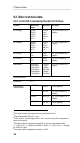
8.1. View of the back of the instrument
Screws 1 - 6: housing
Screws 7 and 8: open the battery compartment
8.2. Replacing the batteries
The batteries need to be replaced when the battery icon appears on the LC
display.
✓ Instrument is switched off and de-energized.
1. Fully disconnect the instrument from the test leads.
2. Using a screwdriver, unscrew the two metal screws (7, 8) on the
battery compartment until the battery compartment cover can be
removed. Do not unscrew the screws completely.
3. Remove the spent batteries.
4. Insert new batteries, type AAA / IEC LR03 (1.5 V), ensuring correct
polarity.
5. Put the battery compartment cover back on and screw down.
8.3. Changing the fuses
✓ Instrument is switched off and de-energized.
When opening/assembling the instrument, take care not to lose
any of the removed screws. Placing a cloth on the work space is
recommended.
1. Fully disconnect the instrument from the test leads.
2. Fold out the stand.
3. Undo and remove the screws (1 to 6) using a cross-head screwdriver.
4. Remove the lower section of the housing.