
User Manual

6 Using the product
27
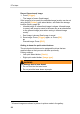
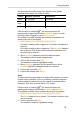
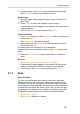
are shown as a humidity image. The special colour palette
indicates which areas are at risk of mould:
Colour Surface moisture Assessment
green 0…64%RH non-critical
yellow/or
ange
65…80%RH potentially critical
red >80%RH critical
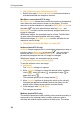
If this function is enabled ( ), the shortcut buttons are
permanently assigned the functions Humidity (only if no radio
humidity probe is logged on) and Emission level….
The values for relative humidity and ambient temperature are
shown at the top of the display.
1. [OK] | Measurement | [OK] | Humidity | [OK].
- If a radio humidity probe is logged on: No further information is
required.
- If no radio humidity probe is logged on: The Humidity dialogue
box is opened. The values for the ambient temperature and
humidity can be entered.
2. Move Joystick up/down to select the desired option.
- The selected option has an orange border.
3. Confirm the selection with [OK].
- The selected number is highlighted orange.
4. Move Joystick up/down to set the desired value. Move
Joystick right/left to change between the numbers.
5. Confirm the entry with [OK].
6. Confirm the settings with Apply.
Solar
To detect and document failures in photovoltaic systems, the solar
function can be selected. The sun's radiation intensity measured
(with an external instrument) can be entered for documentation
purposes. This value is saved with the IR- image.
If this function is enabled ( ), the shortcut buttons are
permanently assigned the functions Intensity and Hotspot.
The radiation intensity value is shown at the top of the display.
1. [OK] | Measurement functions | [OK] | Solar | [OK].
- The Solar dialogue box is opened. The radiation intensity value
can be entered.
2. Confirm selection with [OK].
- The selected number is highlighted orange.