
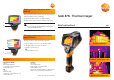
User Manual

Recording the image
1 Freeze image: Press trigger button ➁ once.
2 Save image: Press trigger button again.
or
Discard image: Press [Esc] ➀.
Getting to know the menu
1 Open menu: Press [OK] ➀.
2 Navigate: Move Joystick ➀ up / down.
3 Open submenu (only for menu points marked
with ): Move joystick to the right.
4 Call up a function: Press [OK].
or
Exit menu: Press [Esc] ➁.
Focusing the picture
❯ Tur n lens ➀ by hand.
Switching on / off
❯ Remove protection cap ➀ from the lens.
❯ Switch on: Press [ ]
➁.
- The measurement view is opened after the warm-
up period.
- The thermal imager performs an automatic
zeroing approx. every 60 sec. This can be
recognized by a “click”. The image is frozen
briefly when this occurs.
❯ Switch off: Press [ ] again.
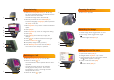
➆
➅
➂
➃
Apply
➄
➁
➀
➀
➁
➀
➀
➁
➀
➁
Measurement
Image gallery
Scale...
Display...
Emissivity...
Palette
Configuration
Commissioning
1 Push the rechargeable battery ➀ all the way
into the rechargeable battery slot until this is flush
with the bottom of the handle.
- The thermal imager starts automatically.
2 Remove protective film from the display ➁.
- Instrument language (Language) and temperature
unit (Unit) can be set:
3 Move Joystick ➂ up / down to select the desired
option.
4 Press [OK] ➂.
5 Move Joystick up / down to change the setting.
6 Press [OK].
7 Press [Apply] ➃ function key to apply the
settings.
8 Press []➄ to switch off the thermal imager.
9 Connect mains unit () ➅.
10 Completely charge battery (3 hours).
11 Insert Memory card in the card slot (SD) ➆.
- The camera is now ready for operation.