
Replacement Part List


MAKE
SURE
DOOR IS
ZIPPED
SHUT
FIGURE 6
TAKE DOWN INSTRUCTIONS
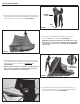
5. Locate the two corded poles in the carry bag. Assemble the pole
by interlocking the poles together. Go back inside the screen
tent and locate the small pockets on the top and bottom of the
vertical seams next to the door. Insert each pole into the top and
bottom pockets. Then secure with the hook/loop strap in the
center of the vertical seam. Do this on both sides of the door.
[ SEE FIGURE 5 ]
6. Locate the ground stakes and ropes in the carry bag and fasten
the stakes through the grommets located at each outer corner.
Hammer stakes through each grommet completely.
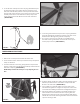
7. Tie a rope to each eye-bolt, centered on each hub. Then tie
the other end to a ground stake. Use the slider on the rope to
achieve proper tension. [ SEE FIGURE 6 ]
1. Remove the corded poles from either side of the door.
2. Undo all stakes and tie-down ropes and remove any wind panels
if they are attached.
3. From the inside the screen tent, gently pull the roof poles/hub
down to collapse the roof. DO NOT stand directly underneath the
hub when collapsing. [ SEE FIGURE 7 ]
NOTE: Always start the take-down process by collapsing the roof
rst.
4. From the outside, zip the door shut to prevent tangling of poles.
Push the pole/wall near the center hub to collapse each wall.
Do this to all of the walls. [ SEE FIGURE 8 ]
5. Once all hubs are collapsed, gather all corners of the screen
tent and fold together into a tight cone shape. Do not force the
screen tent when folding and watch for entanglement of poles.
6. Take the provided strap and wrap it around the folded screen
tent to allow for easier insertion into the carry bag. Place the
folded screen tent back into the carry bag with the hubs always
towards the closed end of the bag. Place the stakes and tie-down
ropes into the bag as well.
FIGURE 5
FIGURE 7
FIGURE 8