
Operation and maintenance manual


Rear Axle Group - Differential Drive Head
4
Section 160-0020
SM 2151 6-02
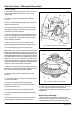
2. Match mark straps (49) as shown in Fig. 3 to ensure
correct rebuild position then remove nuts (51) and
washers (50).
3. Lift off two straps (49) and diff bearing adjusting
nuts (16).
4. Remove and discard bearing adjusting nut split pins
(48) from diff straps (49).
5. Lift complete differential and crownwheel assembly
from gear casing (40). Place assembly on bench with
crownwheel (11) teeth uppermost.
6. Check end flanges (14 & 46) and differential housing
body (13) for identification and matching marks (See
Fig. 4). If unmarked, centre punch the parts to ensure
correct mating on assembly.
7. Remove nuts (47) from studs (12) which fasten
upper end flange (46) to differential housing body (13).
8. Lift off end flange (46) and thrust washer (15).
Note: Shims (45) may have been fitted between end
flange (46) and differential housing body (13). These must
be replaced on assembly to maintain an operating clearance
within the differential assembly. The components contained
in the differential unit have been carefully measured and
selected to ensure correct operation. DO NOT fit the
components in a different sequence to that of the original
assembly or attempt to change/introduce shimming. This
will result in failure of the POWR LOK system.
9. Remove first clutch plate (44) and friction plate (10)
followed by second pair of plates. Set aside plates so that
they can be reinstalled in their original position.
10. Slide out cage half (9) from differential housing
body (13).
11. From remaining cage half, lift out wheel (8), pinions
(7) and trunnions (20).
12. Remove second wheel (8) and cage half (9)
followed by two pairs of clutch plates (10 & 44) and
second thrust washer (15).
13. Unscrew and remove nuts (18) and bolts (19).
14. Separate end flange (14) from differential housing
body (13).
15. Using hide faced mallet, remove crownwheel (11)
from its register on differential housing body (13).
SM - 2734
16. Inspect all parts of differential assembly. If there is
any wear or damage install new differential unit
complete. Renew crownwheel (11) and pinion (37) as a
matched pair.
Bevel Pinion Assembly
1. Remove setscrews (32) then, using hide faced
mallet, knock out complete pinion assembly from gear
casing (40) taking care not to lose any of the pinion
SM - 2735
Fig. 4 - Matching Marks on Diff Housing
Fig. 3 - Match Marking Gear Casing Straps