
Data Sheet


Copyright © Terabee 2017
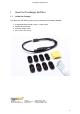
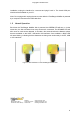
Step 2. Connecting the Flex Cable to the sensor
Start by plugging the Flex Cable to the sensor’s Flexible Flat Cable (FFC) connector.
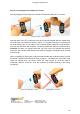
Figure 7. Open, Insert, Close
Note that each of the FFC connectors need to be manually opened and then closed when
connecting the Flex Cables as shown in Figure 7. For easier opening you can gently pull
the small locking ‘tabs’ on the sides of the connector before pulling the connector down.
You may find this easier with tweezers. The locking mechanism has to be pulled out only a
millimeter or less, not entirely! Note that too much force can damage the sensor’s
connector. Also, double check that the Flex Cable is plugged in a straight manner to avoid
a short-circuit.
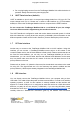
When connecting the Flex Cable, make sure that the side with conductive tracks is facing
the sensor’s Printed Circuit Board as shown in Figure 7. Connecting the wrong side of the
cable can damage both, the sensor and/or the cable (Figure 8). Once the cable is
positioned inside the connector, close the connector by smoothly pushing in the locking
mechanism.
Figure 8. Left image - correct Right image - incorrect
Terabee Website:
90RueHenriFabre Technicalsupport:
01630Saint-Genis-Pouilly Commercial:
www.teraranger.com
support@teraranger.com
teraranger@terabee.com
10