PHONECELL® SX5D GSM • Fixed Wireless Phone • Fixed Wireless Fax Phone • Fixed Wireless LCR Phone 850/1900 MHZ GSM (DUAL BAND) USER MANUAL 7/28/03 Part Number 56029701
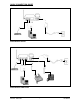
QUICK CONNECTION GUIDE Fixed Wireless Phone Fixed Wireless FAX Phone Phonecell® SX5D GSM i User Manual
Fixed Wireless Personal Least Cost Routing (LCR) Phone Phonecell® SX5D GSM ii User Manual
SX5D MENU STRUCTURE Phonebook Menu View Names Add Name Settings Call Log Messages Received Messages Saved Messages Create Message Message Settings Voicemail Info Message All Calls Missed Calls Received Calls Dialed Numbers Clear Logs Call Time GPRS Info Call Divert Clock Set Alarm Clock Settings Set Time Set Date Set Time Zone All Calls When Busy No Answer Not Found Cancel All Diverts Settings Phone Settings Audio Settings Call Settings Data Settings Fax Settings* Extension Settings* Dial Setti
CONTENTS Phonecell® SX5D GSM Desktop Phone Spike Antenna Power Supply AC Power Cord Before installing your Phonecell® SX5D, carefully remove the contents from the shipping carton and check for evidence of shipping damage. If damage is found, contact your Authorized Telular Distributor or shipping agent immediately. SAFE OPERATION INSTRUCTIONS IMPORTANT! Before installing or operating this product, read the SAFETY INFORMATION section of this manual. • Install unit indoors.
TABLE OF CONTENTS Quick Connection Guide..................................................................................................i SX5D Menu Structure ....................................................................................................iii Contents.........................................................................................................................iv Safe Operation Instructions ........................................................................................
Supplementary Services (Network Dependent) ...........................................................21 In-Call Options .........................................................................................................21 Call Divert (Forwarding)...........................................................................................22 Call Waiting..............................................................................................................22 Multiparty Calling .....................
SX5D SETUP SIM Card Installation The SX5D requires a Subscriber Identification Module (SIM) for normal operation. The service provider supplies the SIM card, which carries the account information needed to operate the SX5D. The SIM compartment is on the back of the SX5D. NOTE: If you don’t have a SIM card, contact your network service provider. 1. Remove the power supply if it has already been connected. The power supply must be removed whenever a SIM Card is removed or installed. 2.
Battery Operation The unit will not automatically switch from AC to battery upon loss of AC power. The AC/Battery switch must be changed manually to the battery position - see Figure 5. Battery power will provide up to 1 hour of talk time and 48 hours of standby. AC/Battery Switch AC Position Battery Position Figure 5 – AC battery Switch. Location and Setup The SX5D comes with a standard spike antenna (TNC). 1. Attach and finger-tighten the antenna - see Figure 6. Do not over-tighten the antenna. 2.
Desk-Mounting A wedge is included with the SX5D to be used to position the SX5D for easier viewing of the LCD screen and keypad. Attaching the wedge is optional. To attach the wedge, use the following instructions. 1. Slide the wedge tabs on the thin end of the wedge into the bottom tab slots on the SX5D see Figure 9. NOTE: Holding the wedge at an angle makes it easier to slide the wedge tabs into the bottom tab slots.
Wall-Mounting 1. Remove the mounting clip from the cradle and re-insert it with the tab pointing up - see Figures 11 and 12. Mounting Clip in Cradle (tab up) Remove Mounting Clip from the Cradle (tab down) Insert Mounting Clip into the Cradle (tab up) Figure 12 – Handset mounting clip for wall-mount. Figure 11 – Handset mounting clip assembly. 2. Slide the wedge tabs on the thin end of the wedge into the bottom tab slots on the SX5D see Figure 13.
4. Mark two hole locations 83 mm (3-1/4 inches) vertically apart and drill two holes into the wall. 5. Install the screws (not supplied) into the wall, leaving a gap of approximately 3 mm (1/8 inches) between the screw head and the wall. 6. Align the mounting holes with the screws and mount the SX5D onto the screws - see Figures 15 and 16. 83 mm (3-1/4 inches) Mounting Holes Figure 16 – Mount the SX5D onto the screws. Figure 15 – SX5D mounting hooks. Connect the SX5D to AC Power 1.
GETTING TO KNOW YOUR SX5D Function Keys Operation of the SX5D is accomplished through the function keys on the keypad of the unit - see Figure 18. LCD Screen - Displays icons, information, and menu options necessary to operate the SX5D. Volume - Controls the speaker volume level for the handset and the speakerphone when the SX5D is off-hook. Redial - Dials the last number called from the SX5D. LCD Soft Keys - Provide access to the SX5D menu options and features.
LCD Screen Icons Icons displayed on the LCD screen indicate the features in use, the status of the phone, signal strength and battery status - see Figure 19. Speaker - Indicates speaker phone is activated. Message - Displays when a new text or voicemail message has been received. Call - Indicates that the handset is off-hook. Alarm - Indicates that the alarm feature has been set. Battery - Indicates the level of battery power. The more bars, the more power.
CALL FUNCTIONS Making Calls 1. Pick up the handset or press the SPEAKERPHONE key. The SX5D is now “off-hook.” 2. Listen for dial tone. 3. Dial the phone number. The dialed number will be displayed. The name will also be displayed if it is stored in the phonebook. Correct Dialing Errors • To erase one digit, press the CLEAR key once. • To erase all digits, press and hold down the CLEAR key until all digits are erased. • To insert numbers, use the arrow keys. Making Calls.
SX5D BASIC FEATURES Date and Time Settings The SX5D allows customization of the date, time, time zone, and time format (12 or 24 hour). Set the Date 1. Press the MENU key. 2. Select Clock. 3. Scroll to Set Date, then press the CHANGE key. 4. Enter the desired date. 5. Press the OK key. Enter date (D/M/Y) Change the Date Format 1. Press the MENU key. 2. Select Clock, then select Clock Settings. 3. Scroll to Date Format. The current format will display. 4. Press the CHANGE key. 5.
Adjust Alert Tones (Ringer) Alert tones can be customized for different types of calls, such as voice or text. 1. Press the MENU key. 2. Select Settings, then select Audio Settings. 3. Use the arrow keys to scroll through the alert types. 4. Select the desired alert sound. NOTE: If No Alert is selected, no alert will sound. Turn On/Off the Keypad Tones 1. Press the MENU key. 2. Select Settings, then select Audio Settings. 3. Select Keypad Tones. 4. Select On or Off. Turn On/Off the Warning Tones 1.
Keypad Buttons for Text Entry (Multitap) There are three or four letters assigned to each number on the telephone keypad. The letters on the keypad will display when pressed. For example, if the number 3 is pressed, a “D” will appear. If it is pressed twice, the “E” will appear, and if it is pressed three times, the “F” will appear. The cursor will move on to the next space after a brief pause, so the letter must be selected quickly.
Speed Dialing Speed dialing permits one-touch dialing for up to 10 telephone numbers stored in the phone book. Assign a Number to a Speed Dial Location 1. Press the NAME key. 2. Select the desired entry to add to the speed dial list. 3. Press the OPTIONS key. 4. Select Add to Speed Dial. 5. Use the arrow keys to scroll to a location, then press the SELECT key. NOTE: If a location is already in use, the phone number that is stored there can be replaced with a new one. Dial a Speed Dial Location 1.
SX5D ADDITIONAL FEATURES Call Logs The SX5D stores the telephone numbers of the last ten outgoing calls and the last ten incoming calls with the dates and times of the calls. These numbers are displayed and can be dialed directly from the call log. View the Call Log 1. Press the MENU key. 2. Select Call Log. 3. Select the desired calls to view (All, Missed, Received, Dialed). Calls are denoted by the following icons: Dialed Calls Missed Calls View Logs. Received Calls View All Calls.
Set Alarm to Repeat Daily 1. Press the MENU key. 2. Select Clock, then select Set Alarm. 3. Select Repeat Daily. Set Alarm to Repeat Daily. Turn Alarm On/Off 1. Press the MENU key. 2. Select Clock, then select Set Alarm. 3. Select Alarm Status. 4. Select On or Off. 5. Press the OK key. Turn Alarm On/Off. Language Selection The SX5D is capable of displaying menu items in several different languages. Options include English, French, Portuguese, Russian and Spanish. Select a Language 1.
5. Press the OK key. * HINT: Use the “ ” key to switch between upper case, lower case and numbers. Use the “1” key to access special characters. Call Settings Minute Minder When turned on, the Minute Minder emits a low audible tone once every minute while a call is active. 1. Press the MENU key. 2. Select Settings, then select Call Settings. 3. Select Minute Minder, then select On or Off as desired. Call Timer When turned on, the Call Timer displays during an active call.
4. Use the arrow keys to change the delay time (2-20 seconds). 5. Press the OK key. Auto Dial The SX5D is able to recognize frequently called numbers and automatically dial them without waiting for the Dial Delay. Once a number has been called twice successfully, it will Auto Dial when this option is turned on. 1. Press the MENU key. 2. Select Settings, then select Dial Settings. 3. Select Auto Dial. 4. Select On to enable Auto Dial. Auto Dial.
If a known network is not on the list, it can be added. The Country Code, Network Code, and Network Name must be provided in order to add a network to the list. Once added to the network list, the network can be accessed via the Set Preferred Network option. 1. Press the MENU key. Add New Network. 2. Select Settings, then select Network Settings. 3. Select Select Network. 4. Select Add New Network. 5. Press the SELECT key. 6. Select Add. 7.
Change SIM PIN1 SIM PIN1 must be enabled and a valid PIN must be entered before this menu item will appear. 1. Press the MENU key. 2. Select Settings, then select Security Settings. 3. Select SIM PIN1. 4. Select Change PIN. 5. Enter the old PIN, then press the OK key. 6. Enter the new PIN, then press the OK key. 7. Enter the new PIN again, then press the OK key. NOTE: The PIN must be between 4 and 8 digits. Press the CLEAR key to make changes. Change SIM PIN2 1. Press the MENU key. 2.
Bar Outgoing Calls to Specific Prefixes (Prefixes Set) 1. Press the MENU key. 2. Select Settings, then select Security Settings. 3. Select Handset Call Barring. 4. Select Bar Outgoing, then select List. Bar Outgoing Calls to Specific Prefixes, via the Handset. 5. The list of prefixes you have already set will be shown. You can now add a new prefix, edit or delete a selected prefix, or clear all prefixes by pressing OPTIONS. Add Additional Prefixes 1. Press the OPTIONS key, then select Add. 2.
Deskphone Lock Access to the SX5D menu options can be restricted by locking the phone. When the deskphone is locked, a PIN is required to make any calls or access any menu items. Incoming calls can still be received. When the SX5D is locked, press the UNLOCK key, then enter the PIN to unlock it. Lock the SX5D 1. Press the MENU key. 2. Select Settings, then select Security Settings. 3. Select Deskphone Lock, then select On. 4. Enter the PIN (default pin is 1234). Change Deskphone Lock PIN 1.
SUPPLEMENTARY SERVICES (NETWORK DEPENDENT) In-Call Options The following options are available during a call. While in a call, press the MENU key to access these options. Options display based on call status. For example, Retrieve will only display if a call is on hold or if Call Waiting indicates a second incoming call. Hold: Puts active call on hold. Retrieve: Activates a call that is on hold. Swap: Swaps between held call and active call. End Current: Ends the current call.
Call Waiting Call Waiting enables notification of incoming calls when the SX5D is off-hook (whether during a call or during dialing). To respond to Call Waiting, press the FLASH key or the hook switch. Contact your service provider to activate Call Waiting. Call Waiting. Enable/Disable Call Waiting 1. Press the MENU key, then select Settings. 2. Select Call Settings, then select Call Waiting. 3. Select On to enable. Select Off to disable.
Voicemail The VM key will blink and the envelope icon will display when there are new voicemail messages. Contact your service provider to activate voicemail and for voicemail settings. Set Voicemail Access Numbers Typically, your service provider will set the voicemail access numbers for you. If they do not, contact them for the Home Mailbox , Roam Mailbox, Voice, and Message numbers. 1. Press the MENU key. 2. Select Messages, then select Voicemail. 3. Select Voicemail Settings, then select Box Numbers.
Forward Text Messages 1. View the desired message. 2. Press the OPTIONS key, then select Forward. 3. Enter the desired number or press the NAME key to select a phonebook entry. 4. Press the OK key. Forward Text Messages. 5. To send the message, select Send Now. To save the message to send at a later time, select Send Later. Delete Text Messages 1. View the desired message. 2. Press the OPTIONS key. 3. Select Delete. Create Text Messages 1. Press the SMS key. 2. Select Create Message. 3.
Message Settings Message Center The message center number is used to retrieve your text messages. Contact your service provider for this number. 1. Press the SMS key, then select Message Settings. 2. Select Message Center, then enter the number that your service provider gave you. NOTE: If the number is already entered, press the OK key. 3. Press the OK key. Message Lifetime Message lifetime is the amount of time that an unread message will remain on the network server before being removed. 1.
Network Call Barring The SX5D supports network call barring of incoming or outgoing calls and allows barring of specific types of services, such as voice or data. Contact your service provider to activate network call barring. The following call barring options are available: • Foreign Calls: Does not allow international calls. • Only local and home country: Only allows local and home country calls. • Bar Incoming: Does not allow any incoming calls.
DATA FEATURES When connected to a personal computer (PC), the SX5D is capable of sending and receiving digital fax and data, sending and receiving email communications, and accessing the Internet. Data speeds may vary depending upon your cellular network. DB9 Data Port Connect SX5D to a Computer Use a data cable to connect the DB-9 data port on the SX5D to the appropriate data port on your PC.
GPRS (Packet Data) Connections The SX5D will allow GPRS connectivity if your network service provider has this feature available. GPRS allows packet data connections at higher speeds than conventional circuit switched (dial-up) connections. A GPRS Kit can be used when you are connecting with GPRS service. This kit contains a serial cable and a setup CD for installation on a standard personal computer. Contact your service provider or nearest dealer for more information.
NOTE: This modulation/data rate is only for the air interface connection between the carrier and the SX5D. 1. Press the MENU key. 2. Select Settings, then select Data Settings. 3. Select Air Rate, then select Data Rate. Modulation Over the Air Data Rate V.21 300 V.22 1200 V.23 1200, 75 V.22bis 2400 V.26ter 2400 V.32 9600, 4800 V.34 14,400, 9600 V.
Telephone Extension Setup* Certain models of the SX5D can support standard telephone extensions. You can connect standard telphones to the jack marked with a telephone icon. The SX5D can support up to a 5REN load. Connecting Standard Telephones to the SX5D 1. Using a RJ-11 cable (not supplied), connect a standard... Pulse Dialing The SX5D supports a pulse dialing from a standard telephone connected the extension jack, but it is recommended that you use a DTMF (tone) type telephone. 1.
SX5D FIXED WIRELESS LCR PHONE The SX5D Fixed Wireless LCR (Least Cost Routing) Phone allows calls to be placed through the wireless GSM network or the public switched telephone network (PSTN) - see Figure 21. This capability enables users to take advantage of favorable rates based on type of call (local or long distance), time of call, and receiving party (wireless subscriber or PSTN subscriber). Additional phone Wireless Network PSTN Figure 21 - Personal LCR option.
PSTN Alert Setup The SX5D can use a different alert tune to denote the difference between a landline call and a wireless call. 1. Press the MENU key. 2. Select Settings then Audio Settings. 3. Select Extension Alert. The current setting will be displayed. Make Calls via the Alternate Service 1. Pick up the handset. 2. Press the FLASH key. The alternate service will be displayed. 3. Dial the desired number.
Dual Jack Setup This feature allows the operation of a fax machine without entering a prefix before sending a fax. The fax machine must be connected to the unmarked RJ-11 jack on the SX5D. Any extension phones must be connected to the RJ-11 jack marked with a phone icon - see Figure 24. 1. Press the MENU key. 2. Select Settings, then select Fax Settings. 3. Select Analog Fax Jack. 4. Select Dual Jack. To unmarked jack RJ-11 Cable RJ-11 Cable Figure 24 - Connect the SX5D for dual jack mode.
Single Jack Setup This feature allows both the fax machine and extension phones to use the same RJ-11 jack on the SX5D (as in the case of combination fax/phones). Connect a fax machine to the phone jack on the SX5D that is marked with a telephone icon - see Figure 25. 1. Press the MENU key. 2. Select Settings, then select Fax Settings. 3. Select Analog Fax Jack. 4. Select Single Jack. This RJ-11 Jack is not usable. RJ-11 Cable OR Figure 25 - Connect the SX5D for single jack mode.
SX5D TROUBLESHOOTING Telephone Service is Not Working (Cannot make or receive calls) · Make sure the SX5D powered on properly. · Make sure any equipment that is externally connected to the SX5D is correctly connected. · Test any externally connected equipment on a known system to verify operation. · Do you have the antenna connected? If not, connect the antenna. · Is service established with a service provider? If so, is there any service provider issue.
CONFORMANCE STATEMENTS The SX5D 850/1900 MHz (Dual Band) model conforms to the requirements of the applicable EU CE Council Directives. FCC Part 15 Class B Compliance This Phonecell® SX5 model has been tested and found to comply with the limits for a Class B digital device, pursuant to Part 15 of the FCC rules. Changes or modifications not expressly approved by Telular Corporation will void your authority to operate the equipment per FCC part 15 paragraph 15.21.
Antenna Care and Replacement Do not use the Phonecell® SX5 with a damaged antenna. If a damaged antenna comes into contact with the skin, a minor burn may result. Have your antenna replaced by a qualified technician immediately. Use only a manufacturer-approved antenna. Unauthorized antennas, modifications, or attachments could damage the Phonecell® SX5. Driving Check the laws and regulations on the use of cellular products in the areas where you drive.
WARRANTY I. WHAT THIS WARRANTY COVERS AND FOR HOW LONG: TELULAR CORPORATION ('Telular") warrants to a distributor Buyer, or to a customer only if the customer is a Buyer directly from Telular, that the Products (including accessories) shall comply with the applicable Specifications and shall be free from defects in material and workmanship under normal use and service for a period of fifteen (15) months from date of shipment from Telular.
IV. WHAT THIS WARRANTY DOES NOT COVER: (a) Subsequent upgrades and enhancements to the Product. (b) Defects, non-compliance or damage resulting from use of the Product in other than its normal and customary manner or environment. (c) Defects, noncompliance or damage from misuse, lightening, accident or neglect. (d) Defects, noncompliance or damage from improper testing, operation, maintenance, installation, adjustment, or any alteration or modification of any kind.
NOTES Phonecell® SX5D GSM 40 User Manual
APPENDIX A PC SERIAL PORT SETUP FOR CIRCUIT SWITCHED DIGITAL FAX AND DATA (not for use with GPRS) Requirements · GSM account with your network service provider including a circuit switched data and fax facility. · PC, laptop, notebook with a RS232 serial port. · Windows 98 or better. · RS-232 Cable (DB9 to DB15). NOTE: When all of the above have been satisfied, you may proceed. Modem Setup 1) Power on your PC or device that is connected to the SX5D.
4) The Install New Modem window may appear asking for the type of modem to install. Select "Other" followed by clicking the NEXT button. If this window does not appear, go to Step 5. 5) The Install New Modem window will appear. Then, click on the "Don't detect my modem option" followed by clicking the NEXT button.
6) The Install New Modem will update again to select the manufacture an dthe modem model.Select “Standard Modem Types” from the Manufactures list. Select “Standard 1900 bps Modem” from the Models list then click next. 7) The Install New Modem will update to select the COM port. Select the COM port that will be connected to the SX5D then click Next. Windows will now create a modem configuration file for the Phonecell ® SX5. This may take several minutes. 8) The Install New Modem window will update again.
8) The Modems Properties window should appear. Click on the Properties button. 9) The Standard 19200 bps Modem Properties window will open in the General tab. Set as shown with the COM port you have selected. 10) Then click on the Connection tab. Set as shown below.
11) Click on the Advanced button. Set as shown. 12) Click on OK and Close to back out of each window. Your modem is now set up. NOTE: When using the SX5D for PC fax operation, make sure the modem connection uses software flow control. When using PC data, either hardware or software flow control can be used, as long as the PC application (and modem) match the SX5D's configuration. The SX5D defaults to hardware flow control. The following AT commands are used to change the SX5D's flow control.
NOTES Phonecell® SX5D GSM 46 User Manual
NOTES Phonecell® SX5D GSM 47 User Manual
NOTES Phonecell® SX5D GSM 48 User Manual
7/28/03 Part Number 56029701