
Installation and Operation Instructions

Telrad Networks Ltd. BreezeAIR Installation Guide
Page 10 of 29
2
2
.
.
3
3
.
.
2
2
M
M
o
o
u
u
n
n
t
t
i
i
n
n
g
g
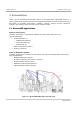
Note: A distance of at least 250cm between the equipment and all persons should
be maintained during the operation of the equipment.
Une distance d'au moins 250cm entre l'équipement et toutes les personnes
devraient être maintenues pendant le fonctionnement de l'équipement
2
2
.
.
3
3
.
.
2
2
.
.
1
1
B
B
a
a
s
s
i
i
c
c
m
m
o
o
u
u
n
n
t
t
i
i
n
n
g
g
k
k
i
i
t
t
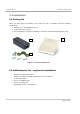
BreezeAIR basic mounting kit features:
Azimuth Adjustable Mount
Suitable for pole mounting 1-2"
Made of galvanized steel
Heavy duty
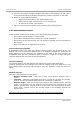
Packing list
Item Qty Description
1 1 Mounting Bracket 1.25”
2 2 Spring Lock Washer 5/16”
3 2 Plain Washer 5/16”
4 2 Hex Nut 5/16”
5 2 Hex Cap Screw 5/16-18 x 2"
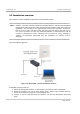
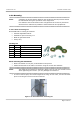
Basic mounting kit installation
• Place the bracket on the pole, as illustrated in the picture
• Attach the bracket to the radio’s enclosure using the screws and washers.
Note: The depth of the enclosure’s threads is about 1cm. Do not use excessive force
when tightening the screws. you may damage the enclosure.
• In case of narrow pole, the screws might be too long. In such case, use the Hex Nuts
prior to securing the screws into the enclosure.
Figure 2-3: BreezeAIR basic mounting kit