
User's Manual


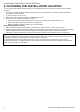
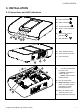
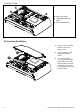
Table Of Contents
- 1. INTRODUCTION
- 2. CHOOSING THE INSTALLATION LOCATION
- 3. INSTALLATION
- 3.1 Connections and LED Indications
- 3.2 Inserting the Battery
- 3.3 PowerManage 360 Connections
- 3.4 GSM Connection and Configuration
- 3.5 SIM Card Insertion
- 3.6 PowerMaster 360 Prerequisites
- 3.7 Enrolling / Deleting a Z-Wave Device
- 1. Press and hold the (+) button (“J” in Figure 3.1) for 2 seconds. The red LED (“N” in Figure 3.1) blinks slowly.
- To delete an enrolled device, proceed as follows.
- 1. Press and hold the (-) button (“J” in Figure 3.1) for 2 seconds. The red LED (“N” in Figure 3.1) blinks quickly and a happy beep is heard and then the LED turns off.
- 3.8 Panel Reset
- 3.9 Factory Default Restore
- 4. PROGRAMMING
- 4.1 General Guidance
- 4.2 Entering the "Installer Mode" and Selecting a Menu Option
- 4.3 Setting Installer Codes
- 4.4 Zones / Devices
- 4.4.1 General Guidance & Zones/Devices Menu Options
- 4.4.2 Adding New Wireless Devices
- 4.4.3 Deleting a Device
- 4.4.4 Modifying or Reviewing a Device
- 4.4.5 Replacing a Device
- 4.4.6 Configuring Soak Test Mode
- 4.4.7 Defining Configuration Defaults for "Device Settings"
- 4.4.8 Updating Devices after Exiting Installer Mode
- 4.5 Control Panel
- 4.5.1 General Guidance – "Control Panel" Flow-Chart & Menu Options
- 4.5.2 Configuring Arming/Disarming and Exit/Entry Procedures
- 4.5.3 Configuring Zones Functionality
- 4.5.4 Configuring Alarms & Troubles
- 4.5.5 Configuring Sirens Functionality
- 4.5.6 Configuring Audible & Visual User Interface
- 4.5.7 Configuring Jamming and Supervision (Missing device)
- 4.5.8 Configuring Miscellaneous Features
- 4.6 Communication
- 4.6.1 General Guidance – "Communication" Flow-Chart & Menu Options
- 4.6.2 Configuring GSM-GPRS (IP) - SMS Cellular Connection
- 4.6.3 Configuring Events Reporting to Monitoring Stations
- 4.6.4 Configuring Events Reporting to Private Users
- 4.6.5 Configuring Motion Cameras for Visual Alarm Verification
- 4.6.6 Configuring Upload / Download Remote Programming Access Permission
- 4.6.7 Broadband2F
- 4.7 Custom Names
- 4.8 Diagnostics
- 4.9 User Settings
- 4.10 Factory Default
- 4.11 Serial Number
- 4.12 Partitioning
- 4.13 Operation Mode
- 5. PERIODIC TEST
- 6. MAINTENANCE
- 7. READING THE EVENT LOG
- APPENDIX A. PowerMaster 360 Configurator
- APPENDIX B. VISONIConfig Mobile Installer App. For PowerMaster 360
- APPENDIX C. User Mobile Application with PowerMaster 360
- APPENDIX D. Specifications
- APPENDIX E. Working with Partitions
- APPENDIX F. Detector Deployment & Transmitter Assignments
- APPENDIX G. Event Codes
- APPENDIX H. Sabbath Mode
- APPENDIX I. Glossary
- APPENDIX J. Compliance with Standards
- PowerMaster 360 Quick User Guide

3. INSTALLATION
8 D-305735 PowerMaster 360 Installer's Guide
O. Battery plug socket
P. GSM Module SIM card
holder
Q. Rechargeable battery
Figure 3.1 – Connections and LED indications
3.2 Inserting the Battery
1. Press on the tab inward
and lift to remove the
battery cover.
2. Insert the battery cable
plug into the battery
socket.
3. To close the battery
cover, align the two tabs
of the battery cover with
their respective slots and
press down on the cover
in the direction shown until
a click is heard.
O
P
Q
2
1