22” FHD LED TV LED2260FHDDVDDVBT BEDIENUNGSANLEITUNG INSTRUCTION MANUAL MODE D‘EMPLOI MANUAL DE INSTRUCCIONES ISTRUZIONE D‘USO
CONTENTS Safety Precautions ENGLISH ·Installation And Safety Warnings.............................................................................................................2 ·Warnings.................................................................................................................................................3 ·Caution.............................................................................................................................................. .
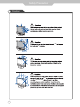
Safety Precaution Installation and Safety Warnings 1) Position the unit on a flat surface avoiding anywhere which may be subject to vibration. 2) It is advisable to un-plug both the power and aerial during a storm to avoid damage. Electrical surges causing damage to the TV are not covered under the manufacturer’s warranty. 3) Avoid rapid changes in environmental or temperature conditions. Allow the TV to reach room temperature and avoid locating near heat sources, i.e radiators/fires.
Safety Precaution Warnings ENGLISH the 3
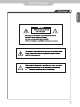
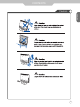
Safety Precaution Caution do to put products that 4
CONTENTS Caution ENGLISH 5
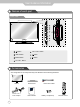
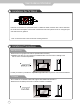
User Guidance Information Names of each part VOL. VOL. CH. CH. MENU INPUT Front View 4 VOL.+/VOL.- Button Button 5 INPUT Button 6 Button MENU Button 7 Button CH.+/CH.- Button Accessories * The configuration of the components may look different from the following illustration.
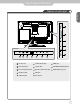
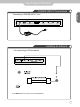
User Guidance Information Names of each part 13 12 11 10 9 USB ANT IN HDMI COMMON INTERFACE EARPHONE OUT ENGLISH PC/VGA AUDIO IN SCART IN 1 2 3 4 VIDEO IN L AUDIO IN R Y/Pb/Pr IN 6 7 5 8 PC/VGA IN DIGITAL AUDIO OUT PC IN DC IN DC IN (12V) 6 AUDIO (R/L)IN jack 11 HDMI jack PC/VGA IN jack 67 Y/Pb/Pr jack 12 COMMON INTERFACE jack PC/VGA AUDIO IN jack 8 DIGITAL AUDIO OUT jack 13 EARPHONE OUT jack 4 SCART IN jack 9 USB jack 5 VIDEO IN jack 10 ANT IN jack 7
User Guidance Information Installation the TV Stand Place the TV face down on a protective surface. To attach the stand, insert the neck of the TV stand into the socket of the stand plate. Turn the base of the stand to lock it into position on the TV. Using the open and close arrows for guidance. Note: It’s normal to hear a click sound when screwing the stand. Installation Precautions Wall Mounting ·Please secure enough space for safe use. (Please refer to A and B.
User Guidance Information POWER INPUT Connections ENGLISH ·Connecting to POWER INPUT +12V PC IN DC IN PC/VGA IN PC/VGA AUDIO IN SCART IN VIDEO IN L AUDIO IN R Y/Pb/Pr IN Installing an Antenna ·For connecting to PAL broadcast DIGITAL AUDIO OUT USB ANT IN HDMI COMMON INTERFACE EARPHONE OUT Press INPUT button to select TV, then press OK button.
User Guidance Information Remote Control ·Functions of remote control buttons The remote control is using Infra-Red(IR). Point it towards the front of the LED TV. The remote control may not work correctly if it is operated out of range or out of angle. 1 2 1 2 3 7 9 8 standby mode or enter standby mode. - Press this button to mute or restore sound. 3 [0-9, -/--] - Select and switch to a channel using 0-9. 4 JUMP - Switch back and forth between the current and previous 5 S.
User Guidance Information Precautions ENGLISH Avoiding Remote Control Problems 1. Check the polarity (+,-) of the batteries in the remote control. 2. Check that the batteries have power. 3. Check that the LED TV is powered and that it is properly plugged in. 4. Check if any three-wavelength lamp, special fluorescent or neon sign is turned on near the LED TV. Inserting Batteries in the Remote Control 1. Open the cover completely. 2. Insert the two supplied batteries (AAA, 1.5V).
Connection VCR Connections · Connecting to the Composite terminal Connection terminals of other equipments differ by manufacturer and model. Composite Cable VCR PC IN DC IN PC/VGA IN PC/VGA AUDIO IN SCART IN VIDEO IN L AUDIO IN R Y/Pb/Pr IN ·Connect the LED TV’s Composite In terminal to the VCR’s Composite Out terminal using the Composite cable.
Connection Satellite/ TV Set-Top Box Connections ENGLISH · Connecting to the Composite terminal * In order to watch Cable TV, subscribe to your local Cable TV company and install a separate receiver(Set-Top-Box) Connection terminals of other equipments differ by manufacturer and model.
Connection DVD Connections · Connecting to the component terminal Connection terminals of other equipments differ by manufacturer and model. Component Audio Cable PC IN DC IN PC/VGA IN PC/VGA AUDIO IN SCART IN VIDEO IN L AUDIO IN R Y/Pb/Pr IN Mini Y Pb Pr Cable Component Connection Cable 1. Connect LED TV’s Y, Pb, Pr Terminal to DVD’s Video Out terminal using the external cable. 2. Connect LED TV’s Audio terminals (left & right) in AV to DVD’s Audio Out terminal using the Audio cable. 3.
Connection PC Connections ENGLISH Connection terminals of other equipments differ by manufacturer and model. PC IN DC IN PC/VGA IN PC/VGA AUDIO IN SCART IN VIDEO IN L AUDIO IN R Y/Pb/Pr IN VGA Cable VGA Audio Cable · Connect LED TV’s PC Input terminal to PC’s VGA terminal using the VGA cable. · Connect LED TV’s PC Audio terminal to PC’s Audio terminal using the Audio cable.
Connection USB Connections ·Connecting to the USB DIGITAL AUDIO OUT USB ANT IN HDMI COMMON INTERFACE EARPHONE OUT Digital Amplifier Connections · Connecting to the Digital Amplifier Connection terminals of other equipments differ by manufacturer and model. COAXIAL Cable DIGITAL AUDIO OUT USB ANT IN HDMI COMMON INTERFACE NOTE: Only in DVD modes can output.
Basic Use Selecting Input Source 1. Press INPUT button on the remote control. 2. Use▼ / ▲ buttons to move to the desired input source. 3. Press OK button to select. Input Source ATV DTV AV Component HDMI SCART DVD PC Media OK 17 ENGLISH ·You can select between the TV signal and the input signal of other equipments connected to the TV. ·Use this function to switch to the input source you wish to view.
Basic Use Basic Operation Select DTV or ATV for example. (Press INPUT button to select DTV or ATV mode) 1. Press the button to turn the LED TV on. 2. Press MENU button to display the main menu, and press the ◄► button to select CHANNEL in the main menu, it will highlight the first option. Auto Tuning ATV Manual Tuning DTV Manual Tuning Programme Edit Signal Information CI Information CHANNEL Move MENU Return OK Select EXIT Exit 3.
Application Operating the MENU PICTURE MENU: Allow you to set up a variety of picture options. PICTURE Move MENU Return 50 50 Move 50 Return OK Middle EXIT Exit -- -- -- -GMT Off Off 30 S Select Move SCREEN MENU: Allow you to set up a variety of screen options.
Application Customizing the CHANNEL Settings Select DTV or ATV for example. (Press INPUT button to select DTV or ATV mode) 1. Press the button to turn the LED TV on. 2. Press the MENU button on the remote control to display the Main menu, and use the ◄ / ► buttons to select the CHANNEL. 3. Use ▼ / ▲ buttons to highlight an individual CHANNEL option, use ◄ / ► buttons to change the setting, and press the MENU button to exit.
Application Customizing the CHANNEL Settings ENGLISH Programme Edit Programme Edit 1 BBC ONE DTV 2 BBC TWO DTV 3 BBC THREE DTV 30 CBBC Channel DTV 40 BBC NEWS 24 DTV 51 BBCi DTV Delete OK Skip FAV Fav Menu Input source for the DTV Rename OK FAV Skip Move Fav Menu Programma bewerken 1 BBC ONE DTV 2 BBC TWO DTV 1 C-21 ATV 3 BBC THREE DELETE (red button) DTV 30 CBBC Channel DTVthe remote control with the selected channel, Press the red button on 40 press BBC NEWS 24
Application Customizing the PICTURE Settings Select DTV or ATV for example. (Press INPUT button to select DTV or ATV mode) 1. Press the button to turn the LED TV on. 2. Press the MENU button on the remote control to display the Main menu, and use the ◄ / ► buttons to select the PICTURE. 3. Use ▼ / ▲ buttons to highlight an individual PICTURE option, use ◄ / ► buttons to change the setting, and press the MENU button to exit.
Application Customizing the SOUND Settings Sound Mode Treble Bass Balance Auto Volume SPDIF Mode SOUND Move MENU Return OK Select ENGLISH Select DTV or ATV for example. (Press INPUT button to select TV mode) 1. Press the button to turn the LED TV on. 2. Press the MENU button on the remote control to display the Main menu, and use ◄ / ► buttons to select the SOUND 3. Use ▼ / ▲ buttons to highlight an individual SOUND option, use ◄ / ► buttons to change the setting, and press the MENU button to exit.
Application Customizing the TIME Settings Select DTV or ATV for example. (Press INPUT button to select DTV or ATV mode) 1. Press the button to turn the LED TV on. 2. Press the MENU button on the remote control to display the Main menu, and use ◄ / ► buttons to select the TIME. 3. Use ▼ / ▲ buttons to highlight an individual TIME option, use ◄ / ► buttons to change the setting, and press the MENU button to exit.
Application Customizing the SETUP Settings ENGLISH Select DTV or ATV for example. (Press INPUT button to select DTV or ATV mode) 1. Press the button to turn the LED TV on. 2. Press the MENU button on the remote control to display the Main menu, and use ◄ / ► buttons to select the SETUP. 3. Use ▼ / ▲ buttons to highlight an individual SETUP option, use ◄ / ► buttons to change the setting, and press the MENU button to exit.
Application Customizing the SCREEN Settings Press INPUT button to select VGA mode 1. Press the button to turn the LED TV on. 2. Press the MENU button on the remote control to display the Main menu, and use ◄ / ► buttons to select the SCREEN. 3. Use ▼ / ▲ buttons to highlight an individual SCREEN option, use ◄ / ► buttons to change the setting, and press the MENU button to exit.
Application Customizing the MEDIA Settings ENGLISH Press INPUT button to select Media mode) 1. Press the button to turn the LED TV on. 2. Press the INPUT button on the remote control to display the Source menu, and use the ▼ / ▲ buttons to select the Media. 3. Use ◄ / ► buttons to highlight an individual Media option. The Media Menu will appear on the screen. Press ◄ / ► button to select the option( Photo, Music, Movie, Text) that you want to active in the Media menu, then press OK button. USB 2.
Application DVD Functions Information Functions Information display An On Screen Display (OSD) indicator will be displayed at the upper part TV screen when certain functions are executed, or when pressing the OSD button on the remote control. The OSD indicator is a user friendly interface designed to display the status of playback type. When a different disc is loaded (DVD, CD, Music ready); the OSD indicator bar will be different. Support formats DVD support DVD / CD-DA / JPEG formats.
Application Customizing Language Setup Settings ENGLISH Press DVD SETUP button to enter setup menu 1.Use the ▼ / ▲ buttons to select Language Setup option. 2.Use the ▼ / ▲ ◄ / ► buttons to highlight an individual Language Setup option. Language Setup OSD Menu Audio Subtitle Dutch English French German Italian The Language Setup Menu includes the following options : : OSD . Menu The default language of the On Screen Display is Dutch.
Application Customizing Screen Setup Settings Press DVD SETUP button to enter setup menu 1.Use the ▼ / ▲ buttons to select Screen Setup option. 2.Use the ▼ / ▲ ◄ / ► buttons to highlight an individual Screen Setup option.
Application Customizing Audio Setup Settings ENGLISH Press DVD SETUP button to enter setup menu 1.Use the ▼ / ▲ buttons to select Audio Setup option. 2.Use the ▼ / ▲ ◄ / ► buttons to highlight an individual Audio Setup option. Audio Setup Digitalal uit Downmix SPDIF/PCM SPDIF/RAW Off The Language Setup Menu includes the following options : : Digital out Select from options: SPDIF/PCM, SPDIF/RAW or OFF. Down mix Select from options: Lo/Ro or Lt/Rt.
Application Customizing Cutom Setup Settings Press DVD SETUP button to enter setup menu 1.Use the ▼ / ▲ buttons to select Custom Setup option. 2.Use the ▼ / ▲ ◄ / ► buttons to highlight an individual Custom Setup option. Custom Setup Style Angle Mark Default Style Style Style Style 1 2 3 4 The Screen Setup Menu includes the following options : : Style Change the background colour and style from the four options available. Angle Mark Angle Mark can be set to ON or OFF.
Maintenance and Service Trouble shooting Problem The screen does not appear. ENGLISH ·Do not use other functions that are not mentioned in this user’s manual.In case a problem occurs with ·your LED TV, please take the following steps first.If you still have the problem, turn the power off and ·contact your dealer or an authorized service center. Action Is the power plug pulled out? Insert the power plug. Press the button of the remote control.
Maintenance and Service Specifications Panel Panel Size 22” TFT LED Brightness 250 cd/m2 Contrast Ratio 1000:1 Viewing Angle 170º/160º Max. Resolution Input Connector Output Connector 1920 x 1080 VIDEO/AUDIO (L/R) 1 SCART 1 YPbPr(Component) 1 PC VGA/PC VGA AUDIO IN 1 HDMI 1 ANT IN 1 USB 1 CI (Common Interface) 1 EARPHONE 1 DIGITAL AUDIO OUT 1 Power Source AC 230V~ (DC 12V, 4A) Power Consumption 31 W Dimension 531.6 (L) x 161.6 (W) x 379 (H) mm Weight 5.
Maintenance and Service Energy Label ENGLISH 35
NOTICE ABOUT RECYCLING NOTICE ABOUT ROHS This symbol means that in electrical and electronic eauipment ,restriction the use of certain harmful substances.