R LCD TV BEDIENUNGSANLEITUNG INSTRUCTION MANUAL MODE D‘EMPLOI D50F275N3C
TELEFUNKEN® Markenlizenz: TELEFUNKEN Licenses GmbH Vertrieb: Vestel Germany GmbH, D-85748 Garching bei München TELEFUNKEN® licensed by: TELEFUNKEN Licenses GmbH Imported by: Vestel Germany GmbH, D-85748 Garching/Munich 1 1 1 Die Marke TELEFUNKEN ist eine eingetragene Marke der TELEFUNKEN Licenses GmbH.
Contents Safety Information......................................... 26 Getting Started...................................................... 27 Notifications & Features & Accessories................. 27 Remote Control .................................................... 30 Connections.......................................................... 31 First Time Installation - USB Connections............. 32 TV Menu Features and Functions......................... 35 General TV Operation...........................
Getting Started Notifications & Features & Accessories • Automatic programming system. Environmental Information This television is designed to consume less energy to help save the environment. To reduce energy consumption, you should take the following steps: You can use the Power Save Mode setting, located in the Picture menu. If you set the Power Save Mode as Eco, the TV will switch to energy-saving mode and the luminance level of TV set will be decreased to the optimum level.
To change volume: Increase the volume by pushing the button up. Decrease the volume by pushing the button down. To change channel: Press the middle of the button, the channel information banner will appear on screen. Scroll through the stored channels by pushing the button up or down Antenna/Cable/Satellite Connection Connect the aerial or cable TV plug to AERIAL INPUT (ANT-TV) or satellite lead to LNB INPUT(ANT SAT) socket located on the rear bottom side of the TV.
Specification TV Broadcasting PAL SECAM BG/I/DK/LL’ Receiving Channels VHF (BAND I/III) - UHF (BAND U) - HYPERBAND Digital Reception Fully integrated digital terrestrial-cable-satellite TV(DVB-T-C-S) (DVB-S2 compliant) Number of Preset Channels 10.000 Channel Indicator On Screen Display RF Aerial Input 75 Ohm (unbalanced) Operating Voltage 220-240V AC, 50Hz. Audio German+Nicam Stereo Audio Output Power (WRMS.
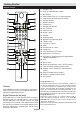
Getting Started Remote Control 1. 2. 3. 4. 5. 6. 7. 8. 9. 10. 11. 12. 13. 14. 15. 16. 17. 18. 19. 20. 21. 22. 23. SOURCE LANG. 1 .,/@ 2 3 4 5 6 7 8 9 0 OK BACK EXIT 1 V+ V- / Q.MENU 2 / P+ 24. 25. 26. 27. 28. P- 29. 30. 31. Teletext Press TXT button to enter. Press again to activate mix mode. Press once more to exit. Follow the instructions displayed on digital teletext screen. Digital Teletext (for UK only) Press TXT button to view digital teletext information.
Getting Started Connections Connector Type Cables Device Scart Connection (back) VGA Connection (back) SIDE AV PC/YPbPr Audio Connection (side) Side Audio/Video Connection Cable (Supplied) PC Audio Cable (Not supplied) HDMI Connection (back) Coaxial Out Connection Coaxial Out SIDE AV (back) Side AV (Audio/Video) Connection (side) HEADPHONE AV Connection Cable (supplied) If you want to connect a device to the TV, make sure that both the TV and the device are turned off before making any connectio
Getting Started First Time Installation - USB Connections To Switch the TV On (*) LCN is the Logical Channel Number system that organizes available broadcasts in accordance with a recognizable channel sequence (if available). Connect the power cord to the 220-240V AC, 50 Hz. Press MENU button to quit channel list and watch TV. To switch on the TV from standby mode either: Cable Installation Switching On/Off Press the “ ” button, CH on the remote control.
Using SatcoDX Feature SatcoDX (optional): You can perform SatcoDX operations using the Satelite Settings menu. In the SatcoDX menu, there are two options regarding to the SatcoDx. You can download or upload SatcoDX data. In order to perform these functions a USB device must be connected to the TV. You can upload current services and related satellites & transponders in TV, to a USB device. Additionally you can download one of the SatcoDx files stored in USB device, to the TV.
E-Manual (optional) You can find instructions for your TV’s features in the E-Manual. To use E-Manual, press to the Info button while main menu is displayed on the screen. By using the navigation buttons select a desired category. Every category includes a different topics. Select a topic and press OK to read instructions. To close the E-Manual screen press the Exit button. Note: The contents of the E-Manual may vary according to the model.
TV Menu Features and Functions Picture Menu Contents Mode You can change the picture mode to suit your preference or requirements. Picture mode can be set to one of these options: Cinema, Game, Sports, Dynamic and Natural. Contrast Sets the lightness and darkness values of the screen. Brightness Sets the brightness value for the screen. Sharpness Sets the sharpness value for the objects displayed on the screen. Colour Sets the colour value, adjusting the colors.
Sound Menu Contents Volume Adjusts the volume level. Equalizer Selects the equalizer mode. Custom settings can be made only when in user mode. Balance This setting is used for emphasizing left or right speaker balance. Headphone Sets headphone volume. Sound Mode You can select a sound mode. (If the selected channel supports). AVL (Automatic Volume Limiting) Function sets the sound to obtain fixed output level between programmes.
Other Settings: Displays other setting options of the TV set: Menu Timeout Changes timeout duration for menu screens. Scan Encrypted Channels When this setting is on, the search process will locate the encrypted channels as well. HBB TV This feature is activated/deactivated by selecting ON/OFF. Blue Background Activates or deactivates the blue background system when the signal is weak or absent. Software Upgrade To ensure that your TV always has the most up to date firmware.
General TV Operation Using the Channel List The TV sorts all stored stations in the Channel List. You can edit this channel list, set favourites or set active stations to be listed by using the Channel List options. Configuring Parental Settings To prohibit viewing of certain programmes, channels and menus can be locked by using the parental control system. To display parental lock menu options, the PIN number should be entered. After coding the correct PIN number, parental settings menu will be displayed.
• The location where the transmission is most effective differs depending on the usage environment. • You can plug your wifi dongle into the supplied USB extension cable In cases where network quality is poor and the wifi dongle needs to be placed to a location with better signal quality. • Wireless feature of the TV supports 802.11 a,b,g & n type modems. It is highly recommended that you should use IEEE 802.11n communication protocol in order to avoid any possible problems while watching videos.
You can navigate between menu tabs by pressing left/ right buttons. The help bar on the bottom of the dialog shows features that you may use. Press BLUE button to check your internet connection speed. speed, signal quality and other settings. You need to have a high speed connection for your modem. You can check the signal strenght by using the network settings menu for the wireless device mode.
again. Refer to Media Browser USB Playback section for further information on file playback. confirm your selection. Press the BACK button to go to the previous screen. Subtitle files do not work if you watch video from network through DLNA. Press the EXIT button to quit the Internet portal mode. You can connect only one television with DLNA to same network. If a problem occurs with DLNA network, please switch on/off your television. Trick mode and jump are not supported with DLNA function.
is Enabled, the TV wakes up at 03:00 and searches broadcast channels for new software upgrades. If new software is found and downloaded successfully, the next time the TV powers up, it will have the new software version. Note: If the TV fails to come on after the upgrade unplug the TV for 2 minutes and plug in again. Troubleshooting & Tips Tv will not turn on Make sure the power cord is plugged in securely to wall outlet. The batteries in the remote control may be exhausted.
Nero MediaHome Installation To install Nero MediaHome, please proceed as follows: Note: To use DLNA function, this software should be installed to your PC. 1. Enter the link below completely in the adressbar of your web browser. http://www.nero.com/mediahome-tv 2. Click the Download button on the opening page. The installation file will be downloaded onto your PC. 3. After the download is completed, double click on the installation file to start the installation.
Internet Browser To use the internet browser, please select the internet browser logo from the portal section. Refresh Home Page Address Bar Add History Bookmarks Zoom Previous Next Settings Remote control shortcuts (Zoom in-out/Back/Home) Quick Access • To navigate the web browser, use the arrow buttons on the remote control. Press OK to continue. pages and these will take you to the appropriate pages.
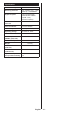
PC Input Typical Display Modes The following table is an illustration of some of the typical video display modes. Your TV may not support all resolutions.
Supported File Formats for USB Mode Media Extension Format Notes Video .dat, .mpg, .mpeg Mpeg1-2 1080P@30fps, 50Mbit/sec .ts, .trp, .tp, .m2ts MPEG2 , H.264, VC1, AVS, MVC H.264:1080Px2@25fps, 1080P@50fps MVC:1080P@ 24fps Other: 1080P@30fps 50Mbit/sec .vob MPEG2 1080P@30fps 50Mbit/sec .mkv MPEG1-2-4, H.264 H.264:1080Px2@25fps, 1080P@ 50fps, 1080P@30fps, 50Mbit/sec .mp4 MPEG4, XviD, H.264 H.264:1080Px2@25fps, 1080P@ 50fps, 1080P@30fps, 50Mbit/sec .avi MPEG2-4, Xvid, H.264 H.
Supported DVI Resolutions When connecting devices to your TV’s connectors by using DVI converter cable(DVI to HDMI cable - not supplied), you can refer to the following resolution information.