
Manual


4 Operation Model 1220
4-12
Teledyne Analytical Instruments
4.5.2.2 Setting the Latching or Non-Latching Mode
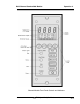
1. At the Front Panel of the Channel Module to be configured:
a. Press SELECT twice to enter the “Alarm Configuration”
Mode. (“H” {High} will be flashing.)
b. Use the up or down arrow key to highlight the appropriate alarm
to be defined (“H” = High Alarm or “C” = Caution Alarm).
c. Use the left or right arrow key to highlight the “LCH” option.
d. Press ENTER.
e. Use the up or down arrow key to switch to the desired configu-
ration for the alarm (“LCH” = Latching and “NLCH” = Non-
Latching.)
f. Press ENTER.
2. If necessary, proceed to the previous or next procedure. Otherwise,
press RUN to place the instrument in the analysis mode.
4.6 Setting the ID Code
1. At the Front Panel of the Channel Module to be configured:
a. Press SELECT three times to enter the “ID Code” Mode. (The
current ID code will be displayed.)
b. Press ENTER.
c. Use the left and right arrow key to select the digit to be modi-
fied and the up and down arrow keys to modify the selected
digit.
d. Repeat Step “c” to modify the remaining digits.
e. Press ENTER to save the ID Code.
2. If necessary, proceed to the previous or next procedure. Otherwise,
press RUN to place the instrument in the analysis mode.
4.7 Enabling/Disabling the Pass Code
1. At the Front Panel of the Channel Module to be configured:
a. Press SELECT four times to enter the “Pass Code” Mode.
(The current pass code state {“Poff” = Passcode off or “P on”
= Passcode on} will be displayed.)
b. Press ENTER.
c. Use the up or down arrow key to modify the state of the code.
d. Press ENTER to accept the change.