
User manual


Analysis Tools
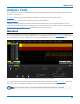
Pass/Fail Testing
Pass/Fail testing is a type of mask testing that is particularly useful for comparing newly acquired signals
to a previously acquired "golden standard" waveform.
Note: Pass/Fail testing does not work with Sequence Mode acquisitions.
A mask defines an area of the grid against which a source Channel, Zoom, or Math trace is compared.
Test conditions are associated with the mask, defining how the waveform is to be compared to the
masked area (e.g., some/all values fall within, some/all values fall outside), and a pass or fail result is
returned indicating the condition was found to be true or false.
Mask testing can be done using a pre-defined mask or a mask created from a waveform with user-defined
vertical and horizontal tolerances.
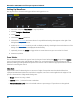
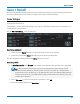
Access Mask Test Dialogs
Choose Analysis > Pass/Fail Setup to display the Pass/Fail dialog. To the right are the Load Mask and
Make Mask subdialogs where you make and manage masks.
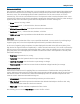
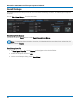
Make Mask
Use this procedure to create a new mask based on a live waveform. The mask covers the area of the
waveform plus the boundaries you enter.
1. Open the Make Mask subdialog.
2. If desired, enter a new DestinationFile Name and path, or touch Browse and select a previous file to
overwrite. The file name should end with the .msk extension.
3. Touch the Ver Delta and Hor Delta fields and enter boundary values using the pop-up Virtual Keypad
or the front panel Adjust knob.
4. Touch Make from Trace.
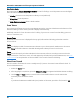
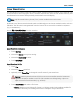
Load Mask
Use this procedure in lieu of Make Mask if you have a pre-defined mask file.
1. Open the Load Mask subdialog.
2. To use a saved .msk file, touch File and select the mask.
89