Welcome MegaCam is a high-quality yet affordable digital camera that allows you to create, edit, share and send photos to friends and family. MegaCam is also not just a digital camera. It lets you record short segments of video. What’s more, it can be used as a Web camera when you connect it to a computer. This easy-to-follow manual shows you how to use your new camera and install all the software that is included in the Digital Camera CD.
Contents Know Your Camera ................................................................................................................ 3 Camera Controls .................................................................................................................... 3 Digital Interface Compartment ................................................................................................. 6 Preparing Your Camera ....................................................................................
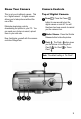
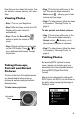
Know Your Camera Camera Controls This is not your traditional camera. This is a “digital camera”. A digital camera allows you to take pictures without the use of film. Top of Digital Camera Eliminate developing costs by downloading the photos to your PC. You can send your photos via email, upload them to your web site. Now, familiarize yourself with the camera controls of MegaCam. Power - Press the Power button for one second to turn the digital camera on and off.
Self-Timer - Use the Self-Timer button when you need to shoot photos of yourself. After you press the Shutter Release button, a 10-second countdown, giving you time to position yourself in front of the camera before your photo is taken. Digital Zoom - MegaCam provides four times magnification beyond the optical zoom. Press the Record mode button to activate Preview and use the LCD display to frame your subject. And press zoom button once to magnify your object.
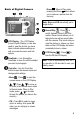
Back of Digital Camera • Erase - When in Play mode, pressing the Erase button allows you to remove a picture from the memory. Note: Erase and OK are actually just a single button. LCD Display - The LCD Display (Liquid Crystal Display) is one way used to view the photos you have taken; indicate camera settings as well as access the menu and info options. Viewfinder - Look through the Viewfinder to view the real life subject you want to photograph.
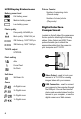
LCD Display Status icons Battery power level Full battery power Medium battery power Picture Counter Number of remaining shots (Record mode) Number of stored photos (Play mode) Low battery power Photo quality Fine quality, 640x480 pix Best quality, 1280x1024 pix 2M Scale up, 1600*1200 pix 3M Scale up, 1920*1440 pix TV/VCR output Digital Interface Compartment Located on the left side of the camera are the two ports for attaching the following cables: Video Output and USB.
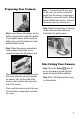
Preparing Your Camera • Step 1 Insert the two AA batteries into the battery compartment located at the bottom of your digital camera. When closing the battery door, push the battery door down and then slide it closed. Note: 1. To remove the SD card, push the SD card once and the card will be ejected from the memory compartment. 2. MegaCam comes with built-in 8Mbyte internal NAND Flash memory. You don’t necessarily add extra memory for it.
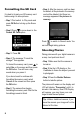
Formatting the SD Card It is best to format your SD memory card before using it to store pictures. • Step 1 First switch to Play mode and press OK Button to bring up the Erase menu. • Step 6 After the memory card has been formatted, all the pictures in the memory card will be deleted. And there is a message appeared: No pictures in memory. to move down to the • Step 2 Press Format SD Card option. Press to switch to Record mode. You can now begin taking pictures. Shooting Photos • Step 3 Press OK.
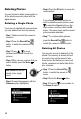
Now that you have taken the photos, they are stored in camera memory, let’s view them. Viewing Photos • Step 1 Turn on your MegaCam. • Step 2 After two beep sounds, the LCD Display will be also turned on automatically. • Step 3 Press the Record/Play button to switch the camera to Play mode. • Step 4 View the pictures one at a time on the LCD Display. Press to move backward and forward through the pictures. • Step 1 Turn the lens all the way to the left.
Deleting Photos You can choose to delete a single photo or all the photos previously taken with the digital camera. Deleting a Single Photo If you are not satisfied with some pictures, you may delete them from the memory. • Step 1 Make sure that the camera is turned on. • Step 2 Press the Record/Play button to switch the camera to Play mode. to move • Step 3 Press backward and forward through the pictures. • Step 4 When you see a picture that you want to delete, press the Erase button.
• Step 4 Press the OK button. Changing Camera Settings • Step 5 When you see the message, to select “Delete All Images?”, press Yes on the screen and then press the OK button to erase all of your pictures. Access the Camera Setup menu in your digital camera to change camera settings. If you change your mind and do not want to continue deleting all the pictures, or to select Cancel on the press menu screen. Then press the OK button. All your pictures will be retained.
• WB (White Balance) - Allows the camera to adjust to light conditions using preset selections (auto, sun, shade, tungsten, fluorescent). • TV Mode - Choose the TV standard that you use in your country for the video you record. • Language - Let you to choose different languages for Camera menu. • Step 5 Press OK to select a menu option. The selected option will be highlighted. to cycle through • Step 6 Press the available settings. • Step 7 Press OK to choose a setting.
Press Move to Exit to exit the menu. • Step 5 Connect one end of the video output cable (the black colored plug) into the video out port located in the Digital Interface Compartment on the left side of the camera. • Step 6 Connect the other end of the video output cable (the yellow plug) to the video in plug on your TV/VCR. Note: TV/VCR manufactures vary. Locate the audio/video ports on your individual TV/VCR and insert the video output connector into the Video port. • Step 7 Turn on your TV and VCR.
• Step 3 And while you are recording, A red text “REC” appears on the upper right side of the LCD Display. And disappears after you terminate the recording process. And the remaining seconds will be counted down as you continue shooting. • Step 4 To stop recording, press the Shutter Release button again. Using the Digital Camera as a Web Camera When you connect MegaCam to your computer, you can use it as a Web camera. You can then join video conferencing sessions on the Internet with your camera.
Installing All Software and Driver Installing Selected Software To install the digital camera driver and all the software in the MegaCam CD: To choose the software to install: • Step 1 Place the MegaCam CD into your CD-ROM drive. • Step 2 The Software Installation screen appears, with the Install All the Software and Driver option selected. • Step 1 Place the MegaCam CD into your CD-ROM drive. The Software Installation screen appears. • Step 2 Deselect the Install All Software and Driver item.
Simply follow the on-screen instructions to complete the installation. Note: At the end of each software installation, “Setup Complete” appears and prompts you to restart your computer. If you have not yet finished installing the other software, click Cancel. Click Yes and restart your computer only when you have finished installing the last software. Installing MegaCam Driver The MegaCam Driver option in the installation screen installs two drivers into your computer: the MegaCam Driver and MSDC Driver.
Appendix: Camera Specifications Image Sensor Optical Viewfinder LCD Display Image size (HxV) Color Memory Exposure Control Lens Focus Length Flash Mode Self-timer White Balance Compression method USB Connection PC Camera 1.3M CMOS Image sensor Built-in 1.5" color TFT LCD, Field of View 80% LED Backlight Resolution: 288 x 220 LCD Frame Rate: Min. 30 frame per sec.