Digital Camera K3 USER MANUAL
Table of contents Thank you for choosing our product. Please read the manual carefully to make best use of all functions of the product and to guarantee a long service life. Please store the manual in a safe place for later reference. Table of contents ................................................................ 1 1 Contents of package ....................................................... 3 2 Introduction...................................................................... 4 2.1 2.
6.1 6.2 6.2.1 6.2.2 Supported operating systems ................................................................................29 Installing the driver.................................................................................................29 Installing the driver in MASS mode..............................................................................29 Installing the driver in TWAIN mode ............................................................................
1 Contents of package Please ensure that the following items are included in the box: 1x digital camera 1x user manual 2x AAA batteries 1x USB cable 1x audio cable 1x CD-ROM (driver and application software) 1x carrying case 1x wrist strap 3
2 Introduction This product is a digital imaging device with an integrated digital camera, digital video recorder, digital audio recorder and PC camera. It allows you to take digital photographs and videos, make voice recordings or use it as a webcam. 2.1 Product properties • High resolution photographs, various resolutions can be selected, interpolated output. • Images can be saved internally or externally. • High-sensitivity wide-angle flash, three flash modes can be selected.
3 Getting started 3.1 Parts of your camera Familiarise yourself with the parts of your camera before use. That makes it easier to operate the camera.
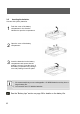
3.2 Inserting the batteries Use two AAA (micro) batteries. 1 Push the cover of the battery compartment in the direction indicated to open the compartment. 2 Open the cover of the battery compartment. 3 Insert the batteries into the battery compartment and ensure that the polarity is correct. Close the cover of the battery compartment by closing it over and pushing it back into place. 1. We recommend that you use rechargeable 1.2V NiMH batteries as they have a longer battery life. 2.
3.3 Inserting and removing the SD/MMC card You can use SD or MMC cards to increase the memory capacity. Switch off the camera before inserting the card. Insert the card as follows (photographs, sound and video recordings are no longer stored in the internal memory, but stored on the card). Inserting the card 1 Open the cover of the card slot. 2 Insert the card in the card slot until it locks into place. 3 Close the cover of the card slot. Removing the card Open the cover of the card slot.
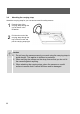
3.4 Attaching the carrying strap Attach the carrying strap for your convenience and for safety reasons. 1 Pass the loop of the carrying strap through the eye as shown in the illustration. 2 Pull the other end of the carrying strap through the loop of the thin cord and pull the carrying strap tight. Caution 1. Do not hang the camera around your neck using the carrying strap to avoid danger. This applies to children in particular. 2.
4 4.1 Basic operation Switching the camera on and off Switching the camera on On/off button Press the On/Off button for 12 seconds to switch the camera on. If the camera is not switched on, check the polarity of the batteries and ensure that they are charged. Switching the camera off Press and hold the main switch for several seconds to switch the cameral off. The LCD goes blank. If the camera is idle for more than three minutes, it is switched off automatically to save battery power.
4.2 Using the mode buttons The camera features five operating modes. When the camera is switched on,If USB is disconnected, it is automatically in still photograph mode. Press the following mode buttons to select the required mode. Selects the photography mode,Video mode,Recording mode and setting mode Mode buttons Play mode When the camera is in photography mode, press the When the camera is in video mode, press the When the camera is in recording mode, press the button to access the video mode.
4.3 4.3.1 Taking photographs LCD descriptions display Status symbols in the photography mode Number of photographs taken, number of photographs available 0.5M 0.5 megapixel image mode Battery status 2.0M 2.0 megapixel image mode Single shot mode 3.0M 3.0 megapixel image mode Burst mode 4.0M 4.0 megapixel image mode Self-timer mode 5.0M 5.
4.3.2 Snapshot Press the On/Off button to switch the camera on. 1 Select single shot mode Photo/Video/sound recording/configuration mode button When the camera is switched on, it is automatically in still photograph mode. If this is mode not the case, press the button to select the photography mode. Photography mode is active when the symbol appears in the upper corner of the LCD display.
• Resolution • Photo Quality • Photo Effect Page 2: • WB • EV You can choose between three different image modes in the “Capture Mode” menu function: Single When the shutter release is pressed, a single photograph is taken. Sequence When the shutter release is pressed, a series of three photographs is taken. SelfTimer The photograph is taken 10 seconds after the release is pressed. The photography mode is preset to single-shot.
2 The information shown here is displayed when recording was started using the shutter release. Press the shutter release again to stop sound recording. The sound is recorded as a WAV file. The length available depends on the size of the memory. The LCD display can be switched off using the sleep button (LCD on/off) to save power.
4.5 Making video clips 4.5.1 LCD descriptions The elapsed time is shown at the top right. The remaining time is shown at the bottom left. The display is not changed during recording and is not updated until recording is complete. 4.5.2 Making a video clip Switch the camera on. 1 Press the button for the video mode. Video mode is active when the symbol appears in the upper corner of the LCD display. 2 Press the shutter release to start recording a video.
4.6 4.6.1 Playing images, audio and videos LCD descriptions Status symbols in play mode 2007:02:11 12:02:47 Current system time: 11.02.2007, 12:02:47 01/10 Number of photographs taken / total photographs Photo is protected Photo is not protected Current file is a photograph (jpg) Current file is a video (avi) Current file is a sound recording (wav) 4.6.2 Viewing photos, videos and listening to sound recordings 1 Press the button to activate play mode.
several photos, videos or sound recordings at once. Use the control buttons file. , , and to select a file and press OK to play the There are three thumbnail modes: 2x2, 3x3 and 4x4, so that four, nine or sixteen thumbnails can be shown on the LCD.
4.7 Deleting photos You can delete unrequired photos. Either single photos or all photos can be deleted. To do so, you must be in playback mode. Deleting a single photo Select the photo to be deleted in playback mode. Then press the menu button and select “Delete” and “Current” to erase the photo. Deleting all photos To delete all photos, press the menu button and select “Delete” and “All”. All photos are now deleted. Formatting the memory button to open the Press the configuration mode.
5 5.1 Advanced operation Using the flash If there is not enough available light for your photo, the built-in flash can provide the additional light required. 1 Switch the camera on and select the photo mode (single shot or selftimer mode). 2 Press the right button once or repeatedly to set one of three flash modes. The flash mode changes from “Auto” to “Always on” to “Off” each time you press the button. The corresponding status symbol for the flash mode is shown in the upper left corner of the LCD.
5.3 Changing menu options The camera features image, playback and configuration menus. 1 Press the menu button to select Photography and Playback menus from the photography, playback mode. Press the 2 button to open the configuration menu. Press the (up) and (down) buttons to select the corresponding option and press the OK button to confirm. The respective option selected is highlighted in colour.
5.4 List of menu options The menu contents vary in accordance with the operating mode. The menu contents may vary in accordance with the camera model. See “Specifications” on page 34 for further details. Photography mode Menu Setting Description Single Take a single photograph Capture Mode Sequence SelfTimer Takes a series of three photos 10 seconds self-timer AUTO Strobe Force See page 18 for further details on the setting.
Playback mode Menu Protect Delete Thumbnail Set Logo Play Logo Setting Description Lock Current Protect current photo to prevent accidental deletion Unlock Current Cancel protection for current photo Lock All Protect all photos to prevent accidental deletion Unlock All Cancel protection for all photos Current Delete current photo All Delete all photos 2x2 Show 4 thumbnails simultaneously 3x3 Show 9 thumbnails simultaneously 4x4 Show 16 thumbnails simultaneously Use the current photo
5.5 Exposure compensation By correcting the exposure value (EV), you can adjust images which appear too light or too dark. 1 Selecting the image mode 2 Selecting EV 3 Selecting an EV value Press the menu button in photography mode. Select the EV item in the menu and press OK to open the exposure option. or to select a suitable exposure compensation and press OK to confirm. Press The value can be set in eight steps between -2.0 EV and +2.0 EV. Exposure compensation can be very useful.
5.7 Setting the image resolution The basic setting for the image resolution is 5.0 megapixels. 1 Press the menu button in photography mode. 2 Press 3 You can select one of six resolution settings: 5.8 or to select the “Resolution” option and press OK to confirm. 12 megapixels, 5.0 megapixels, 4.0 megapixels, 3.0 megapixels, 2.0 megapixels and 0.5 megapixels. At the 12 megapixel settings, pixels are interpolated – no image bursts can be captured in these resolutions.
2 Select the “Photo Effect” item in the menu and press OK to confirm. 3 Press “up” or “down” to select the photo effect option and press OK to confirm. • “Normal”: No special photo effect. • “Black and white”: Images are recorded in black and white. • “Sepia”: Images are recorded in a nostalgic brown tone. Sepia: Brown/amber simulates the brown tone of old photos caused by oxidation of the chemical components of the photograph.
3 5.11 Press or to select the required driver type and press OK to confirm. Protecting photos against accidental deletion This camera offers a protect function to prevent selected images being accidentally deleted. 1 Press the button to start the playback mode. Open the photo to be protected. Press the menu button and select the “Protect” item. 2 Select the required option from the list displayed.
5.13 Setting the date and time Your digital camera can save the date and time each photo was taken and display this information in playback mode. However, you must first set the date and the time for the camera. 1 Press the button to activate the configuration menu. 2 Select the “Date&Time” item in the menu and press OK to confirm. 3 Now change the time setting. Select the setting required using the control buttons and , and then change the value and control buttons.
5.14 Setting the LOGO The LOGO is the startup image which is shown on the display when the camera is activated. This allows the user to define individual images. To do so, proceed as follows: 1 Press the button to start playback mode. Open the required photo Press the menu button and select the “Set Logo” item. 2 After setting the logo, select the option “Play Logo” in the playback mode menu. There are two options: • Enable: The image selected by the user is used as the startup image.
6 Installing the software 6.1 Supported operating systems • Windows 98 (including Second Edition) • Windows Me • Windows 2000 • Windows XP Microsoft Windows 98, Windows 98 SW, Windows 2000 Professional, Windows ME or Windows XP systems are pre-installed. 6.2 Installing the driver Driver installation is similar for the various Windows systems. When specifying the path, you must simply select the driver in the CD-ROM drive. The camera has two USB driver modes: TWAIN and MASS.
2. Select “Search for the best driver for your device” and click “Next”. 3. Select “Specify a location” and click “Browse”. Specify the driver CD in your drive. 4. Now click “Next”. The system installs the driver and the following window appears: 5. Click “Finish” to complete installation. 6.
6.2.2 Installing the driver in TWAIN mode 1. Connect the camera to the computer. The system should automatically recognise that a new device has been connected. 2. In TWAIN mode, the driver must be installed for all systems. The procedure is similar to that described for Mass mode. 3. Under Windows 2000, you may be asked about the digital signature of the driver. Click “Yes” to install the driver. 4. When installing the driver on Windows XP the Found New Hardware Wizard appears.
the camera. Location of the drivers on the CD: (Example: “X:\ ” as the CD-ROM drive) X: \ Driver\mass: MASS driver for Win 98 X: \Driver\PC_CAM \win98_2k: TWAIN driver for Win 98 / 2000 X: \Driver\PC_CAM\WinMe_XP: TWAIN driver for Win ME / XP Photos should be downloaded directly in MASS mode. To select the correct driver mode before installing the driver.
8 Specifications Sensor 1/2.5" CMOS Pixels 5.1 million Effective resolution 2560x1920,2304x1728,2048x1536, 1600x1200, 800x600 Interpolated resolution 4000x3000 Photo: JPEG (EXIF 2.1 Version) File formats Video: AVI/Motion JPEG Sound: WAV format Special effects Standard, black and white, sepia modes Zoom factor 8x digital zoom LCD monitor 3.0 inch TFT monitor Compatible systems Windows 98/2000/ME /XP Focal length F = 8.7 mm Aperture F2.
Power supply via USB port Memory medium 9 32MB internal (including system memory), SD or MMC card Memory requirement Resolution Quality Superfine 2560x1920 Fine 32MB 64MB 4 8 16 32 64 approx. 600kB 5 10 20 40 80 128MB approx. 510kB 6 12 24 48 96 approx. 620kB 5 10 20 40 80 approx. 480kB 7 14 28 56 112 Economy approx. 400kB 8 16 32 64 128 Superfine approx. 530kB 6 12 24 48 96 approx. 400kB 8 16 32 64 128 Economy approx.
10 Troubleshooting If your camera does not work properly, please check the following items. If the problem still exists please contact your dealer. Symptoms Cause and solution Cause: Not enough light Camera does not take photos Solution: Change angle of camera to include more light or use automatic flash. Error B Cause: Weak batteries Photos disappear from the LCD after a period Solution: Insert two fresh batteries. Error A Cause: The PC does not have enough free RAM.
11 Further information 11.1 Safety instructions Although this product is safe, please observe the following information and warnings. Caution 1. Do not modify or dismantle the camera. 2. Contact your dealer for repairs and inspections. 3. Do not shake the camera or subject it to hard knocks. The camera may be damaged if it falls. 4. Ensure that no water or moisture enters the camera. This can cause short circuits and accidents.
11.4 Battery tips Incorrect handling of the batteries can cause them to leak, become hot or explode. Observe the following safety instructions: • Do not heat batteries or dispose of them in fires. • Do not transport batteries with metallic objects, as they can come into contact with the battery poles and cause damage. • Do not expose batteries to moisture. Always store them in a dry area. • Do not dismantle, deform or modify batteries. • Never remove the cover of the battery.