P H A S E R® 7 4 0 a n d 7 4 0 L L A S E R P R I N T E R S Setup Guide ® www.tek.
Phaser® 740 and 740L Laser Printers Setup Guide First printing August 1998 063-3101-00
Copyright © Tektronix, Inc. Unpublished rights reserved under the copyright laws of the United States. Contents of this publication may not be reproduced in any form without permission of Tektronix, Inc. Tektronix®, Phaser®, PhaserShare®, the TekColor® icon, and Made For Each Other® are registered trademarks of Tektronix, Inc. PhaserLink™, PhaserPrint™, PhaserSym™, PhaserTools™, TekSMART™, and the TekColor™ name are trademarks of Tektronix, Inc.
Phaser® 740 and 740L Printer Warranty Tektronix warrants that the Phaser 740 and 740L Printers will be free from defects in materials and workmanship for a period of one (1) year from the date of shipment. If the product proves defective during the respective warranty period, Tektronix, at its option, will repair the defective product onsite (740 only), at the depot, or by means of telephone support, without charge for parts and labor, or provide a replacement in exchange for the defective product.
User safety summary Terms in manual: CAUTION WARNING Conditions that can result in damage to the product. Conditions that can result in personal injury or loss of life. Power source: Do not apply more than 250 volts RMS between the supply conductors or between either supply conductor or ground. Use only the specified power cord and connector. Refer to a qualified service technician for changes to the cord or connector.
When you operate this equipment, the socket outlet should be near the equipment and be easily accessible. DANGER: CAUTION: VORSICHT: ATTENTION: Invisible laser radiation when open and interlock defeated. AVOID DIRECT EXPOSURE TO BEAM. Invisible laser radiation when open and interlocks defeated. AVOID DIRECT EXPOSURE TO BEAM. Unsichtbare Laserstrahlung, wenn Abdeckung geöffnet und Sicherheitsverriegelung überbrückt. NICH DEM STRAHL AUSSETZEN.
Getting Set Up At a glance Page Unpack 2 ■ Take inventory 2 ■ Remove the packing material 4 Set up the printer 5 ■ Select a location 5 ■ Move the printer (and optional Lower Tray Assembly) 6 ■ Install toner cartridges 9 ■ Prepare imaging unit 11 ■ Load media 12 ■ Connect the printer 17 ■ Turn on the printer 20 ■ Select a front panel language 21 Make a print 22 Install printer software on your computer 24 Register your printer 33 ■ Where to go from here 34 Setup Gu
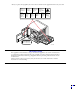
Getting Set Up Unpack the printer Take inventory 1. Documentation ■ Setup overview poster ■ Setup Guide (this book) ■ PhaserShare Networking Setup Guide ■ Supplies information kit ■ User Guide 2. Printer CD-ROMs (2) 3. Power cord 4. Parallel cable adapter 5. Toner cartridge(s) The Phaser 740L printer ships with only one (black) toner cartridge. 6. Media sampler 7.
Getting Set Up 1 2 3 4 5 6 7 8 9 3101-02a Setup Guide 3
Getting Set Up Remove the packing material NOTE Save all packing material in case moving or subsequent shipment is necessary. 1. Remove the plastic bag from the printer. Pull down the plastic skirt to expose the printer. 3101-03 2. 4 If you ordered an optional Automatic Duplex/Lower Tray Assembly, unpack it now.
Getting Set Up Set up the printer Select a location Make sure that the location for the printer is level and strong. The printer weighs 43 kg. (94 lbs.); the optional Automatic Duplex/Lower Tray Assembly weighs 14 kg (31 lbs.). (1005 mm) 39.6 in. (153 mm) 6.0 in. (501 mm) 19.7 in. (464 mm) 18.3 in. (679 mm) 26.7 in. 3101-01 (507 mm) 20 in.
Getting Set Up Lift the printer WARNING The printer weighs about 43 kg. (94 lbs.); observe standard precautions for lifting heavy objects. To lift the printer from its shipping pallet, use the indents at the front and back of the printer for your hands, as shown in this illustration. 43 kg 94 lb.
Getting Set Up If you ordered an optional Automatic Duplex/Lower Tray Assembly WARNING The printer weighs about 43 kg. (94 lbs.) and the Lower Tray Assembly weighs about 14 kg (31 lbs.). Observe standard precautions for lifting heavy objects. The printer is not permanently attached to the Automatic Duplex/Lower Tray Assembly. When you move the printer, move the pieces separately; moving the printer incorrectly may damage it and may cause personal injury. 1.
Getting Set Up Remove adhesive tape 1. Remove all adhesive tape that holds the printer’s doors shut. 2. Remove the adhesive tape that holds the output tray against the printer. 3. Gently lower the tray to its operating position.
Getting Set Up Install the toner cartridges Install the toner cartridges The toner cartridges are shipped in the packing tray under the foam. NOTE If you have a Phaser 740L printer, refer to page 10 before installing the toner cartridge. 1. Remove each toner cartridge from its packaging. Make sure that you remove all tape. 2. Remove the shipping cover from each cartridge. 3. Open the printer’s right side door. 3 1 2 3101-05 4. Install each cartridge in the slot labeled for its color. 5.
Getting Set Up Phaser 740L printers The Phaser 740L printer includes only a black toner cartridge in the printer box. Read the following information, then follow the instructions on page 9 to install the cartridge.
Getting Set Up Prepare the imaging unit 1. Open the printer’s front door. 2. Turn the upper blue lever to the up position: align the lever’s triangle with the triangle on the surface of the imaging unit. 3. Close the printer’s front door.
Getting Set Up Add paper or transparencies Remove the paper tray r pe Pa A4 3101-10 12 Phaser 740 and 740L Laser Printers
Getting Set Up Remove packing material Remove the packaging materials from inside the tray: twist the cardboard “lock,” pull it out and discard it.
Getting Set Up Load media CAUTION For proper operation, install only paper in the PAPER tray (60 - 90 g/m2, 16 - 24 lb.) and Tektronix transparencies in the TRANSPARENCY tray. 1. 2. Push down on the tray’s metal plate until it clicks, locking it. Fan the paper or transparencies. Do not to leave fingerprints on the print area of the transparencies. 1 2 R PE PA A4 3101-11 3. 4. 5. Place media in the tray under the hooks. Transparencies: Place the Tektronix logo strip face up under the hooks.
Getting Set Up 6. If you have a single media tray, slide it completely into the slot. r pe Pa A4 3101-13 7. If you have the Automatic Duplex/Lower Tray Assembly: ■ Install the DUPLEX unit only into the upper (a) slot. ■ Install the TRANSPARENCY tray only into the middle (b) slot. ■ Install the PAPER trays into the middle (b) or lower (c) slots. a x ple Duer b Pap er ett A/Ler c Pap l ga Le er Pap 3101-14 NOTE When you install the Duplex unit, you will have one extra media tray.
Getting Set Up A home for the User Guide The printer’s front door includes an inside pocket for storing the User Guide. Also included is a label for the outside of the printer; it lets users know that the User Guide is stored inside the printer. Open the printer’s front door. 2. Insert the User Guide into the pocket inside the printer door. 2 Phaser 560 Quick Reference 1. 1 3. Close the front door. 4. Place the label on the printer’s front door.
Getting Set Up Connect the interface cables Included here is an overview of the printer ports. If you are connecting the printer directly to your computer, refer to “Connecting to the parallel port” on page 18. If you are connecting the printer to a network, refer to the PhaserShare Networking Setup Guide. Printer port overview NOTE Plus, Duplex, and Extended Configurations include a SCSI port; Standard Configurations require the Z740FP Kit for SCSI support.
Getting Set Up Connecting to the parallel port CAUTION The maximum length for the parallel cable is 3 meters (10 ft.). ■ Use a high-density bi-directional parallel cable or a Tektronix 36-pin high-density printer-to-25-pin DSUB PC cable (order number 012-1468-00). Otherwise, use a 36-pin to 36-pin parallel cable and the parallel adapter supplied with the printer. ■ Connect the larger end of a parallel interface cable to your computer and the smaller end of the cable to the printer’s parallel port.
Getting Set Up Connecting a SCSI peripheral device NOTE Standard Configurations of the printer require the Z740FP Kit to support the SCSI port; Plus, Duplex, and Extended Configurations include a SCSI port. The printer’s SCSI ID number is 7; available SCSI ID numbers for peripheral devices are 0 – 6. The SCSI port is used for these peripherals: ■ Scanner ■ External SCSI hard disk Allows you to use your printer as a color copier.
Getting Set Up Turn on the printer CAUTION To protect your printer from a power surge, make sure that the printer’s power switch is in the off position before plugging in the cord. 1. Plug the power cord into the printer and into a grounded outlet. 2. Turn on the power to any peripherals you have connected. 3. Wait about 10 seconds, then turn on the printer. 3 ER PAP A4 1 3101-20 ■ The printer goes through a series of self-tests, taking about 3 minutes. ■ The Startup Page prints.
Getting Set Up Select a front panel language NOTE If the front panel already displays the language you want, turn to the next topic, “Print the Menu Map” on page 22. By default, the front panel displays in English. If the Kanji font SIMM is installed, front panel messages display in Japanese. To change the default to Spanish, French, German, Italian, English, or Japanese, follow these steps.
Getting Set Up Print the Menu Map The menu map provides a guide to the front panel menus. Keep it by the printer for easy reference. 1. On the printer’s front panel, press the Menu button; you see this message: Help Pages <-----> 2. Menu Press Menu; you see this message: Consumables Page <-----> Print 3. Press <--- to scroll to this message: Menu Map <-----> 4. 22 Press Print.
Getting Set Up Press Menu Menu Help Pages Menu Exit scrolls backward Exit exits without a change scrolls forward OK accepts the new setting enters the sub-menu Consumables Page Configuration Page Startup Page Usage Profile Demonstration Page Service Print 1 Service Print 2 RGB Sampler Prints CMYK Sampler Prints Menu Map Adjust Light / Dark Adjust Each Color Print Page Adjust Left Margin Adjust Top Margin Page Count Imaging Unit Transfer Kit Fuser Fuser Roll Main Charge Grid Automatic
Getting Set Up Install printer software PC/Windows software CAUTION As with all Windows applications, close all other programs before beginning this installation, including Microsoft Office, toolbars, and virus checkers. Failure to do so could result in computer errors. Before you begin Make a note of this information and refer to it during the on-screen installation procedure. 1.
Getting Set Up Install 1. 2. Insert the printer’s CD-ROM. Start the Installer. Use one of the following procedures: ■ If the Windows autorun feature is enabled, the Installer starts automatically. ■ If the Windows autorun feature is disabled, double-click My Computer, then double-click the CD-ROM icon to launch the CD-ROM. ■ View the brief introductory information, then click Install Drivers to launch the installer.
Getting Set Up 3. 4. View the license agreements, and click Yes to continue. Choose the set of files to install from one of these options: Easy Install to install a printer driver and support files. Custom Install to specify which files to install. 5. Follow the on-screen prompts to complete the installation and electronic registration. 6. When the CD-ROM introduction screen reappears, click Exit or click Explore CD to launch the web browser.
Getting Set Up Configuring the driver After your software installation is complete, the printer driver needs to be configured for your printer’s installed options. Windows 95/Windows 98/NT4 1. From the Start menu, select Settings, then select Printers. 2. Select your Tektronix printer driver and choose Properties from the pop-up menu. 3. Click the Device Options (Windows 95/Windows 98) or Device Settings (Windows NT4) tab. 4.
Getting Set Up Macintosh software Before you begin Make a note of this information and refer to it during the on-screen installation procedure.
Getting Set Up Install 1. Insert the printer’s CD-ROM. 2. Double-click Start Me First. View the brief introductory information, the click Install Drivers to launch the installer.
Getting Set Up 3. Click Continue. 4. View the license agreements and click Accept to continue. 5. Select Easy Install or Custom Install from the pull-down menu: Easy Install to install a printer driver and support files. a. Click Read Me for details on each item to be installed. b. Click Install. Custom Install to specify which files to install. a. Select Custom Install. b. Select items to install. c. Click the i button for information on each item. d. Click Install. 6.
Getting Set Up Set up the driver 1. From the Apple menu, select Chooser. 2. Click the icon of the printer driver (LaserWriter 8) on the left side of the window. 3. Click the Zone for your printer. 4. Select your printer from the list of printers on the right side of the window. If it is not in the list, check your hardware connections and verify that you have selected the correct zone in the Chooser on the left side of the window. 5.
Getting Set Up Register your printer By registering your printer with Tektronix, you are validating the product warranty and ensuring that you will be sent information about upgrades, service, and accessories as it becomes available. During the software installation, the online registration screen appears. Follow the prompts. You will need the printer’s serial number when registering the printer; it appears on the Startup Page, which prints when you turn on the printer.
Getting Set Up Where to go from here Task / Information needed Resource Where Set up your printer on a network PhaserShare Networking Setup Guide ■ Printer’s box Network services PhaserShare Networking Manual ■ Printer’s CD-ROM ■ Printer’s web site ■ For a printed copy, order number 071-0180-01 User Guide ■ Printer’s box Color Connection www.colorconnection.tektronix.
® Printed on recycled paper 0 6 3 - 3 1 0 1 - 0 0