
Printer User Manual
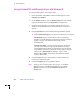
Table Of Contents
- Copyright
- Warranty
- Safety Summary
- Table of Contents
- Introduction
- Getting Set Up
- Printing Basics
- Overview
- Printing from a PC
- Using Windows printer drivers
- Using the printer’s front panel
- Using the AdobePS 4 and Microsoft drivers with Windows 95
- Using the Tektronix driver for Windows 3.1
- Using the Adobe PostScript driver for Windows 3.1
- Using the Windows NT 3.51 PostScript driver
- Using the Windows NT 4.0 PostScript driver
- Printing from DOS
- Printing from a Macintosh
- Printing from a workstation
- Printing from specific applications
- Selecting print features
- Print quality modes
- Color corrections
- All about media
- Media trays
- Printing on letterhead
- Printing transparencies
- Manual-feed printing
- Duplex printing
- Printer languages: PostScript, HP-GL, PCL5
- Fonts
- Printing: Beyond the Basics
- Caring for Your Printer
- Overview
- Adding ink
- Emptying the waste liner (A)
- Replacing the maintenance tray (B)
- Replacing the media tray separator pad
- Cleaning the printer
- Cleaning pages
- Cleaning supplies
- Using isopropyl alcohol
- Identifying cleaning procedures
- Cleaning for light stripes: printhead
- Cleaning for upper tray jams: media pick roller
- Cleaning for jams and ink smears: media-feed rollers
- Cleaning for lower tray jams: paper pick roller
- Cleaning for lower tray jams: paper-feed rollers
- Cleaning for ink smears and transfix problems: internal paper path
- Cleaning for ink smears: paper-exit path
- Cleaning the maintenance tray blade (optional)
- Moving your printer
- Troubleshooting
- If you need help
- Receiving email update notices
- Using the automated fax systems
- Front panel messages
- Problems and solutions
- All about media jams
- If your file doesn’t print
- PostScript printing errors
- Printed colors are not what you expected
- Selecting page sizes in Windows applications
- Fonts printing incorrectly from Windows
- Sharing the printer on a network
- Using the Front Panel
- Supplies, Accessories, and Expanding Your Printer
- Tektronix supplies: the mark of quality
- Customizing your printer
- Ordering printer supplies
- Extended Features upgrade
- Lower Paper Tray Assembly (recommended)
- Printer Station (recommended)
- Media tray
- Memory upgrade
- Font upgrade
- 600 x 300 dpi upgrade
- PhaserShare network cards (recommended)
- Phaser Copystation
- SCSI hard disk
- PhaserPrint for UNIX software
- PhaserSym
- Regulatory Information and Specifications
- Index
Printing Basics
3
User Manual
3-7
6.
Set the Timeouts. These options regulate your computerÕs
communications with its printer ports.
■ Device Not Selected: Type a value in this text box to change the
number of seconds Windows waits before notifying you that a
printer is off-line. The default is 15 seconds, and is recommended.
■ Transmission Retry: On large or multiple-page documents you
may see an Alert message that the printer is no longer accepting
data before the job is completely downloaded to the printer. To
avoid these unnecessary timeouts, set this option to a larger value,
such as 850 seconds (14 minutes, 10 seconds). Type a value
between 45 and 850 in this text box; the Windows default setting is
45 seconds.
7.
Click OK to return to the Printers dialog box, then click the Setup
button. A dialog box appears with the name of the printer you
selected across the top. Use this dialog box to select paper source,
paper size, number of copies, and image orientation.
Note
You may want to set the number of copies from your application
because the number of copies in the Setup dialog box remains the
same until you change it again. Also, if you are printing multiple
copies, make sure the Transmission Retry is set for at least
600 seconds (10 minutes).
8.
From the Setup dialog box, click the Options button to see the
Options dialog box. Refer to your Microsoft Windows
documentation for details on the options in this dialog box. Make
sure the Color check box is on to print in color. Select one of the
following header options:
■ Make sure the Send Header with Each Job check box is on to
download PostScript header information with each print job. This
is the recommended setting.
■ Click the Send Header button. In the Send Header dialog box,
select either Printer or File, and click the Send Now button. This
saves the PostScript header information in the printer. This option
makes print Þles a little smaller and faster, but you need to click the
Send Now button every time the printer is turned on.