
Printer User Manual
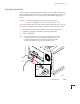

Table Of Contents
- Copyright
- Warranty
- Safety Summary
- Table of Contents
- Introduction
- Getting Set Up
- Printing Basics
- Overview
- Printing from a PC
- Using Windows printer drivers
- Using the printer’s front panel
- Using the AdobePS 4 and Microsoft drivers with Windows 95
- Using the Tektronix driver for Windows 3.1
- Using the Adobe PostScript driver for Windows 3.1
- Using the Windows NT 3.51 PostScript driver
- Using the Windows NT 4.0 PostScript driver
- Printing from DOS
- Printing from a Macintosh
- Printing from a workstation
- Printing from specific applications
- Selecting print features
- Print quality modes
- Color corrections
- All about media
- Media trays
- Printing on letterhead
- Printing transparencies
- Manual-feed printing
- Duplex printing
- Printer languages: PostScript, HP-GL, PCL5
- Fonts
- Printing: Beyond the Basics
- Caring for Your Printer
- Overview
- Adding ink
- Emptying the waste liner (A)
- Replacing the maintenance tray (B)
- Replacing the media tray separator pad
- Cleaning the printer
- Cleaning pages
- Cleaning supplies
- Using isopropyl alcohol
- Identifying cleaning procedures
- Cleaning for light stripes: printhead
- Cleaning for upper tray jams: media pick roller
- Cleaning for jams and ink smears: media-feed rollers
- Cleaning for lower tray jams: paper pick roller
- Cleaning for lower tray jams: paper-feed rollers
- Cleaning for ink smears and transfix problems: internal paper path
- Cleaning for ink smears: paper-exit path
- Cleaning the maintenance tray blade (optional)
- Moving your printer
- Troubleshooting
- If you need help
- Receiving email update notices
- Using the automated fax systems
- Front panel messages
- Problems and solutions
- All about media jams
- If your file doesn’t print
- PostScript printing errors
- Printed colors are not what you expected
- Selecting page sizes in Windows applications
- Fonts printing incorrectly from Windows
- Sharing the printer on a network
- Using the Front Panel
- Supplies, Accessories, and Expanding Your Printer
- Tektronix supplies: the mark of quality
- Customizing your printer
- Ordering printer supplies
- Extended Features upgrade
- Lower Paper Tray Assembly (recommended)
- Printer Station (recommended)
- Media tray
- Memory upgrade
- Font upgrade
- 600 x 300 dpi upgrade
- PhaserShare network cards (recommended)
- Phaser Copystation
- SCSI hard disk
- PhaserPrint for UNIX software
- PhaserSym
- Regulatory Information and Specifications
- Index
Getting Set Up
2
User Manual
2-23
Parallel connection
The printer supports a standard (uni-directional) parallel port. The parallel
port can also be set for bi-directional communications using downloadable
utility Þles or from your World Wide Web browser. Refer to the on-line
manual on the printerÕs CD-ROM for instructions on using utility Þles to
control the parallel port. The CD-ROM and the PhaserShare Network Cards
and Software System Administrator Manual also covers other topics such as
disabling timeouts, bi-directional status reporting and the parallel port
pinout.
When connecting the printer to your computerÕs parallel port, you have two
options:
■ Use the Tektronix parallel cable adapter (order number
013-0299-00) included with the printer and a standard PC-printer
cable (36-pin low-density Centronics connector to 25-pin DSUB
connector). The adapter converts the standard cable from a
low-density parallel connector to the high-density parallel
connector required for the printer.
■ Obtain an optional parallel cable from Tektronix (order number
012-1468-00). This cable features a 36-pin high-density parallel
connector for the printer and a 25-pin DSUB connector for the
computer.