
Printer User Manual
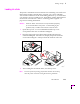

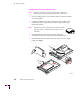
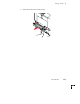
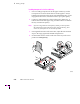
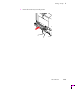
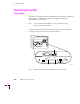
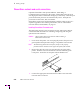
Table Of Contents
- Copyright
- Warranty
- Safety Summary
- Table of Contents
- Introduction
- Getting Set Up
- Printing Basics
- Overview
- Printing from a PC
- Using Windows printer drivers
- Using the printer’s front panel
- Using the AdobePS 4 and Microsoft drivers with Windows 95
- Using the Tektronix driver for Windows 3.1
- Using the Adobe PostScript driver for Windows 3.1
- Using the Windows NT 3.51 PostScript driver
- Using the Windows NT 4.0 PostScript driver
- Printing from DOS
- Printing from a Macintosh
- Printing from a workstation
- Printing from specific applications
- Selecting print features
- Print quality modes
- Color corrections
- All about media
- Media trays
- Printing on letterhead
- Printing transparencies
- Manual-feed printing
- Duplex printing
- Printer languages: PostScript, HP-GL, PCL5
- Fonts
- Printing: Beyond the Basics
- Caring for Your Printer
- Overview
- Adding ink
- Emptying the waste liner (A)
- Replacing the maintenance tray (B)
- Replacing the media tray separator pad
- Cleaning the printer
- Cleaning pages
- Cleaning supplies
- Using isopropyl alcohol
- Identifying cleaning procedures
- Cleaning for light stripes: printhead
- Cleaning for upper tray jams: media pick roller
- Cleaning for jams and ink smears: media-feed rollers
- Cleaning for lower tray jams: paper pick roller
- Cleaning for lower tray jams: paper-feed rollers
- Cleaning for ink smears and transfix problems: internal paper path
- Cleaning for ink smears: paper-exit path
- Cleaning the maintenance tray blade (optional)
- Moving your printer
- Troubleshooting
- If you need help
- Receiving email update notices
- Using the automated fax systems
- Front panel messages
- Problems and solutions
- All about media jams
- If your file doesn’t print
- PostScript printing errors
- Printed colors are not what you expected
- Selecting page sizes in Windows applications
- Fonts printing incorrectly from Windows
- Sharing the printer on a network
- Using the Front Panel
- Supplies, Accessories, and Expanding Your Printer
- Tektronix supplies: the mark of quality
- Customizing your printer
- Ordering printer supplies
- Extended Features upgrade
- Lower Paper Tray Assembly (recommended)
- Printer Station (recommended)
- Media tray
- Memory upgrade
- Font upgrade
- 600 x 300 dpi upgrade
- PhaserShare network cards (recommended)
- Phaser Copystation
- SCSI hard disk
- PhaserPrint for UNIX software
- PhaserSym
- Regulatory Information and Specifications
- Index
2
Getting Set Up
2-14
Phaser 380 Color Printer
Choosing media tray configurations
Standard media tray
Use the adjustable, 250-sheet media tray shipped with your printer for
paper, letterhead, label stock, and transparency print jobs. A media selector
switch located on the side of the media tray selects between paper and
transparency printing. Depending on the switch setting, the printer changes
the ink density to match the type of media used (paper or transparency).
Note
Printing with the media selector switch incorrectly set to Paper
(for transparency print jobs) or Transparency (for paper print
jobs) will result in lower-quality prints.
If you often print on transparencies or specialty papers, you can save time
and effort by purchasing a Lower Paper Tray Assembly. Having a lower tray
lets you quickly switch between printing on paper and transparencies by
simply making a selection in the printer driver. There is no need to load and
unload media from the tray when changing between different types or sizes
of media.
Optional Lower Paper Tray Assembly
For maximum ßexibility, youÕll want to add the optional 250-sheet Lower
Paper Tray Assembly to supplement the standard media tray. The lower
paper tray is convenient when you want to print on two different types,
weights or sizes of media. For example, you could load Tabloid-size Cover
paper in the upper tray and load Tektronix Tabloid Maximum-size Bond
paper in the lower tray. With dual-tray capability, you can make printer
driver selections that specify a print job by its paper size or by tray position
(upper or lower) without the need to leave your computer to switch trays.
Refer to ÒEstablishing a default media tray (optional)Ó on page 3-37 for
information on selecting between the upper and lower tray as the default
printing tray.
Note
Use the Lower Paper Tray Assembly only for paper print jobs. The
Lower Paper Tray Assembly ignores the Transparency position of
the media selector switch on the side of the lower paper tray.