
Printer User Manual
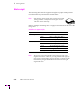
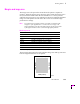
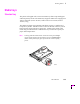
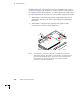
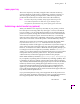
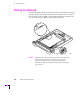
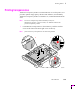
Table Of Contents
- Copyright
- Warranty
- Safety Summary
- Table of Contents
- Introduction
- Getting Set Up
- Printing Basics
- Overview
- Printing from a PC
- Using Windows printer drivers
- Using the printer’s front panel
- Using the AdobePS 4 and Microsoft drivers with Windows 95
- Using the Tektronix driver for Windows 3.1
- Using the Adobe PostScript driver for Windows 3.1
- Using the Windows NT 3.51 PostScript driver
- Using the Windows NT 4.0 PostScript driver
- Printing from DOS
- Printing from a Macintosh
- Printing from a workstation
- Printing from specific applications
- Selecting print features
- Print quality modes
- Color corrections
- All about media
- Media trays
- Printing on letterhead
- Printing transparencies
- Manual-feed printing
- Duplex printing
- Printer languages: PostScript, HP-GL, PCL5
- Fonts
- Printing: Beyond the Basics
- Caring for Your Printer
- Overview
- Adding ink
- Emptying the waste liner (A)
- Replacing the maintenance tray (B)
- Replacing the media tray separator pad
- Cleaning the printer
- Cleaning pages
- Cleaning supplies
- Using isopropyl alcohol
- Identifying cleaning procedures
- Cleaning for light stripes: printhead
- Cleaning for upper tray jams: media pick roller
- Cleaning for jams and ink smears: media-feed rollers
- Cleaning for lower tray jams: paper pick roller
- Cleaning for lower tray jams: paper-feed rollers
- Cleaning for ink smears and transfix problems: internal paper path
- Cleaning for ink smears: paper-exit path
- Cleaning the maintenance tray blade (optional)
- Moving your printer
- Troubleshooting
- If you need help
- Receiving email update notices
- Using the automated fax systems
- Front panel messages
- Problems and solutions
- All about media jams
- If your file doesn’t print
- PostScript printing errors
- Printed colors are not what you expected
- Selecting page sizes in Windows applications
- Fonts printing incorrectly from Windows
- Sharing the printer on a network
- Using the Front Panel
- Supplies, Accessories, and Expanding Your Printer
- Tektronix supplies: the mark of quality
- Customizing your printer
- Ordering printer supplies
- Extended Features upgrade
- Lower Paper Tray Assembly (recommended)
- Printer Station (recommended)
- Media tray
- Memory upgrade
- Font upgrade
- 600 x 300 dpi upgrade
- PhaserShare network cards (recommended)
- Phaser Copystation
- SCSI hard disk
- PhaserPrint for UNIX software
- PhaserSym
- Regulatory Information and Specifications
- Index
3
Printing Basics
3-40
Phaser 380 Color Printer
2.
When you are printing transparencies using the standard media
tray, load up to 100 transparency sheets in the tray. A label inside
the media tray indicates the trayÕs maximum transparency
capacity.
3.
Set the media selector switch on the side of the media tray to
Transparency and install the media tray in the printer.
4.
When you print, use a supported printer driver and specify
Transparency to obtain the correct print mode for transparency
media.
Transparency quality tips
■ Keep transparencies in covered containers. Dust and dirt can
transfer to the transparency media, resulting in poor print quality.
■ Handle transparencies by the edges and with both hands to avoid
Þngerprints and creases, which can result in poor print quality.
■ To avoid having the transparencies stick together, gently fan the
media before loading it into the media tray.
■ Place slip sheets between printed transparencies or use a
protective cover to prevent contact between transparencies.
■ If your transparency prints have slightly darker bands running the
length of the print, you may need to clean the media-feed rollers.
Refer to ÒCleaning for ink smears and transÞx problems: internal
paper pathÓ on page 5-41.
■ Select the Standard print-quality mode in the printer driver for
the fastest color printing of transparencies. Use the Enhanced
(600 x 300) print-quality mode (Extended Features option) to
produce transparencies with the most vibrant colors, the
smoothest color gradations and color sweeps, and the highest
durability.
■ Use large type on overheads; 18-point type or larger works well.
■ Use yellow or other light colors for text on solid-color
backgrounds.
Note
Do not load transparencies in the Lower Paper Tray Assembly. To
avoid a jam condition, do not re-use transparencies that have been
fed through the printer once (for example, after a jam).