
Printer User Manual
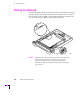
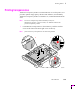
Table Of Contents
- Copyright
- Warranty
- Safety Summary
- Table of Contents
- Introduction
- Getting Set Up
- Printing Basics
- Overview
- Printing from a PC
- Using Windows printer drivers
- Using the printer’s front panel
- Using the AdobePS 4 and Microsoft drivers with Windows 95
- Using the Tektronix driver for Windows 3.1
- Using the Adobe PostScript driver for Windows 3.1
- Using the Windows NT 3.51 PostScript driver
- Using the Windows NT 4.0 PostScript driver
- Printing from DOS
- Printing from a Macintosh
- Printing from a workstation
- Printing from specific applications
- Selecting print features
- Print quality modes
- Color corrections
- All about media
- Media trays
- Printing on letterhead
- Printing transparencies
- Manual-feed printing
- Duplex printing
- Printer languages: PostScript, HP-GL, PCL5
- Fonts
- Printing: Beyond the Basics
- Caring for Your Printer
- Overview
- Adding ink
- Emptying the waste liner (A)
- Replacing the maintenance tray (B)
- Replacing the media tray separator pad
- Cleaning the printer
- Cleaning pages
- Cleaning supplies
- Using isopropyl alcohol
- Identifying cleaning procedures
- Cleaning for light stripes: printhead
- Cleaning for upper tray jams: media pick roller
- Cleaning for jams and ink smears: media-feed rollers
- Cleaning for lower tray jams: paper pick roller
- Cleaning for lower tray jams: paper-feed rollers
- Cleaning for ink smears and transfix problems: internal paper path
- Cleaning for ink smears: paper-exit path
- Cleaning the maintenance tray blade (optional)
- Moving your printer
- Troubleshooting
- If you need help
- Receiving email update notices
- Using the automated fax systems
- Front panel messages
- Problems and solutions
- All about media jams
- If your file doesn’t print
- PostScript printing errors
- Printed colors are not what you expected
- Selecting page sizes in Windows applications
- Fonts printing incorrectly from Windows
- Sharing the printer on a network
- Using the Front Panel
- Supplies, Accessories, and Expanding Your Printer
- Tektronix supplies: the mark of quality
- Customizing your printer
- Ordering printer supplies
- Extended Features upgrade
- Lower Paper Tray Assembly (recommended)
- Printer Station (recommended)
- Media tray
- Memory upgrade
- Font upgrade
- 600 x 300 dpi upgrade
- PhaserShare network cards (recommended)
- Phaser Copystation
- SCSI hard disk
- PhaserPrint for UNIX software
- PhaserSym
- Regulatory Information and Specifications
- Index
Printing Basics
3
User Manual
3-37
Lower paper tray
The Lower Paper Tray Assembly, using the same universal media tray,
operates identically to the printerÕs standard tray with one exception. It
does not support printing of transparencies, and therefore ignores the
position of the media-selector switch on the side of the media tray.
Note
The Lower Paper Tray Assembly accepts paper media only; do not
use it with transparencies or label stock. If you attempt to print
transparencies from the lower tray, lower-quality prints will result.
Establishing a default media tray (optional)
When you add the Lower Paper Tray Assembly to your printer, you then
have the option of selecting which tray (the upper or lower) is the default
tray for printing. You can set the default media tray selection through the
printerÕs front panel, through PhaserLink software (refer to the PhaserShare
Network Cards and Software System Administrator Manual), or a PostScript
utility Þle (refer to the printerÕs CD-ROM). When using a supported printer
driver, driver selections override the printerÕs default media tray setting.
When the Lower Paper Tray Assembly is Þrst installed, the default media
tray selection is set to AutoSelect. With this selection, the printer
automatically switches to the upper tray if the lower tray becomes empty. If
paper of the same size exists in the upper tray slot, then printing resumes.
However, if a different size media is installed, then the printer prompts you
to load paper in the Lower Paper Tray Assembly. With the AutoSelect
setting, you can choose between two different media sizes (or types) loaded
in the printer directly from the printer driver. The printer then decides
which media tray contains the appropriate media for the print job.
Other default media tray selections (Upper, Lower, Paper, Transparency)
let you explicitly set printing with no automatic tray-switching capability. This
is valuable if you have, for example, common ofÞce paper in the Lower Paper
Tray Assembly and letterhead in the upper paper tray. You can have the default
media tray selection set for printing ofÞce paper in the lower tray. If you are
using an unsupported printer driver and want to print on letterhead in the
upper tray, you will need to change the default media tray setting to Upper.
(Users with supported printer drivers can choose between the upper and lower
trays directly from the printer driver.)
If you print transparencies using a non-supported driver the printer uses a
paper print mode, producing unsatisfactory results. To print transparencies,
use a supported printer driver and explicitly select Transparency.