
User Manual


Application examples
1. Connect the PA3
000 to the computer with the PWRVIEW software installed
using the supplied USB cable. Ethernet or GPIB can also be used, if desired.
2. Open the PWRVI
EW software by double-clicking the desktop icon.
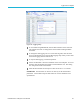
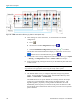
3. Click the Add button to connect the PA3000.
All available instruments will be listed in the selection panel.
4. Select the desired instrument (the PA3000) and then click Connect.
NOTE. There are various default applications and compliance tests on the left
panel that you can select from. This example discusses the AC-DC LED Driver
efficienc
y measurement. This method can also be used for similar AC-DC power
supplies.
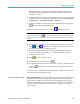
5. Select LED Driver Efficiency under the Applications/Test section on the left
panel a n
dthenclicktheWizardbutton.
The wizard helps with wiring and shunt selections. A 1 A shunt or 30 A shunt
can be s
elected based on the peak input and output currents.
6. Make changes on the setup wiring as suggested.
7. Click Finish when done and the page will direct you to the Efficiency Setup
tab.
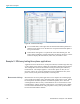
8. Verify the instrument and group information and then click the check box for
the Measurement Efficiency.
PWRVIEWisnowreadytotakeeffi ciency measurements.
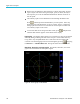
9. Click the Measure tab page at the top and then click the blue Start button.
The measurements will start updating.
10. To add more measurements or change other settings, such as range and filters,
go to the Setup tab and select the desired settings.
NOTE. The m easurements have to be stopped to make any changes on the Setup
page. Stop the measurements by clicking the Stop button on the bottom of the
Setup page.
Further settings if required
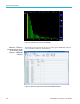
Waveform, Harmonics, and Trend Chart. In the measurement Grid, you can view
Waveform, Harmonics, and Trend charts by clicking the respective icons on the
menu bar.
PA3000 Power Analyzer User Manual 109