
EB410.2 Manual
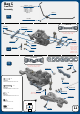
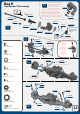

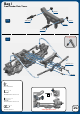

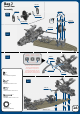


Table Of Contents
- P1_EB410_2instructions_FrontCover
- P2_EB410_2instructions_Intro
- P3_EB410_2instructions_BagA
- P4_EB410_2instructions_BagB
- P5_EB410_2instructions_BagC
- P6_EB410_2instructions_BagD
- P7_EB410_2instructions_BagE
- P8_EB410_2instructions_BagF
- P9_EB410_2instructions_BagF
- P10_EB410_2instructions_BagF
- P11_EB410_2instructions_BagG
- P12_EB410_2instructions_BagH
- P13_EB410_2instructions_BagI
- P14_EB410_2instructions_BagI
- P15_EB410_2instructions_BagJ
- P16_EB410_2instructions_BagJ
- P17_EB410_2instructions_BagK
- P18_EB410_2instructions_BagL
- P19_EB410_2instructions_Shocks
- P20_EB410_2instructions_BagM
- P21_EB410_2instructions_BagM
- P22_EB410_2instructions_BagM
- P23_EB410_2instructions_BagN_O
- P24_EB410_2instructions_BagO
- P25_EB410_2instructions_BagP
- P26_EB410_2instructions_SpareParts
- P27_EB410_2instructions_Setup_1
- P28_EB410_2instructions_Setup_2
- P29_EB410_2instructions_RadioInfo
- P30_EB410_2instructions_Maintenance
- P31_EB410_2instructions_SetUpSheet_Filled
- P32_EB410_2instructions_BackCover

A Block Inset
Note: It is nessesary to slightly loosen both screws holding
the A block in place before attaching the front clip to the
chassis. This is due to the fact that the A block is now
keyed into the front of the chassis. This feature helps
secure the front clip and improves durability.
CHASSIS
CHASSIS
A
BLOCK
A
BLOCK
TKR1323
TKR6501B
TKR6586
TKR1323
TKR1322
TKR1401
TKR6546
TKR1323
TKR6530
TKR6634
TKR6538
Step
J-1
Step
J-2
Step
J-3
TKR1322
M3x8mm Flat Head Screw
x2
TKR1401
M3x6mm Button Head Screw
x2
TKR1323
M3x10mm Flat Head Screw
x10
Thread
Lock
Thread
Lock
Bag J
Front/Center Assembly
15