552_U 09/14 tekmarNet® Thermostat 552 Zoning Replaces: 08/11 User Manual A Watts Water Technologies Company 1 of 12 © 2014 552_U - 09/14
This brochure will provide you with the information you need to benefit the most from your tekmarNet® thermostat. Please visit www.tekmarcontrols.com for more detailed information on this or any other tekmar product. This thermostat provides heating for one zone in your building. It will maintain your air temperature with an on board room sensor. Floor temperature control may also be enabled in this thermostat when a floor sensor is installed.
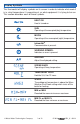
Display Symbols This thermostat will display symbols on its screen in order to indicate what mode it is in, what temperature it is operating at, or what equipment it is trying to turn on. This section describes each of those symbols. HEAT ON Heat is turned on. SUN Operating at the occupied (day) temperature. MOON Operating at the unoccupied (night) temperature. tekmarNet® Communication is present. WARNING SYMBOL Indicates an error is present. ARROWS Adjust the displayed setting.
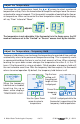
Adjust the Temperature To change the set temperature, touch the or arrows to select a preferred temperature setting. Press the home button to accept the setting or leave the screen untouched for several seconds. This thermostat is capable of controlling the floor or air temperature. When set to control the floor temperature alone, the large display will say “Floor” instead of “Room”.
Mode Heat or Off Heating operation can easily be turned off by selecting the “Off” mode. Touch the Mode key on the screen to change between Heat and Off. The temperature is not adjustable while the thermostat is off. If near freezing temperatures are detected the system will operate to maintain 40°F (4.5°C), even in the Off mode. or Secondary Temperature Display This thermostat can display the outdoor, floor or room set temperature in the smaller number area at the top right of the screen.
Programmable Schedule - Day and Night This thermostat is capable of running at a lower temperature setting when you are asleep or out of the building. When the schedule setting is on, day and night temperature settings will display on the screen. If you adjust the temperature while the sun is displayed, the day setting changes. If you adjust the temperature while the moon is displayed, the night setting changes.
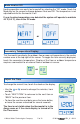
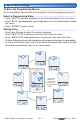
Program Menu Settings To Enter the Programming Menus --------------------------------------------------Press and hold the Home button for 3 seconds to enter the programming menus. Select a Programming Menu --------------------------------------------------------• Touch “NEXT” to advance (clockwise in the illustration below) to the next menu. • Touch “BACK” to go backwards (counterclockwise in the illustration below) through the menus. • Touch “ENTER” to enter a menu.
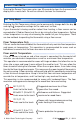
Screen Clean Menu Entering the Screen Clean menu gives you 30 seconds to clean the thermostat and display with a moist cloth. Do not use solvents to clean the thermostat. Set Temp Menu Entering the Set Temp menu allows you to permanently change both the day and night temperature settings for the room and / or floor. If your thermostat is being used for radiant floor heating, a floor sensor can be connected to it. Radiant floors heat the air by raising the floor temperature.
Time Menu Settings Set date, month and year Required for daylight savings time. Daylight Save Automatic daylight saving time update for the spring and fall. Time Mode Select either 12 or 24 hour time format. Clock Select on to display the time clock in the Home menu (available when schedules are not used). Schedule Menu Settings Lowering the room temperature setting reduces the amount of fuel required to heat the building resulting in energy savings.
Schedule Menu Settings (Continued) The schedules can be repeated every: • 24 hours • 7 days (week) A 7 day schedule allows a unique time to be set to change the temperature for each day of the week. The schedule also includes a “SKIP” option that allows the programmable schedule to skip a temperature change and remain at the previous temperature setting. The “SKIP” setting can be found between 11:50 PM (23:50 hours) and 12:00 AM (0:00 hours).
Monitor Menu The monitor menu allows you to view the following temperatures and running hours: • Outdoor temperature highs and lows • Room temperature highs and lows • Floor temperature highs and lows (requires floor sensor to be installed) • Heat W1 = Number of hours the thermostat is actively heating the room To clear the temperature highs and lows or the running hours: 1. Touch the temperature or running hours. 2. Display will show “ ”. 3. Touch Enter.
Frequently Asked Questions Symptom Look for... Corrective Action indicates heat is on. If the is displayed and there is no heat, contact your heating professional. No heat MODE No or The thermostat is in the Off mode. Touch the mode key to change to Heat. Touch the ‘Cancel Away’ key on the display. key Heat on before scheduled time Optimum Start is on and has turned on the heat in advance of your schedule change.