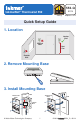
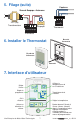
552_Q 02/14 tekmarNet® Thermostat 552 Zoning Replaces: 12/13 Quick Setup Guide 1. Location Interior Wall Behind Door 5 feet 1.5 m Exterior Wall 2. Remove Mounting Base 3.
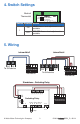
4. Switch Settings 1051-03 1051-03 1 2 3 witch Settings: Setback nlock ock Lock Scene ffsed Back of Thermostat ON 1 2 ool Master 1 None ON Switch Settings tekmarNet tNt 552 One Stage Heat Thermostat 552 Mmm YYYY / Lot # 12345 One Stage Heat / www.tekmarcontrols.com Power: 24 V ±10% 50/60 Hz 1.7 VA P N2 24 V ( ) 10% 1 8 VA Switch Position Action ON LOCK Access level adjustment is not available. OFF UNLOCK Access level adjustment is available. 1 5.
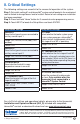
5. Wiring (Continued) Sensors Standalone - Zone Valve L R N C No Power S1 Com S2 24 V (ac) Transformer tN4 C R tN2 tN2 Rh W1 Thermostat Valve Thermostat 6. Install Thermostat Thermostat Base Thermostat Front Push 7. User Interface Display the Floor or Outdoor temperature Adjust the Time Adjust the Schedule Room Temperature Away Key Adjust the Temperature Turn the Heat on or Off Home Button. Return to the ‘Home’ Screen from any menu.
8. Critical Settings The following settings are essential to the successful operation of the system. Step 1: Set switch setting #1 and tekmarNet® system control located in the mechanical room to Unlock to change Access level to Installer. Return to Lock setting once installation has been completed. Step 2: Press and hold “Home” button for 3 seconds to enter programming menus. Step 3: Touch NEXT to locate the Setup Menu and touch ENTER.
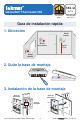
52_Q 02/14 tekmarNet® Thermostat 552 Zonage Remplace: 12/13 Guide d'installation rapide 1. Emplacement Mur intérieur Derrière porte 5 pi. 1,5 m Mur extérieur 2. Retirez la base de montage 3.
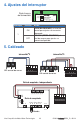
4. Réglages des commutateurs 1051-03 1051-03 1 2 3 witch Settings: Setback nlock ock Lock Scene ffsed Dos du thermostat Switch Settings ON 1 2 ool Master 1 None ON tekmarNet tNt 552 One Stage Heat Thermostat 552 Mmm YYYY / Lot # 12345 One Stage Heat / www.tekmarcontrols.com Power: 24 V ±10% 50/60 Hz 1.7 VA P N2 24 V ( ) 10% 1 8 VA Commutateur Position Action ON VERROUILLAGE Le réglage du niveau d'accès n'est pas disponible. OFF DÉVERROUILLAGE Le réglage du niveau d'accès est disponible.
5. Filage (suite) Capteurs Zone de Soupape - Autonome L R N C Power PasNo d’alimentation S1 Com S2 24 V (ca) Transformateur tN4 C R tN2 tN2 Rh W1 Soupape Thermostat Thermostat Base de thermostat 6. Installer le Thermostat Façade du thermostat Poussoir 7.
. Paramètres critiques Les paramètres suivants sont essentiels au bon fonctionnement du système. Étape 1: Définir le réglage du commutateur sur #1 et le système de contrôle tekmarNet® situé dans la salle mécanique sur Déverrouiller pour changer le niveau d'accès à l'installateur. Retour pour Verrouiller réglage, une fois l'installation terminée. Étape 2: Appuyez et maintenez le bouton «Home» pendant 3 secondes pour entrer dans les menus de programmation.
552_Q 02/14 tekmarNet® Thermostat 552 División en zonas Remplazado por: 12/13 Guía de instalación rápida 1. Ubicación Pared interior Detrás de la puerta 5 pies 1,5 m Pared exterior 2. Quite la base de montaje 3.
4. Ajustes del interruptor Parte trasera del termostato Interruptor Posición 1 2 3 witch Settings: Setback nlock ock Lock Scene ffsed 1051-03 1051-03 ON 1 2 ool Master 1 None ON Switch Settings tekmarNet tNt 552 One Stage Heat Thermostat 552 Mmm YYYY / Lot # 12345 One Stage Heat / www.tekmarcontrols.com Power: 24 V ±10% 50/60 Hz 1.7 VA P N2 24 V ( ) 10% 1 8 VA Acción ON LOCK (BLOQUEADO) el nivel de acceso para ajustes se encuentra bloqueado.
5. Cableado (continuación) Sensores Válvula de zona – Independiente L R N C No Power S1 Com S2 24 V (ca) Transformador tN4 C R tN2 tN2 Rh W1 Válvula Termostato Termostato 6. Instalación del termostato Base del termostato Frente del termostato Eempuje 7.
8. Ajustes críticos Las siguientes configuraciones son esenciales para que el sistema trabaje de manera correcta. Paso 1: Desbloquee (opción UNLOCK) el ajuste número uno del interruptor y del control del sistema tekmarNet® para cambiar el nivel de accesibilidad a Instalador. Cámbielo nuevamente a Bloquear (opción Lock) luego de finalizar la instalación. Paso 2: Mantenga presionado el botón “Home” por 3 segundos para ingresar a los menús de programación.