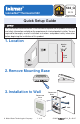
532_Q 02/15 tekmarNet® Thermostat 532 Zoning Replaces: New Quick Setup Guide The information contained herein is not intended to replace the full product installation and safety information available or the experience of a trained product installer. You are required to thoroughly read all installation instructions and product safety information before beginning the installation of this product. 1. Location Interior Wall 5 feet 1.5 m Exterior Wall 2. Remove Mounting Base 3.
4. Installation to Gang Box Stud Adapter Plate 012 Thermostat Base Thermostat Front 3 1/4” (83 mm) Gang Box 5. Wiring Install field jumper wire R to Rh Zone Valve RC tN4 C R tN2 tN2 Rh W Optional Slab Sensor 079 No Power Com S1 S2 T T Boiler LN 6. Switch Settings 7.
8. Settings The following settings are essential to the successful operation of the heating system. Press + Together • Press and hold down both the and buttons for 3 seconds to change from one step to the next. • Release both buttons once the step has been reached. • Press the or the button to change the setting, if available. • Press and hold down both the and buttons for 3 seconds to go to the next step, OR • After 15 seconds of no button activity, the display goes back to normal operation.
Setting The following settings are available when the thermostat is unlocked. SET LIMIT ROOM MAX Set the max room temperature limit while in the occupied time period. Available when a room sensor is connected. SET LIMIT ROOM MAX Set the max room temperature limit while in the unoccupied time period. Available when a room sensor is connected and a schedule or scenes are selected. SET LIMIT ROOM MIN Set the min room temperature limit for both occupied and unoccupied time periods.
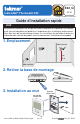
32_Q 02/15 tekmarNet® Thermostat 532 Zonage Remplace: Nouveau Guide d’installation rapide AVIS Les présentes informations ne sont pas destinées à remplacer les informations d’installation et de sécurité complètes du produit ou l’expérience d’un installateur professionnel. Vous êtes tenu de lire attentivement toutes les instructions d’installation et toutes les informationsde sécurité du produit avant de commencer l’installation de ce produit. 1. Emplacement Mur intérieur 5 pi. 1,5 m Mur extérieur 2.
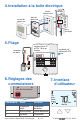
4. Installation à la boîte électrique Goujon Plaque adaptrice 012 Base de thermostat Façade du thermostat 3 1/4” (83 mm) Boite électrique 5. Filage cavalier entre “R” et “Rh”. Mise au champ soupape de zone tN4 C R tN2 tN2 Rh W RC sonde de sol optionnelle 079 No Power Com S1 S2 T T LN 6. Réglages des 7.
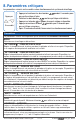
8. Paramètres critiques Les paramètres suivants sont essentiels au bon fonctionnement du système de chauffage. Appuyez + Ensemble • Appuyez et maintenez les deux boutons pendant 3 secondes pour passer d’une étape à l’autre. • Relâchez les deux boutons une fois que l’étape a été atteinte. • Appuyez sur le bouton ou pour changer le réglage si disponible.
Paramètres Les paramètres suivants sont disponibles lorsque le thermostat est déverrouillé. “SET LIMIT ROOM MAX ” - RÉGLER LIMITE MAX PIÈCE JOUR Réglez la température maximale de la pièce pendant la période où elle est occupée. Disponible si un capteur de température ambiante est installé. “SET LIMIT ROOM MAX ” - RÉGLER LIMITE MAX PIÈCE NUIT Réglez la température maximale de la pièce pendant la période où elle est inoccupée.
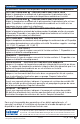
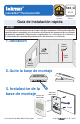
532_Q 02/15 tekmarNet® Thermostat 532 División en zonas Remplazado: Nuevo Guía de instalación rápida AVISO La información de este documento no está pensada para reemplazar la información disponible completa sobre la seguridad y las instrucciones de instalación o la experiencia de un instalador de productos capacitado. Debe leer por completo todas las instrucciones de instalación y la información de seguridad del producto antes de comenzar su instalación. 1.
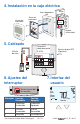
4. Instalación en la caja eléctrica Poste Placa adaptadora 012 Base del termostato Frente del termostato 3 1/4” (83 mm) Caja de electricidad 5. Cableado Conecte el cable de puente R al Rh Válvula de zona tN4 C R tN2 tN2 Rh W RC Sensor de piso 079 (Opcional) No Power Com S1 S2 T T LN 6. Ajustes del 7.
8. Ajustes Las siguientes configuraciones son esenciales para que el sistema de calefacción trabaje de manera correcta. Apretar + al mismo tiempo • Mantenga apretados los botones y por 3 segundos para cambiar de una opción a la siguiente. • Suelte ambos botones una vez que encuentre la opción deseada. • Presione los botones o para cambiar de ajuste, en caso de que esté disponible la opción.
Configuración Los siguientes ajustes están disponibles cuando el termostato está desbloqueado. “SET LIMIT ROOM MAX ” - ESTABLECER LÍMITE MÁXIMO AMBIENTE DÍA Permite establecer el límite máximo de temperatura ambiente en el período ocupado. Disponible cuando está conectado un sensor de ambiente. “SET LIMIT ROOM MAX ” - ESTABLECER LÍMITE MÁXIMO AMBIENTE NOCHE Permite establecer el límite máximo de temperatura ambiente en el período libre.