
Install Instructions

© 2009 D 090 - 07/09 4 of 8
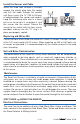
The mounting plate can be fastened to the ground by driving 1/2” (12.7 mm) rebar
through the four holes located on each of the four corners and then tying the
mounting plate to the rebar.
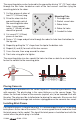
Mounting Plate
1. Drainage hole
2. Socket screw holes
3. Rebar holes
4. Rebar tie holes
5. Conduit tie holes
3 3
3 3
4 4
4 4
5
2
1
2
2 2
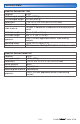
4) Form a “U” shape and pull wire through the rebar tie hole from the bottom to
the top side.
5) Repeat by pulling the “U” shape from the top to the bottom side.
6) Repeat (4) and (5) for each of the four corners.
7) Cross the wire, then wrap around the rebar.
8) Twist wire using pliers to tighten.
The mounting plate also has conduit tie holes to allow a cable tie or steel wire to
fasten the conduit to the mounting plate.
Placing Concrete
A plastic plug is provided with the socket to prevent it from being accidentally filled
with concrete. The plastic plug is the same thickness as the sensor flange. This
allows the finished surface of the concrete (asphalt, etc.) to be troweled flush with
the plug. The plug must be installed prior to placing the concrete. Also ensure that
the mounting plate drainage hole remains unplugged once the concrete has cured.
Installing Brick Pavers
If using brick pavers instead of concrete, it is recommended to mortar surrounding
brick pavers to the side of the socket. This ensures good thermal conduction from
the brick pavers to the socket. The top of the brick pavers should be level with the
socket when the plastic plug is installed.
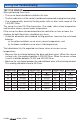
1) Cut four pieces of rebar at
least 12” (300 mm) long.
2) Drive the rebar into the
ground through each of
the mounting plate rebar
holes. Leave approxi-
mately 2” (50 mm) of rebar
above the ground.
3)
Cut several 12” (300 mm)
pieces of steel wire.