LABELVIEW T E K LY NX U ® S E R G U I D E ™
The information contained in this guide is not of a contractual nature and may be subject to change without prior notice. The software described in this guide is sold under a license agreement. The software may be used, copied or reproduced only in accordance with the terms of the agreement. No part of this guide may be copied, reproduced or transmitted in any form, by any means or for any purpose other than the purchaser’s own use without the written permission of Teklynx Newco SAS.
Table of Contents ABOUT THIS MANUAL ................................................................................................................................. VII TYPOGRAPHICAL CONVENTIONS ......................................................................................................................... VII ABOUT YOUR PRODUCT ...................................................................................................................................... VII INTRODUCTION...................
LABELVIEW User Guide VARIABLE OBJECT CREATION ............................................................................................................................. 34 PRINTING........................................................................................................................................................... 37 A POWERFUL PRINT ENGINE ................................................................................................................................
About this manual Typographical conventions This manual distinguishes between different types of information using the following conventions: Terms taken from the interface itself, such as commands, appear in bold. Key names appear in all caps. For example: ''Press the SHIFT key.'' Numbered lists indicate that there is a procedure to follow. When the conjunction -or- appears next to a paragraph, it means there is the choice of another procedure for carrying out a given task.
Introduction Welcome! Congratulations, you have just purchased the world’s leading automatic identification software package! This label design software allows you to quickly create and edit complex labels, and allows you to integrate all of the electronic data from across your company, guaranteeing the full integrity of all your systems. The application meets all your automatic identification needs, and fits seamlessly into your production process.
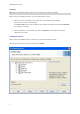
LABELVIEW User Guide Installation Note: Before installing this software, please save your work and close all other programs. Before running the installation program, check the configuration of your PC. 1. Place the CD for the installation in the correct drive. The Installation window appears. If this CD does not start up automatically: Go to Start > Run and then type the letter of the CD-ROM drive followed by the filename index.hta (for example D:\index.hta). 2.
Introduction License activation Your software can be activated using a software key (an activation code) or a hardware key (a dongle). The dongle is a small electronic device that you plug into your PC’s parallel or USB port before launching the software. Without the hardware protection key, the program will run in evaluation mode. You will not be able to save your labels, 'e' will be replaced with 'x', '0' will be replaced with '5', and images will be crossed when printing.
LABELVIEW User Guide 2. For Windows XP and Server 2003: Enter C:\Program Files\TKI\9\Common\Tools\Dongle\ then type the following command: \HaspDinst.exe -i For Windows 7 64-bit machines: Enter C:\Program Files (x86)\Common Files\TKI\Dongle\ then type the following command: \HaspDinst.exe -i For 32-bit machines: Enter C:\Program Files\Common Files\TKI\Dongle\ then type the following command: \HaspDinst.
Introduction 2. Enter your information in the User Registration form. Click Next. 3. Enter the Serial number and the Password provided with the product and click Next. 4. Click Finish. If any problems were encountered, a message will inform you that the activation has failed and an error message will be displayed.
LABELVIEW User Guide 5. When you receive the Validation code and the Installation code, please start the software to launch the wizard. 6. Select Continue a pending activation and click on Next. 7. Enter the Validation code and the Installation code returned by email and click on Next. 8. Click on Finish. Reset a pending email activation This activation mode can be used if you have not sent the email for activation or if you have lost your license.
Discovering the interface Description of the main window This section presents a general overview of the main interface elements as they appear in the main window at the beginning of a work session. The Menu Bar The Menu bar contains the following options: File, Edit, View, Objects, Data Sources, Tools, Window, and Help. To open a menu 1. Select the menu. 2. Choose the command of your choice. Note: To access a command using the keyboard, use the hot keys.
LABELVIEW User Guide To select a tool Click the button corresponding to the tool. The Title Bar The Title bar displays the name of the software and the name of the current document, or "documentno" if a new document is created. It allows the workspace window to be moved using the mouse. Text formatting toolbar These tools allow you to modify text and/or paragraph formatting, that is, change the font, character size, style options, text wrap, and other elements.. To change the formatting: 1.
Discovering the interface Design toolbar The Design toolbar comprises a number of buttons, each one representing a tool for creating and manipulating objects. Button Name of tool Use Selection tool Selects and manipulates objects of all types. Text generation Creates fixed and variable text. Barcode generation Creates fixed and variable barcodes. Image import Inserts images. External object insertion Inserts objects external to the application.
LABELVIEW User Guide The up and down arrow keys on your keyboard allow you to move up and down the object tree. The + and symbols allow you to expand or shrink the list and display the list of variables associated with each data source or the objects available for each category. About data sources A data source contains a list of variables fed by data from the same source. When you select a data source, you are indicating where the required data is located, and what type of data it is.
Setting up the work environment Choosing a printer Before starting to create a document, you first need to set up your work environment. The first step consists of selecting the printer on which you wish to print your labels. Not all printers share the same characteristics and, as a result, different options are available according to the model of printer chosen. The second step involves choosing your work environment options: for example, interface language, unit of measurement, and so on.
LABELVIEW User Guide To select a printer 1. Choose File > Select printer. You can also click the button or press F5. 2. Select the printer from the list. 3. Click OK. Note: The drivers provided by the application are identified by icon. Adding a printer You can access the Add a printer window using through the File > Select printer > Add. This dialog box allows you to add the printer drivers supplied with the software.
Setting up the work environment 4. Select the LPT1 port, clear the Direct access box and click OK. Note: Direct access transfers control over the port to the software. Allows the software to manage the port, providing faster data transfer and closer control of the printer. Customizing the work environment Your software offers a number of options for customizing your work environment.
LABELVIEW User Guide 3. In the Display font field, click 4. Select the font. 5. Click OK. . To modify the grid scale The grid scale, which is used to align objects, can be modified or disabled. 1. Choose Tools > Configuration. 2. Click the Grid tab. - or Double-click on the vertical ruler to access the Grid tab directly. 3. Select the required grid scale. 4. Select the Display option. 5. Click OK. Note: The unit of measurement used for the grid scale is defined on the Display tab.
Setting up the work environment Document page setup Formatting a document Document templates are created and modified in the Label/Page Setup dialog box. Formatting a document consists of setting the page size, its orientation, the number of labels per row and per column, document size, margins, and distance between labels. You can create your own document templates and save them for future use.
LABELVIEW User Guide 5. Click the Page tab and select the following values: 6. Click on the Margins tab and enter the following values: 7. 8. Page sizing: Automatic Margins: Left: 10 Top: 10 Gap: Between rows: 5 Between columns: 5 Click the Stock tab and enter the following values: Type: Family Name: Layout1 Click OK, then save the label as InstallDir\Samples\Forms\Tutorial\TEST1. Exercise: Designing a CD sleeve: Page setup and creating a custom stock 1.
Setting up the work environment Note: The printer used in this example is a Windows printer. If you want to use a thermal printer, it is possible for error messages to appear during page setup when the printer does not support the size of label defined in this exercise. You will need to modify the values suggested in the exercise. Deleting custom stock When a stock you have created is no longer needed, you can remove it. To remove a customized stock: 1. Choose File > Label/Page Setup.
Creating a document using fixed object Creating and manipulating fixed objects Creating fixed objects involves inserting objects such as text, barcodes, images, lines, rectangles, and circles into your document. Creating objects You can quickly and simply create an object in your document (bar code, image, text, drawing, etc.) using: The Creation toolbar, - or - The Object menu. Note: Each object created is automatically given a name by the application.
LABELVIEW User Guide button down, drag the item to the desired location. Release the left mouse button to place the item on the label. To create a text object A Text object can be one character, one word, or an entire paragraph. Character style and paragraph format can be defined using the Text formatting toolbar or the Text dialog box. To create a text object: 1. On the Creation toolbar, click the Writing button. - or Choose Objects > Text. 2.
Creating a document using fixed object 1. Using the mouse, open the branch of the tree marked with a (pointing to the object selected in the document). For the Text object... Select Press the F2 key, then enter... ''Volume:'' the x coordinate: ''10'' the y coordinate: ''40'' the x coordinate: ''10'' the y coordinate: ''40'' ''Conducted by:'' 4. Select the two text objects and click on the Lock button. Unicode can be used to create labels using a variety of linguistic characters.
LABELVIEW User Guide 5. If necessary, specify the characteristics of the barcode (height, narrow bar width, ratio, check character). 6. Enter the data to be coded in the Data field. 7. Click OK. Note: Certain printers do not have resident barcodes. The Graphic option allows barcodes to be printed despite this. This will slow printing down as barcodes are sent to the printer as graphics. Exercise: Creating a barcode object 1. Open the C:\InstallDir\Sample\RECTODISK1_00.TPL label. 2.
Creating a document using fixed object Width and Height: 20 6. Click OK 7. Go to Object > Layout > Horizontally Centered in Document then Vertically Centered in Document to align the circle with the center of the sleeve. 8. Select the circle then click the Lock button. To import an image Your software allows you to insert images and company logos to help you perfect your label.
Creating a document using variable objects About data sources A data source contains a list of variables populated with data of the same origin. Data sources can be divided into categories and sub-categories except Database data source. When you select a data source, you are indicating where the data you are interested in is located and what type of data you plan to use. The data can be of internal origin (formula, date, counter) or external to the application (database, direct entry).
LABELVIEW User Guide For each of these creation modes: The data source created is automatically displayed under the selected data source. The application gives the data source a default name. Note: Brackets {} cannot be used in a variable name. This procedure applies to all data sources, except variables from the Database data source. To create a database variable, you need to create a query.
Creating a document using variable objects Note: Click to select all fields. Tip: We recommend that you only select the fields that will be used in the label. This reduces the amount of communication with the database, increasing processing speed. 5. Click to view the result. Advanced SQL creation mode 2. Select SQL mode. 3. Enter your query in SQL format in the Edit field, - or Click SQL Query Builder to access the Query Builder.
LABELVIEW User Guide The Table lookup data source Command: Data sources > Table lookup > Add The Table lookup data source contains a list of data sources you have created. The data source values are the result of searches carried out in databases other than those linked to the current document. Searches are carried out in one or more database fields. Data is extracted from one of the record fields found (called the "result field").
Creating a document using variable objects The Date data source Command: Data sources > Date > Add The Date data source contains a list of data sources. These data sources are fed by the computer's date system or by the printer. It allows you to display the date and time in the format previously defined. The values are updated automatically at the start of each print session. You can insert the current date and/or time into a document. You can also add a fixed value to the current date or time.
LABELVIEW User Guide 1. Open a label. 2. Create a counter and name it namecd. 3. Select the counter, then choose Properties from the context menu. 4. Select Decimal as the type of counter. 5. Enter ''1'' in the Increment field. 6. Enter ''1'' in the Initial value field. 7. Click OK. 8. Select the counter, then drag and drop it into the workspace. Select Text in the context menu. 9. Right-click on the counter and choose Properties from the context menu. 10.
Creating a document using variable objects Exercise: Creating a simple formula Displaying the price of a product In this example, the production label must show the price of the product as a function of its weight and the price per kilogram. 1. Open a label. Two variables have to be created: WEIGHT and PRICEPERKG. 2. For the WEIGHT variable, enter 788 (the weight of the product is 788 g) as the Local value, enter ''Please enter the weight in g'' in the Prefix field, then click OK. 3.
LABELVIEW User Guide The When Printed data source Command: Data sources > When Printed > Add The When Printed data source contains a list of variables you have created. These data sources are populated by entering data directly into the form using the keyboard. To display the form The form lets you enter data during design or, most commonly, before printing. To display the form: 1. Open a label containing a When Printed variable. 2. Click the button in the toolbar.
Creating a document using variable objects Modify the order in which data is entered into the form You can change the order in which data is entered into the form. Proceed as follows: 1. Select the form using the mouse. 2. Right-click. 3. Select Start tab ordering. The default numbering appears. 4. Click the number of the field you want to appear first in the form. The number turns green when validated. 5. Repeat step 4 to continue ordering. 6.
LABELVIEW User Guide The Advanced data source Command: Data sources > Advanced > Add The Advanced data source contains a list of data sources you have created. These data sources are populated by data that is not specified upon creation. An Advanced data source can be used to create intermediate data sources. Defining the properties of a Advanced data source 1. In the Input tab, select one of the following options: Local, Shared, or From a file.
Creating a document using variable objects The Object menu You can create an object using one of the following options: Direct mode creation: 1. Click the object you want to insert into your document. 2. Click the location where you want to place the object. The Creation wizard will run by default. If the wizard does not automatically launch, double-click the object to open the Properties dialog box. 3. Click the Data sources tab. 4. Select Variable. 5.
LABELVIEW User Guide The Creation Wizard will run by default. If wizards are disabled, double-click the object to bring up the Properties dialog box. 3. Click the Data sources tab. 4. Select Variable. 5. Select the variable you want to assign to your object, right-click and select Add. - or Click New, then select the variable you want to add. - or - Guided mode creation: 1. Click the menu button for your object. A submenu is displayed showing the actions you can take. 2.
Printing A powerful print engine Your software is a powerful, user-friendly creation tool and a print engine, bringing together the widest possible range of printers (thermal, thermal transfer and inkjet). Whether printing a single label, a series of labels, or multiple copies of the same label, all print commands are grouped together in the Print dialog box. LABELVIEW also allows you to install and control printers located anywhere on your network.
LABELVIEW User Guide Type: Decimal Increment: +1 Min value: 0 The first counter identifies a particular label, whereas the ISO counter counts the total number of labels printed. Labels in the series In this example, we are going to print a series of 10 labels: 1. Enter the following values in the Print dialog box: Labels: 10. This means that there are 10 different labels in the series. 2. Click Print.
Printing 5. Go to File > Page Setup or click . The Page Setup dialog box opens. The preview gives you an idea of how the page will look when it is printed. 6. Close the dialog box. 7. Click 8. Enter the following values: 9. . Labels: 8 Copies of each page: 2 Click Print. The result will be: Exercise: Print Merge Print Merge is only available if your label is linked to a database (ASCII or ODBC). The Merge function prints all the records contained in the database.
LABELVIEW User Guide Printing using the form 1. Go to File > Print or press the F6 key. 2. Enter ''2'' in the Labels field. 3. Launch printing. The form is displayed, and you can enter the data to be printed. 4. Enter ''Smith'' and ''51'', then click OK. After the first label is printed, the form is displayed again. 5. Enter ''Mullang'' and ''52'', then click OK. Note: The form is displayed for each label contained in the series.
Printing specifications of your printer (refer to the printer manufacturer’s manual). In both cases (serial or Check the connection. parallel):The cable is connected to the wrong port. In both cases (serial or Check the connection. parallel):The cable is connected to the wrong port. A page is not printed For direct thermal printing: The Reinsert the media the right way. print media has been inserted the wrong way (the print head is heating the wrong side of the paper).
United States 1-414-837-4800 France 33-562-601-080 Germany 49-6103-30026-0 Singapore 65-6477-7293 China 86-21-6100-6588 Japan 81-45-461-3603 Copyright 2012 Teklynx Newco SAS. All rights reserved. Printed in the USA 06/12. TEKLYNX and LABELVIEW are trademarks of Teklynx Newco SAS. All other brands and product names are trademarks of their respective owners. www.teklynx.