
User guide

Creating a document using variable objects
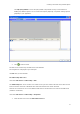
5. Click th
e Test button to display the result in the Query dialog box.
The Date data source
Command: Data source > Date > Add
The Date data source contains a list of data sources created. These data sources are fed by the computer's
date system or by the printer. It allows you to display the date and time in the format previously defined. The
values are updated automatically at the start of each print session.
You can insert the current date and/or time into a document. You can also add a fixed value to the current date
or time.
Defining the properties of a Date data source
1. In the Date tab, select the desired format for the date and time.
2. The date format is displayed in the Preview zone.
3. Click OK.
Demonstration: Inserting a date
1. Open a label.
2. Add a Date data source and name it datefab.
3. Compose the date in the Date dialog box. It must be in the dd/mm/yy format. To add separators, enter the
''/'' character in the text box in the lower left of the dialog box, then click Add.
3. Click OK.
4. Select the Date (datefab) then drag and drop it into the workspace.
5. Choose Text in the context menu.
The Counter data source
Command: Data source > Counter > Add
The Counter data source contains a list of data sources you have created. These data sources are populated by
data calculated either by the computer, or by your printer.
The content of the data source changes as printing advances, according to an initial value and an increment
value.
Defining the properties of a Counter data source
1. Select the type of counter.
If you want to use a type of counter other than those displayed in the list, choose the Custom option
and enter a customized sequence.
2. Enter a value in the Increment box. By default, the increment is +1.
3. Enter a start value in the Current value box. By default, the value is 0.
4. Click OK.
29