
User's Manual

TEKCOM Industries Limited
Page 5 of 7
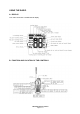
Dual Watch
Press and release the DW/TRI button to activate the Dual Watch mode. The DUAL indicator
appears on the LCD. Dual Watch monitors the current working channel and Channel 16 in cycle.
Dual Watch is demonstrated in the figure to the left; the sample working channel is CH 72.
Press and release the DW/TRI button to terminate Dual Watch and return to the previous working
channel.
Press and hold the DW/TRI button to terminate Dual Watch mode and go into Tri Watch mode.
Press and release the 16/9 button to terminate Dual Watch mode and switch to the Priority
channel.
Note: During Dual Watch mode, the SCAN and Channel ▲/▼ (UP/DOWN) button are inactive and sounds an
error beep if pressed.
Tri Watch
Press and hold the DW/TRI key for 3 seconds to activate Tri Watch mode. The TRI indicator
appears on the LCD. Tri Watch monitors in cycle Channel 16, the current working channel and the
channel you have set as the Favourite (PLUS) Channel. Tri Watch is demonstrated in the figure to
the left; the sample working channel is CH 72.
Press and release the DW/TRI button to terminate Tri Watch and return to the previous working
channel.
Press and release the 16/9 button to terminate Tri Watch mode and switch to the Priority
Channel.
Note: During Tri Watch Mode, the SCAN, and Channel ▲/▼ (UP/DOWN) keys are inactive and sounds an
error beep if pressed.
Resetting the Radio
You can reset many radio settings back to their factory defaults, this will:
• Erase any channels stored in memory
• Return to International channels, if another mode is selected
• Turn OFF the Weather Alert setting, if active
• Return power settings to their original state
To perform the reset:
1. Turn the radio OFF.
2. Simultaneously press and hold the SCAN & WX/BAND button.
3. While continuing to hold these keys, power the radio ON.
The LCD remains blank for 2 seconds, and then the unit switches to channel 16.
Attaching and Charging Your Battery Pack
Before attaching the pack, you should detach the belt clip first, then aligningly place the pack on
the unit and secure it using the supplied screw.
The design of the battery pack let you can charge it either when it is attached on the radio or being
detached. You should use the supplied specialized desktop charger to charge it (either 7.2V or
12V Ni-MH battery pack) for 14~15hrs. To charge, plug the charger cable into a standard wall
socket and the other terminal to the charger cradle, place the radio/battery pack mounting on the
charger pedestal firmly to start the charging, accompanied by lighting of the charging indicator
LED.