
User Manual


Prepare to Invert
BEFORE USING THE INVERSION TABLE
Make sure the inversion table rotates smoothly to the fully inverted position and back, and that all fasteners are secure. Ensure that there is
adequate clearance to rotate in front, above and behind you.
WARNING
!
FAILURE TO PROPERLY SECURE THE ANKLES COULD RESULT IN SERIOUS INJURY OR DEATH!
ALWAYS
check that the Ankle Lock
System is fully engaged in a hole setting that brings the Cups to a snug, close t against the smallest part of the ankles.
ALWAYS
wear
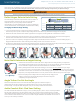
securely tied, lace‑up shoes with a at sole, such as a tennis shoe. DO NOT wear shoes with thick soles, boots, high‑tops or any shoe that
extends above the anklebone, as this type of footwear could interfere with properly securing your ankles. NEVER use the inversion table
face down. DO NOT attempt to invert or lean your upper body against the Table Bed before securing your ankles.
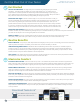
Figure 13 Figure 14
Prior to inverting, properly secure your ankles by following these steps:
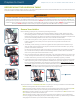
1. With your back to the Table Bed, and using the handles to steady yourself, carefully step onto
the boarding platform to stand next to one side of the Main Shaft (the A‑Frame Crossbar will be
behind your legs) (Figure 10). Lift the foot closest to the Main Shaft over the Ankle Lock System and
place it on the Boarding Platform on the other side, to straddle the Main Shaft.
2. If the Ankle Lock System is closed, grasp the Deluxe EZ‑Reach Handle and depress the blue
button. Pull slightly closed, then push out to open it all the way. Release the handle in the
open position.
3. To balance yourself, rest only your lower body against the lower portion of the Table Bed as you
slide one ankle at a time from the side (Figure 11) between the Front & Rear Ankle Cups, placing
your feet on the Ankle Comfort Dial.
Do not insert your foot into the Ankle Lock System as you would slide your foot into a shoe (Figure
11A). Your feet should always be either on the Boarding Platform or on the Ankle Comfort Dial;
never use any other part of the inversion table as a step.
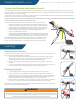
4. Press your ankles back rmly against the Rear Ankle Cups, then slightly rotate the tops of the Cups
so they are angled toward the back of your leg/Achilles tendon (Figure 12). This will allow the Cups
to rotate somewhat as you invert so the cushioned part comfortably supports your ankles.
5. Pull the Deluxe EZ‑Reach Handle towards your legs (Figure 13) and release when the Front & Rear
Ankle Cups t snug, with a close t against the smallest part of your ankles (Figures 14). If there is
too much distance between the Cups and the top of your feet, refer to Ankle Comfort Dial: Find
Your Setting. Jiggle the Deluxe EZ‑Reach Handle from front to back to make sure it has fully
engaged and is locked securely. Verify that no part of your footwear or garments touch or interfere
with the Deluxe EZ‑Reach Ankle Lock System in any way during inversion.
Secure Your Ankles
Employ the method of “HEAR, FEEL, SEE, TEST” every time you secure your ankles in the inversion table:
HEAR the locking Deluxe EZ‑Reach Handle click into place;
FEEL the Deluxe EZ‑Reach Handle to make sure it is fully engaged and locked in its setting, and FEEL
that the Front & Rear Ankle Cups are close‑tting around the smallest part of your ankles;
SEE that the EZ‑Reach Handle is secure, and does not move out of position, and SEE that there is NO
space between your ankles and the Ankle Cups.
TEST the Deluxe EZ‑Reach Ankle Lock System enclosure to ensure that it is snug, close‑tting and
secure by wiggling and attempting to pull your feet through the Ankle Cups. Ensure that you CANNOT
disengage from the Ankle Cups each time before attempting to invert.
Figure 10
Figure 11
Figure 11A
Labeled
right on the equipment!
3
Lock Ankles
Figure 12
FitSpine LX6
™
, LX7
™
, LX8
™
, LX9
™
Inversion Table Owner’s Manual ‑ 3