Legacy 6000 MID-TECH ESC Roadway Management S Y S T E M TM RMS-EXT For The Legacy 6000 USER GUIDE U R G U I D E ® 98-05064
Roadway Management S Y S T E M TM RMS-EXT For The Legacy 6000 USER GUIDE PN - 98-05064 RO
RMS -EXT for the Legacy 6000 Software Version 2.00 Chapter 1 - System Introduction ...................................................................................... 1-1 System Introduction ...................................................................................................... 1-2 RMS-EXT & Legacy 6000 System Features............................................................. 1-3 Compatible Rate Controllers ...............................................................................
RMS -EXT for the Legacy 6000 Software Version 2.00 Running Product Setup .............................................................................................. 3-9 Chapter 4 - Real-time Operation...................................................................................... 4-1 Product Application....................................................................................................... 4-2 Real-time Pages ..........................................................................
RMS -EXT for the Legacy 6000 Software Version 2.00 Exiting Real-Time Operation ..................................................................................... 5-18 RMS-Map Manager .................................................................................................
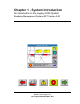
Chapter 1 - System Introduction An introduction to the Legacy 6000 System. Roadway Management System-EXT Version 2.
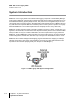
RMS -EXT for the Legacy 6000 Software Version 2.00 System Introduction RMS-EXT on the Legacy 6000 is the real-time data logging component of the Roadway Management System. RMS-EXT combines rate controller data with vehicle positions generated from an on board Global Positioning System (GPS) receiver, and produces an "as applied" map of the vehicle’s activity during a spraying session.
RMS -EXT for the Legacy 6000 Software Version 2.00 RMS-EXT & Legacy 6000 System Features • Coverage Page - this page displays the vehicle trajectory and spray application coverage in real-time, • Booms Page - this page displays the vehicle swath dynamics, such as which swaths are activated.
RMS -EXT for the Legacy 6000 Software Version 2.00 Legacy 6000 Console The Legacy 6000 console runs RMS-EXT software and operates in a Windows CE environment (Windows CE is a product of Microsoft); an extremely dependable and stable operating system. Operation is intuitive, with on-screen menu choices and prompts. An on-board help menu is built in. The heart of the Legacy console is an Intel processor operating at 206 Megahertz for maximum efficiency.
RMS -EXT for the Legacy 6000 Software Version 2.
RMS -EXT for the Legacy 6000 Software Version 2.
Chapter 2 - Getting Started Setting up RMS-EXT for the Legacy 6000. RMS-EXT Version 2.
RMS-EXT for the Legacy 6000 Software Version 2.00 Software Overview This chapter assumes that the Legacy 6000 hardware has been properly installed and clean, reliable power has been supplied. Powering Up To power up the Legacy 6000 console, press the orange button to the left side of the console faceplate (Figure 2-1). When the Legacy 6000 console is powered up, RMS-EXT for the Legacy 6000 automatically starts. The first software page is the Main RMS-EXT Launcher (Figure 2-2).
RMS-EXT for the Legacy 6000 Software Version 2.00 Standard Pages Three basic types of software pages are used in RMS-EXT for the Legacy 6000: a Launcher page (Figure 2-3), a Setup Menu page (Figure 2-4), and a Data Entry page (Figure 2-5). Each is described in more detail below. Each of these page types has its own help window, which displays information about a button or area of the page that is highlighted.
RMS-EXT for the Legacy 6000 Software Version 2.00 Software version, page name, and number Help Window Highlighted Button Figure 2-3: Example of a Launcher Page Setup Menu Page A Setup Menu page (Figure 2-4) is a page that contains all of the setup parameters associated with a particular setup theme, such as GPS Receiver. A Setup Menu page is divided into three columns, Left, Center, and Right. The Left and Right columns are made up of software buttons adjacent to a physical key on the console.
RMS-EXT for the Legacy 6000 Software Version 2.00 To exit the setup without saving changes, press the Back Arrow button located at the top of the left column. To exit and save any changes made, press the Forward Arrow at the top of the right column. Either of these exit methods returns you to the launcher page that the setup menu was accessed from.
RMS-EXT for the Legacy 6000 Software Version 2.00 next character space in the dialog box. Use the left and right arrow keys to move across the character spaces and edit existing entries. If entering a numeric value, use the decimal point in the character set to set the number of digits to the left and right of the decimal point, (E.G. 0.254, 1.00, 10.0, 100.463). This allows you to set the required significant digits.
RMS-EXT for the Legacy 6000 Software Version 2.00 Left most character space in the data entry dialog box.
RMS-EXT for the Legacy 6000 Software Version 2.00 System Setup System Setup allows you to configure the Legacy 6000 to best suit job requirements. To access the System Setup launcher, press the top left button in the Main Launcher page (Figure 2-2) (The help text should say Configure System Settings). This brings up the System Setup Launcher page (Figure 2-7). The table below lists the current system components that you can configure through this page.
RMS-EXT for the Legacy 6000 Software Version 2.00 to save and exit Console Setup. Press the Back Arrow to exit without saving any changes. It is recommended that you set the correct date and time prior to any product application and data collection. . Figure 2-8: The Console Setup Menu Page Setting Units Language Description Defines the system units; Metric or US. Defines the system language. Speaker Sets the system speaker option; internal or external. Volume Sets the speaker volume.
RMS-EXT for the Legacy 6000 Software Version 2.00 GPS Receiver Setup GPS Receiver setup defines the DGPS accuracy and how the GPS receiver communicates with the Legacy 6000 console. Table 2-3 lists the GPS Receiver setup parameters. To access GPS Setup from the Main Launcher page (Figure 2-2), select System Setup (Figure 27) / GPS Receiver Setup (Figure 2-9). To change any of the GPS Receiver settings, highlight the setting name listed in the center column of the GPS Receiver Setup page and press Enter.
RMS-EXT for the Legacy 6000 Software Version 2.00 Vehicle Setup Vehicle Setup allows you to select the spray configuration profile from an imported list. To access Vehicle Setup from the Main Launcher page (Figure 2-2), select System Setup (Figure 2-7) / Vehicle Setup(Figure 2-10) Figure 2-10: The Vehicle Setup Page Setting Description Spray Config The name of the Spray Configuration profile that was created in RMS Office and imported into the Legacy 6000.
RMS-EXT for the Legacy 6000 Software Version 2.00 Figure 2-11: Spray Configuration Page Backing up System Files This completes the System Setup process for RMS-EXT for the Legacy 6000 console. It is important to backup the system files to the PC card as soon as System Setup is completed. For more information on backing up the system configuration, see “Device Manager” on page 2-14.
RMS-EXT for the Legacy 6000 Software Version 2.00 System Tools System Tools allows you to perform some basic system diagnostics. System Tools is accessed from the Main Launcher page (Figure 2-12). To access the System Tools launcher, press the Tools button in the Main Launcher page (the help text should say View System Tools). This brings up the System Tools launcher page (Figure 2-13). Table 2-5 below lists the current System Tools.
RMS-EXT for the Legacy 6000 Software Version 2.00 Tool Device Manager Card Manager Description This tool allows the viewing of all components on the Legacy system, including the Mid-Tech CAN Bus, external rate controller, and GPS receiver. This application runs in conjunction with the PC card. The card must be inserted to run this application. Card manager allows basic file manipulation.
RMS-EXT for the Legacy 6000 Software Version 2.00 listing the console serial number and version number (Figure 2-15). Figure 2-15: The Console Information Page Button Description System File Backup. Press to back up the console system files to the PC card. Update Console System Files. Press to update or restore the console system files with system files located on the PC card.
RMS-EXT for the Legacy 6000 Software Version 2.00 Required Items: • 20 Meg (or larger) ATA Flash PC Card CAUTION: Always make sure that the console is powered off before inserting or removing the PC card. With the console powered down, insert a blank PC card into the Legacy 6000 console and power up the console. From the Main Launcher page (Figure 2-12), select System Tools (Figure 2-13) / Device Manager (Figure 2-14) / Console (Figure 2-15) / Backup Console System Files.
RMS-EXT for the Legacy 6000 Software Version 2.00 GPS Receiver This tool allows the viewing of any GPS data coming into the com port of the Legacy 6000. We recommend that you run this diagnostic the first time that you connect the GPS receiver to the Legacy 6000 console. To access the GPS Receiver diagnostic page from the Main Launcher page (Figure 2-12), select System Tools (Figure 2-13) / GPS Receiver (Figure 2-16).
RMS-EXT for the Legacy 6000 Software Version 2.00 Button Description Create a New Folder - Press to create a new folder at the current location on the PC card. When this button is pressed, a prompt appears requesting the name the folder. Move Up - Press to close the current folder and move up one folder level (This button only appears if you are in a sub-folder). To move down a folder level from the current position, highlight the desired folder name in the File/Folder list and press the Enter key.
RMS-EXT for the Legacy 6000 Software Version 2.
RMS-EXT for the Legacy 6000 Software Version 2.
Chapter 3 - Real-time Setup Setting up RMS-EXT Legacy 6000. RMS-EXT Version 2.
RMS-EXT for the Legacy 6000 Software Version 2.00 RMS-EXT Real-Time Setup This Chapter covers setting up RMS-EXT for real-time operation. Prior to starting real-time operation, we recommend that “Chapter 4 - Real-time Operation” be reviewed. When the System Setup process is complete (see System Setup on page 2-8), real-time setup can begin. Do this by pressing the Bull’s-eye located on the RMS-EXT Main Launcher page (Figure 31).
RMS-EXT for the Legacy 6000 Software Version 2.00 Real-time Setup Steps Step Description Job: When you press the ARM Bull’s-eye button, the Job page appears. Select or create the desired job. There must be a PC Card in the console to store a job. Press the forward key to continue to the ARM Launcher page. Report Setup: If creating an application report, run Report Setup to enter Agency, Operator, and Driver information. The Agency and Personnel profiles contain this information.
RMS-EXT for the Legacy 6000 Software Version 2.00 Setting up a Job Pressing the Bull’s-eye button in the RMS-EXT Main Launcher brings up the Job page (Figure 32). You must have a PC card installed to create a job and store application and trajectory data. Each Job, created with a unique job id, has an associated file folder, named after the job id and placed at the root of the inserted PC card. All data files associated with a job are stored in this folder on the PC card.
RMS-EXT for the Legacy 6000 Software Version 2.00 Creating a New Job To create a new job, press the “Create a New Job” button in the Job page. This brings up the Create a New Job page. There are two methods of creating a new job: manually and automatically. Manually Naming a Job To manually name a job, highlight the text entry window (Figure 3-3) and use the arrow keys enter a name for the job. A job name can contain alpha/numeric characters.
RMS-EXT for the Legacy 6000 Software Version 2.00 ARM Launcher With the appropriate Job name selected, press the Forward Arrow in the Job page to move to the ARM Launcher page (Figure 3-4). You can launch several applications, required prior to starting real-time product application, from this page. Each real-time setup application is discussed in detail below.
RMS-EXT for the Legacy 6000 Software Version 2.00 on the Legacy 6000. All profiles are created in RMS Office. Figure 3-5: The Job Report Page Report Setup Menu Items Item Description Agency The Agency that the job is for. From Agency profile. Operator The person performing product application. From Personnel profile. Driver The person driving the vehicle. From Personnel profile.
RMS-EXT for the Legacy 6000 Software Version 2.00 Figure 3-6: The ARM Setup Page Arm Setup Menu Items Setup Item Map File (.GMF) Base Map File Collection Interval Alarm Alarm Range Description A Map file stores additional field features that it might be necessary to locate during product application. Select any base map file to view in the background. Set the time interval for writing data to the record file. Typically this is set to1 second.
RMS-EXT for the Legacy 6000 Software Version 2.00 Running Product Setup Make Product to tank assignments in Product Setup. The number of tanks is determined automatically from the Vehicle profile. Only products entered in the Chemical profile are available in this dialog. This includes product mixes as well. You cannot create a product mix in Product setup. You must import the Chemical profile from RMS Office prior to running Product setup.
RMS-EXT for the Legacy 6000 Software Version 2.
Chapter 4 - Real-time Operation Operating RMS-EXT for the Legacy 6000. RMS-EXT Version 2.
RMS-EXT for the Legacy 6000 Software Version 2.00 Product Application When the Real-time Setup process is complete (see “Chapter 3 - Real-time Setup), product application can begin. This is accomplished by pressing the ARM Bull’s-eye located on the ARM Main Launcher page (Figure 4-1). ARM Bull’s-eye soft-key Figure 4-1: The ARM Launcher Page When the ARM Bull’s-eye soft-key is pressed, the RMS-EXT software loads all setup information. This loading process may take a few seconds to complete.
RMS-EXT for the Legacy 6000 Software Version 2.00 soft-keys. See Table 4-2 for a description of each soft-key. When viewing the Rates page, the right column contains various utility soft-keys, such as an Alternate Rates page soft-key and the Alarm Off soft-key. The Rates Page The Rates page displays various information related to the product and associated rate controller. Included are the product name at the top of the page, as well as the current rate, current speed, material applied, and area applied.
RMS-EXT for the Legacy 6000 Software Version 2.
RMS-EXT for the Legacy 6000 Software Version 2.00 The Map Page Pressing the change page soft-key, from the Rates page, moves to the next real-time mapping page; the Map Page. The Map page has two views: the Coverage View and the Product View. Each is described in more detail below. All mapping and operation related soft-keys are displayed in the right column of the page. See Table 4-2 for a description of each soft-key displayed in a real-time page.
RMS-EXT for the Legacy 6000 Software Version 2.00 Option Description Coverage View This view shows general application coverage (see “The Coverage View” on page 4-9). Product View This view shows product specific status (see “The Product View” on page 4-10). Data Zoom When activated, the map page uses collected data, not the background map, as its Zoom extents. Show Base Map When activated, the base map file appears in the background. When turned off, the base map file does not appear.
RMS-EXT for the Legacy 6000 Software Version 2.00 Real-time Soft-key Descriptions Soft-key Description The Exit soft-key. Press to exit the real-time process and return to the Main ARM Launcher page. The Next Page soft-key. Press to alternate between the Map page, Boom Status page, and Rates page. The Alternate Rates Page soft-key. Press to view additional product information, such as sensor and monitor status and current implement width. The Mute Alarm soft-key. Press to silence an alarm.
RMS-EXT for the Legacy 6000 Software Version 2.00 Soft-key Description The Course on Ground (COG) View soft-key. This view page option keeps the vehicle stationary in the view page with the heading (course) of the vehicle pointing to the top of the view page. When pressed, this soft-key changes to the North Up View soft-key. The Center Vehicle soft-key. Press to center the vehicle in the map page. Generate Object soft-key. Press to activate a pop-out menu.
RMS-EXT for the Legacy 6000 Software Version 2.00 The Coverage View The Coverage Page displays the vehicle, moving in real-time, and the spray area that has been applied. The Basemap file and the Background file images, selected in ARM Launcher, appear here also. (Figure 4-6) shows the current coverage for the spray session. Sprayed areas are represented by a solid Purple line, with Red on the side of the road that was sprayed. Notice in this figure that both background images are present.
RMS-EXT for the Legacy 6000 Software Version 2.00 The Product View Selecting Product view from the Options menu changes the Map page from Coverage view to the Product view. This view displays the boom activity for a specified product. To view a specific product, press a product soft-key on the left side of the page. Each soft-key displays the name of the product and the current rate. Figure 4-7 shows the view for the carrier Water.
RMS-EXT for the Legacy 6000 Software Version 2.00 The Boom Status Page Press the Change Page soft-key, from the Map page, to bring up the Boom Status page (Figure 49). This page displays the current boom section status for the vehicle. An active section appears in Bright Green while an inactive section appears in Gray (Figure 4-10).
RMS-EXT for the Legacy 6000 Software Version 2.00 System and Warning Messages RMS-EXT for the Legacy 6000 provides system operation feedback in the form of System messages and Warning messages. This system information appears in the top portion (banner bar) of the rates page and map page. System Message A system message does not obstruct real-time operation.
RMS-EXT for the Legacy 6000 Software Version 2.00 Warning Message A warning message does not obstruct real-time operation. When a warning message first appears in the banner bar, the banner bar color changes to Red and the alarm sounds. To mute the alarm, press the arrow soft-key, in the bottom right corner of the screen, and press the Mute Alarm softkey. The warning message remains in the banner bar until the situation causing the warning is resolved.
RMS-EXT for the Legacy 6000 Software Version 2.00 Mapping Points, Hazards, Weather, & Notes Mapping objects (points, hazards, notes, and weather) during the product application process is another feature of RMS for the Legacy 6000. Access all objects from one soft-key (Figure 4-13). When you press the Map Object soft-key, a map object menu appears on the Map page. Select objects from this menu using the arrow keys. Each object type is described in more detail below.
RMS-EXT for the Legacy 6000 Software Version 2.00 Marking a Point The map object Point soft-key allows you to mark a point at the vehicle location. To map a point, drive to the location of the object or feature being mapped. This location should coincide with the location of the GPS antenna. Press the Map Object soft-key and select the Point symbol. When you press Enter, the Point Name dialog box appears (Figure 4-14).
RMS-EXT for the Legacy 6000 Software Version 2.00 Marking a Hazard Map object Hazard allows a hazard to be marked at the vehicle location. The map object Hazard can be used later in Hazard Detection to notify the operator of potentially hazardous objects or features along an application route. To map a hazard, drive to the location of the object or feature to be mapped. This location should coincide with the location of the GPS antenna.
RMS-EXT for the Legacy 6000 Software Version 2.00 Marking a Note Another feature in RMS-EXT is the ability to create a note about a particular situation and location during real-time product application. To create a note, drive to the location that the note is associated with. Press the Map Object soft-key and select the Note, (Figure 4-13). A Note dialog appears (Figure 4-16). Enter the note text and press enter. A note symbol is placed on the real-time map, (Figure 4-17).
RMS-EXT for the Legacy 6000 Software Version 2.00 Marking a Weather Point It is possible to add a point describing significant weather conditions, such as wind speed and direction, temperature, etc.. To create a weather point, drive to the location that the point is associated with. Press the Map Object soft-key and select the weather symbol, (Figure 4-13). The weather wizard dialog appears (Figure 4-18). Select the appropriate conditions and press enter.
RMS-EXT for the Legacy 6000 Software Version 2.00 Exiting Real-Time Operation To exit real-time operation, press the Exit button located at the bottom left corner of the current page. If data is being stored to the PC card, the exiting process may take a minute or so to properly store this data. Exit Soft-Key Figure 4-20: Exiting Real-time Application RMS-Map Manager Some Legacy 6000 system kits include RMS Office for an office computer or laptop.
RMS-EXT for the Legacy 6000 Software Version 2.00 .
RMS-EXT for the Legacy 6000 Software Version 2.
RMS-EXT for the Legacy 6000 Software Version 2.
Chapter 5 - RMS Mapper Mapping Software for Roadside Applications. RMS-EXT Version 2.
RMS Mapper for the Legacy 6000 Software Version 2.00 RMS Mapper Introduction The Mid-Tech RMS Mapper mapping program for the Legacy 6000 allows the mapping of roadways, railroads, power-lines, weed types, and infestations, as well as any other features important to the roadside spraying task. Features can be mapped as points, lines, or polygons. With a submeter GPS receiver, area determination of a mapped polygon is possible to within one-tenth of an acre.
RMS Mapper for the Legacy 6000 Software Version 2.00 Mapper Setup This Section covers setting up the Mapper application for real-time operation. When the System Setup process is complete (see System Setup on page 2-8), real-time setup can begin. Just press the Mapper soft-key located on the RMS-EXT Main Launcher page (Figure 5-1). The steps in the real-time setup process vary, based on how the Legacy 6000 system is configured.
RMS Mapper for the Legacy 6000 Software Version 2.00 Mapper Setup and Operation Steps Soft-key Step Description Start Mapper Application. Press to start the Mapper application. Select or create a job and continue to Mapper setup. Accept Job. Select or create a job and press this soft-key. The Mapper Launcher menu appears. Run Mapper and Road Marker setups or continue on to real-time mapping process. Mapper Setup. Run this setup to name data files and set the data collection rate.
RMS Mapper for the Legacy 6000 Software Version 2.00 Setting up a Job Pressing the Mapper button in the RMS-EXT Main Launcher brings up the Job page (Figure 5-2). You must have a PC card installed to create a job and store application and trajectory data. Each Job created with a unique job id has an associated file folder named after the job id and placed at the root of the inserted PC card. All data files associated with a job are stored in this folder on the PC card.
RMS Mapper for the Legacy 6000 Software Version 2.00 Creating a Job Based on Another Job You can create a new job based on the settings of an existing job. Select the job to be copied in the main job page window, and press the “Create a Job Based on Another Job” button on the Job page. A prompt appears asking you to manually enter a new job name or accept the auto-named job. Creating a New Job To create a new job, press the Create a new Job button in the Job page. This brings up the Create a New Job page.
RMS Mapper for the Legacy 6000 Software Version 2.00 Mapper Launcher When you have selected the appropriate Job name, press the Forward Arrow in the Job page, to move to the Mapper Launcher page (Figure 5-4). There are two setup menus to check and set up to fit mapping needs. Some of the setup parameters must be set each time mapping is started. Each setup menu is discussed in detail below.
RMS Mapper for the Legacy 6000 Software Version 2.00 Mapper Setup All file names, associated with the current mapping session, are assigned in Mapper setup. You cannot collect data without a Map File name. Table 5-2 describes each parameter in more detail. Figure 5-5: The Mapper Setup Page Parameter Description Map File Mapping data is stored in this file. Mid-Tech file type (GMF). Background File A previously mapped GMF file that can be viewed in the background.
RMS Mapper for the Legacy 6000 Software Version 2.00 Road Markers Setup The Road Marker setup menu allows you to pre-define points and hazards, for easier access during the real time mapping process. There is a unique object soft-key in the real-time Map page (Figure 5-8) for each marker that you define in this setup menu. Figure 5-6: The Road Markers Setup Page Parameter Description Marker # The type of marker being defined: Point, Hazard, and Not Used. Name # The name of the marker defined above.
RMS Mapper for the Legacy 6000 Software Version 2.00 Start Mapping When the Mapper Application Setup process is complete, real-time mapping can begin by pressing the Mapper soft-key, located on the Mapper Launcher page (Figure 5-7). Start Mapper soft-key Figure 5-7: The Mapper Launcher Page The Map Page The first real-time page is the Map page. You can perform all mapping tasks in this page.
RMS Mapper for the Legacy 6000 Software Version 2.00 Pre-defined point and hazard objects. Figure 5-8: The Map Page The Options Menu In the Map Page is an Options soft-key (Swiss Army Knife). Pressing the Options soft-key “popsup” a small menu window on the Map page (Figure 5-9). The options menu contains several mapping aides and tools that can be used without exiting out of the real-time process. All items in the Option menu are toggle type; the item is set to either on or off.
RMS Mapper for the Legacy 6000 Software Version 2.00 Options soft-key Figure 5-9: The Options Menu Option Description Data Zoom When activated, the map page uses collected data, not the background map, as its Zoom extents. Show Base Map When activated, the base map file is displayed in the background. When turned off the base map file is not displayed. Show Point Objects When activated, all point objects, contained in the Map file (GMF) named in Mapper setup, are displayed in the Map page.
RMS Mapper for the Legacy 6000 Software Version 2.00 The Map Objects Soft-Key The primary task performed in the Map page is object mapping. In RMS Mapper, objects include points, polylines, or polygons. As explained before, you can pre-define some point and hazard objects in the Road maker setup. Each pre-defined object has a corresponding soft-key in the Map page. Mapping objects are also accessed via the Map Objects soft-key. Pressing this soft-key activates a menu containing all graphical object types.
RMS Mapper for the Legacy 6000 Software Version 2.00 Object Description Point-Mark. Maps a single point to the Map file. The Map Object soft-key changes to a Point soft-key. Press to mark a point. A prompt asks for a point name each time a point is marked. Point-Stream. Maps a stream of points at the data collection interval rate. The Map Object soft-key changes to the Points Stream soft-key. Press to turn stream on and off. A prompt asks for an object name. Polyline-Mark.
RMS Mapper for the Legacy 6000 Software Version 2.00 Real-time Soft-key Descriptions Soft-key Description The Exit soft-key. Press to exit the Mapper real-time process and return to the Mapper Launcher page. The Next Page soft-key. Press to alternate between the Map page and the Navigation page. The Stop Alarm soft-key. Press to mute an alarm. The Device Manager soft-key. Press to launch Device Manager diagnostics.
RMS Mapper for the Legacy 6000 Software Version 2.00 Soft-key Description The Center Vehicle soft-key. Press to center the vehicle in the map page. Generate Object soft-key. Pressed to bring up a menu that allows you to set up a map object to be mapped (see The Map Objects Soft-Key on page 5-13). The Pan soft-key. Press to pan around in the map page, using the arrow keys. Antenna Offset soft-key. Press to change the antenna offset. Erase Object soft-key.
RMS Mapper for the Legacy 6000 Software Version 2.00 The Navigation Page Pressing the Change Page soft-key switches the display from the Map page to the Navigation page (Figure 5-11). This page displays the vehicle position, speed, course, map file name, and file size. Access device manager from this page as well. Press the Change Page soft-key to return to the Map page.
RMS Mapper for the Legacy 6000 Software Version 2.00 Exiting Real-Time Operation To exit real-time operation, press the Exit button, located on the bottom left corner of the current page. If data is being stored to the PC card, the exiting process may take a minute or so to properly store this data. Exit soft-key Figure 5-12: Exiting Real-time Application RMS-Map Manager Some Legacy 6000 system kits include RMS Office for an office computer or laptop.
RMS Mapper for the Legacy 6000 Software Version 2.00 .
RMS Mapper for the Legacy 6000 Software Version 2.
® 2864 Old Rochester Road Springfield, IL 62703-5632 Phone (217) 753-8424 - Fax (217) 753-8426 www.mid-tech.