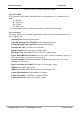
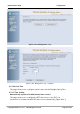
Administrative Guide Configuration Figure 6-38-2. Voice – System – IG Expansion Table 6.6.3 Voice Mail EUT provides a built-in Auto Attendant and Voice Mail System. It is separated into 4 parts: z General z Extension z Holiday z Advanced The configurable items for each part would be described in the following. 6.6.3.1 General This page allows you to configure the general settings of the auto attendant and voice mail. (Figure 6-38) Working Time: Weekday working time.
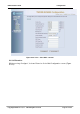
Administrative Guide Configuration Figure 6-39. Voice – Voice Mail – General 6.6.3.2 Extension While pressing “Configure”, it shows Extension Voice Mail Configuration screen (Figure 6-39-1). Copy Right 2006 Tecom, Co. LTD.
Administrative Guide Configuration Figure 6-40-1. Voice – Voice Mail – Extension The following items will be configured in the Configuration setting (Figure 6-39-2): Always Forward to Voice Mail Box: The extension leaves message directly only. It can’t be used for transferred call DND: the extension reject dialing in; 1: reject, 0:allow Voice Mail: Enable/Disable Password: Password of voice mail box of the extension E-mail Address: Phone user’s E-mail Address.
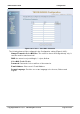
GW 6000 Administrative Guide Configuration Figure 6-40-2. Voice – Voice Mail – Extension – Extension Configuration 6.6.3.3 Holiday This page allows you to configure the holiday or special off-duty days. You can click the buttons under the table to choose pages (Figure 6-40). Figure 6-41. Voice – Voice Mail – Holiday 6.6.3.4 Advanced This page allows you to browse, upload or download voice files and settings via FTP. Copy Right 2006 Tecom, Co. LTD.
Administrative Guide Configuration 6.7 Management The system administrator can do the following functions to manage the configurations, events, and software update of the EUT. z Settings z Log z Time Setting - Internet Time - Day Light Save z Access Control - Services - IP Addresses - Password z Update z Save&Reboot 6.7.1 Settings System Administrator can do the EUT settings backup, restore, and update here. The settings can be saved from EUT to PC.
Administrative Guide Configuration Figure 6-42. Management – Settings 6.7.2 Log This allows System Administrator to view the System Log and configure the System Log options (Figure 6-42-1). Click "View System Log" to view the System Log. Click "Configure System Log" to configure the System Log options (Figure 6-42-2). When you configure the System Log options, you can see 8 levels of Log Level and Display Level, Emergency, Alert, Critical, Error, Warning, Notice, Informational, and Debugging.
Administrative Guide Configuration Figure 6-43-1. Management – Log Figure 6-43-2. Management – Log – Configure 6.7.3 Internet Time This page allows you to configure system’s time and the Daylight Saving Time. 6.7.3.1 Time Setting Automatically synchronize with Internet time servers: This page allows you to configure the NTP time server so the EUT can synchronize its system time with NTP time server automatically (Figure 6-43-1). Copy Right 2006 Tecom, Co. LTD.
GW 6000 Administrative Guide Configuration Figure 6-44-1. Management – Internet Time – Time Setting – NTP setting Manual Setting: Setting EUT’s system time manually. If you do not want to synchronize EUT’s system time with Internet time server, you can configure EUT’s system time manually.
Administrative Guide Configuration Figure 6-44-3. Management – Internet Time – Time Setting – Manual Setting 6.7.3.2 Day Light Save Figure 6-45-1. Management – Internet Time – Day Light Save Copy Right 2006 Tecom, Co. LTD.
Administrative Guide Configuration Figure 6-45-2. Management – Internet Time – Day Light Save – Manual DST Rule This page allows you to configure the Daylight Saving Time (DST) which supports auto adjustment for daylight saving time. Click “Save Settings” button you can save the new configuration. Click “Cancel Changes” button you can cancel the changes.(Figure 6-44-1, Figure 6-44-2) Default International DST Rule: Default DST Rule obey international standard rule.
Administrative Guide Configuration 6.7.4 Access Control This page allows you to configure Service Control List, IP Address Access Control mode and password for user ‘admin’.(Figure 6-45) 6.7.4.1 Services Figure 6-46. Management – Access Control – Services Mark the Enable of the WAN and LAN for each service. HTTP, ICMP, TELNET are supported in EUT. 6.7.4.2 IP Addresses Figure 6-47-1.
Administrative Guide Configuration Access Control mode is disabled, the system will not validate IP addresses form incoming packets. (Figure 6-46-1, Figure 6-46-2) Figure 6-47-2. Management – Access Control – IP Addresses – Add 6.7.4.3 Password In this page you can define the passwords for administrator. The user Administrator has unrestricted access to change and view configuration of your EUT Router. Use the password field to enter up to 16 characters. Note: Password cannot contain a space.
Administrative Guide Configuration 6.7.5 Update Software The new released software could be updated from the Local PC side or remotely. Click the “Browse” to locate the new software image file in the PC. Then, click “Update Software” to process the software update. You can also click “Cancel Changes” button to cancel the location. NOTE: The update process takes about 2 minutes to complete, and your EUT Router will reboot. (Figure 6-48) Figure 6-49. Management – Update Software 6.7.
Administrative Guide Configuration Click “Save/Reboot” to reboot the EUT. The EUT would automatically save the configuration before reboot, so that modified settings would take effect after reboot. 6.
Administrative Guide Configuration Figure 6-51. Diagnostics – Network Copy Right 2006 Tecom, Co. LTD.
Administrative Guide Appendix 1 Appendix 1: Product Summary TCP/IP Protocols IP Protocol (RFC 791) ARP (RFC 826) / RARP (RFC 903) ICMP (RFC792) TCP (RFC 793) UDP (RFC 768) SNTP DNS HTTP Telnet TFTP RTP Static Routing NAT with ALGs IP Address Assignment Static Dynamic Subnet Mask PPPoE Client (RFC 2516) Primary and Secondary DNS DHCP Server (RFC 2131-2132) DHCP Client (RFC 2132) Routing RIP v1/v2 Static routing DHCP
Administrative Guide Appendix 1 IP Precedence VoIP Protocols SIP (RFC 3261) SDP(RFC2327) t Real Time Protocol (RTP ; RFC 1889) MD5 (RFC3261 HTTP) digest authentication G.168 Echo Cancellation Voice Codec: G.711, G.729a and G.723.1 Support FAX/modem tone detection and auto-fallback to G.711 IP Trunk Support up to 8 IP Trunk, which can register to ITSP carrier.
Administrative Guide Appendix 1 WDS support Configuration Management LAN/WAN management via Telnet interface or Web-based browser interface Firmware upgrade available by TFTP/ HTTP Status display and event report from Web-based management Settings Save and Restore Reset to factory default Radio - WLAN Stansard : IEEE 802.1g and 802.
Administrative Guide INTERNET Appendix 1 Blue Off Flashing On LAN network connection not present. LAN activity present (traffic in either direction). WAN connected. Power Requirement Input : Voltage Range 90~230 VAC Output : Linear 15V DC / 1A, 2.5mm barrel jack Operating Environment Temperature : 0~400 C Humidity : 10 to 90%, non-condensing Physical Specification Dimension : 192(W) x 280(L) x 32(D) (mm) Copy Right 2006 Tecom, Co. LTD.
Administrative Guide Appendix 2 Appendix 2: Auto Attendant and Voicemail System Appendix 2.1 System Voice Prompts Appendix 2.1.1 Preset Voice Prompts Provide two languages service for the all voice files. The all files are saved in vox folder in PCM u-law format. The only difference of the file name in the both languages is the first digit of the file name. It’s “1” for the first language, “2” for the second language.
Administrative Guide 10503 The mailbox hasn’t enabled, please dial another number 10504 Please input your password. 10505 The password is incorrect, please try again 10506 The password is incorrect, please check it and try later 10507 10510 10511 To listen to the message, press one To change the password, press two To record your personal greeting, press three To set up leaving message directly, press four.
Administrative Guide 19012 19013 19015 19073 Appendix 2 When finish, press the pound key To record the greeting for regular office hours, press one To record the greeting for out of office hours, press two To record the greeting for lunch time break, press three To record the greeting for holidays, press four When finish, press the pound key To listen to current greeting press one To record the greeting, press two When finished, press the pound key There are no recordings The extension number that you e
Administrative Guide Appendix 2 Appendix 2.2 Flowchart Appendix 2.2.1 Automated Attendant 1 10001 Hello, please dial the , extension number directly or press zero for operator 1A Listening message? Press “ *" Yes 3 No Make an Outside call? Press “ #" Yes 11 No Yes Operators code? Press “ 0" No No 1A Find out operator number Extension Number length? Transfer to Operator Yes 10201 In transferring, please wait 10106 The number is incorrect, please dial again.
Administrative Guide Appendix 2 Appendix 2.2.1.1 Transfer Call to Outside 11 No Error Times =3 10501 please input mailbox number No Yes Hang up 10106 The number is incorrect, please dial again.
Administrative Guide Appendix 2 Appendix 2.2.2 Subscriber Voicemail Flowchart 2 Setting Reject of Dial In No Setting Direct Call Forward Yes 2B No Transfer to Destination ext . Setting Leaving Message Directly Yes No 2A Transfer to Extension .
Administrative Guide Appendix 2 Appendix 2.2.2.
Administrative Guide Appendix 2 Appendix 2.2.
Administrative Guide Appendix 2 Appendix 2.2.3.1 Listening message 31 Leaving messages? No Yes 10511+10512 You have ( ?voice message ) 10514 Listening voice message , press 1 Deleting all message , press 2 Press # for ending 10510 No voice message User抯input 1 # Turn off MWI 2 Playing voice message 10528 Right, press 1. Input # again, press 2. Press # for ending.
Administrative Guide Appendix 2 Appendix 2.2.3.2 Changing Mailbox Password 32 10526 Please input new mailbox password, four digital numbers 2 10527+10528 Your inputted password is XXXX Right, press 1 Input again, press 2 Press # for ending # 1 10529 Succeed changing password 3 Copy Right 2006 Tecom, Co. LTD.
Administrative Guide Appendix 2 2.2.3.3 Recording Personal Greeting 33 10531 Listening greeting, press 1 Recording greeting, press 2 Deleting greeting, press 3 Press # for ending User抯input 1 Yes 2 If no personal greeting recorded? No 10533 Recording greeting after beeping Press # for ending # 3 3 10549 Deleting succeeds 10532 You have not recorded greeting Playing Greeting Recording 10534 Finish Recording Copy Right 2006 Tecom, Co. LTD.
Administrative Guide Appendix 2 Appendix 2.2.3.4 Setting leaving message directly Copy Right 2006 Tecom, Co. LTD.
Administrative Guide Appendix 2 Appendix 2.2.4 System Administrator’s Voicemail Flowchart 4 19001 Input administrator password 10505 Invalid password please try again Y es Error Count < “ Max Input Error ” No No Is ppassword Correct? 4A Y es 19011 Recording the first language greeting, press 1. 10506 Invalid password please check it and try later Recording the second language greeting, press 2. Ending, press # Hang up Option 3 is for internal use only.
Administrative Guide Appendix 2 Appendix 2.2.4.1 Recording Various Greeting 41 19012 Recording on duty greeting, , press 1. Recording out of duty greeting, press 2. Recording lunching time greeting,, press 3.
Administrative Guide Appendix 2 Appendix 2.2.4.2 Recording Process Voice Files 42 19200 Please input voice code, five digital number, canceling, press # Yes Is ‘ #’ ? No 4 19201+10528 The voice code you input is xxxxx. Right, press 1. Input again, press 2.
Administrative Guide Appendix 3 Appendix 3: Feature Access Codes Assignment The Feature Access Codes are applied in Tecom IP2007/8 Phones and FXS phone only. It’s to activate/cancel some GW6000 user-specified functions. These Feature Access Codes are used when the phone is at idle state. Direct Call Forward via AA Forward all of the calls without regard to the extension status.
Administrative Guide Appendix 3 COS Following It changes the individual COS of the extension temporarily. *55+(phone number)+(password) Reset To Default Selected GW6000 extension features can be returned to default setting. To Activate *69 To Cancel **69 Feature Key Programming To program the Feature Key to a PSTN, IP Trunk or Trunk Group number.