Installation Instructions
Manuals
Brands
Techwall Electronics Manuals
Air purifiers
Portable air purifier
1
2
3
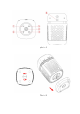
photo
1
Photo
2
1
2
3