
Operation Manual


Help File PDF SnagIt 9.0
58
www.techsmith.com
Video Capture
Use Video Capture Mode to create a video recording of your screen. SnagIt records on-screen activity on your
Windows desktop. Capture all your mouse movements and application action then, save the video as an AVI file. You
can also use SnagIt to create time-lapse video of desktop activity over a period of time.
The maximum size of an AVI file produced by SnagIt is 2 GB. If you pass this size limit, the entire capture is
lost.
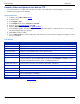
Use the following tips to limit the AVI file size:
Limit the size of the program window captured. Do not add unnecessary content (size or length).
Use SnagIt Region Input selection to select a smaller area to capture then "pan" across the screen while
capturing, thereby making a much smaller video file.
Limit the video frames capture speed.
Limit the length of the video capture sequence. SnagIt captures video sequences in real-time seconds and
minutes. The shorter your sequence, the smaller the AVI files.
Change compression. By default, SnagIt selects the best compression to use for your capture and system.
Experimenting with the settings is also possible.
For additional tips, see Video Capture Tips.
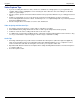
Record Your First Video Capture
1. In SnagIt, select Video capture mode.
2. Select the Output.
3. Click the Capture button or press the capture hotkey.
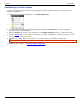
4. A red rectangle appears. Use the rectangle to choose a window to capture or drag the mouse to select a region.
The Video Capture dialog box appears.
5. Click Start to begin recording.
6. Press <CTRL+Shift+P> to end recording. The video renders for a moment. After rendering, the capture is sent to
the selected Output.
For more information, see:
Record a Video with a Caption Effect
Record a Video in Time-Lapse Capture Mode
Record a Video and Upload to the Web via FTP
Video Capture Tips