
Operation Manual


SnagIt 9.0 Help File PDF
www.techsmith.com
133
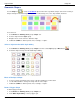
3. Click and drag a line on the canvas.
4. Click and drag again and again to get the desired shape.
5. Double-click the canvas to close the shape.
6. Drag the white object handles to modify the angles.
Change the Shape Outline or Color
Click a shape on the canvas to give it focus.
For Outline changes: Select Styles group > Outline. From here, change the width, outline color, or the general
shape of the callout.
For Fill color changes: Select Styles group > Fill. From here, change the fill color, remove the fill color, or
change the gradient.
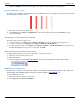
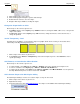
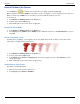
Set the Transparency Level
Transparency is the ability to see through the shape. The graphic below shows a variety of effects that can be
achieved by controlling the transparency level.
1. Click a shape on the canvas to give it focus.
2. Select Styles group > Effects > Transparency > Select the transparency level or click Custom to enter a
specific percentage.
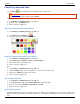
Add, Remove, or Customize the Callout Shadow
Click a shape on the canvas to give it focus.
To add a shadow, select Styles group > Effects > Shadow > Select the shadow effect using the icons.
To remove a shadow, select Styles group > Effects > Shadow > No Shadow icon.
To add a custom shadow, select Styles group > Effects > Shadow > Click More Shadows. Use the options in
the Drop Shadow task pane to create a custom look. Click OK.
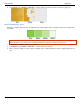
Add a Custom Shape to the Quick Styles Gallery
The Quick Styles Gallery is used to save custom shapes so they can be reused.
1. Click a shape on the canvas to give it focus.
2. Right-click the shape.
3. From the popup menu, click Add to Quick Styles. The shape is now available in the Quick Styles Gallery.