
Operation Manual


Help File PDF SnagIt 9.0
120
www.techsmith.com
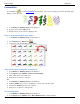
Stamps
Use SnagIt Stamps to annotate your graphics with vector artwork especially designed for screen captures. Choose
from a variety of stamps in the Quick Style Gallery, download more from the TechSmith Website, or create your own.
To use this tool:
1. Select Draw tab > Drawing Tools group > Stamp tool .
2. Select a stamp from the Styles group.
3. Click the mouse on the canvas to apply stamp.
Move or Resize a Stamp
Click a stamp on the canvas to give it focus.
To move a stamp, click down on the center of the stamp and drag to a new location.
To resize a stamp, drag the white handles to change the height and width.
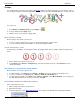
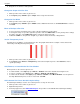
Set the Transparency Level
Transparency is the ability to see through the stamp. The graphic below shows a sample of different transparency
levels.
1. Click a stamp on the canvas to give it focus.
2. Select Styles group > Effects > Transparency > Select the transparency level or click Custom to enter a
specific percentage.
Add, Remove, or Customize the Stamp Shadow
Click a stamp on the canvas to give it focus.
To add a shadow, select Styles group > Effects > Shadow > Select the shadow effect using the icons.
To remove a shadow, select Styles group > Effects > Shadow > No Shadow icon.
To add a custom shadow, select Styles group > Effects > Shadow > Click More Shadows. Use the options in
the Drop Shadow task pane to create a custom look. Click OK.
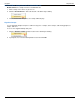
Add a Custom Stamp to the Quick Styles Gallery
Save custom arrows to reuse.
1. Click a stamp on the canvas to give it focus.
2. Right-click the stamp.
3. From the popup menu, click Add to Quick Styles. The stamp is now available in the Quick Styles Gallery.