SnagIt 9.
TechSmith License Agreement TechSmith Corporation provides this manual "as is", makes no representations or warranties with respect to its contents or use, and specifically disclaims any expressed or implied warranties of merchantability or fitness for any particular purpose. TechSmith Corporation reserves the right to make changes to the content of this manual, at any time, without obligation to notify any person or entity of such changes.
SnagIt 9.0 Help File PDF Welcome to SnagIt ............................................................................................................................................... 5 SnagIt Interface Overview .............................................................................................................................. 6 SnagIt Hotkeys .............................................................................................................................................
Help File PDF SnagIt 9.0 Border Effect ........................................................................................................................................... 47 Fade, Torn, Saw, Sharktooth, Beveled, and Wave Edge Effects ................................................... 48 Watermark Effect.................................................................................................................................... 49 Trim Effect .................................................
SnagIt 9.0 Help File PDF Common Editor Tasks ............................................................................................................................. 102 Make a Selection on the Canvas ....................................................................................................... 102 Copy, Paste, Cut, Crop, and Delete Tasks ...................................................................................... 102 View and Zoom Tasks ............................................
Help File PDF SnagIt 9.0 Output Edit Program Options ............................................................................................................. 181 Output FTP Tab .................................................................................................................................... 182 Output Text File Tab ............................................................................................................................ 182 Output File Tab (Web Output) ............
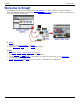
SnagIt 9.0 Help File PDF Welcome to SnagIt SnagIt helps you create and share high-quality screen captures for your presentations, documents and blogs. SnagIt’s streamlined workflow combined with Editor’s Open Captures Tray allows you to continuously capture then save, edit, and share at a later time. In SnagIt… Save often used capture settings as Profiles. Apply edge effects, filters, and other effects during capture. In Editor… Add stamps, arrows, callouts, edge effects, and more.
Help File PDF SnagIt 9.0 SnagIt Interface Overview A Profile includes an Input, Output, and Effects combination. The Capture Profile Properties display as a tooltip when the mouse hovers over the profile icon. Use the Profile Toolbar to create and edit profiles. New Profile saves the current Profile Settings as a new capture profile. Use New Profile Wizard to create a new profile by walking you through all profile settings.
SnagIt 9.0 Help File PDF Quick Launch gives access to SnagIt Editor and Editor’s Library view. www.techsmith.
Help File PDF SnagIt 9.0 SnagIt Hotkeys Hotkeys provide keyboard shortcuts for common tasks. To customize the hotkeys, select SnagIt > Tools > Program Preferences > Hotkeys or right-click on a profile and select Set Hotkey. TO DO THIS PRESS Global capture Initiate a capture with the currently selected profile. Hide/Unhide SnagIt Repeat Last Capture 8 www.techsmith.
SnagIt 9.0 Help File PDF Image Capture Capture an image of anything your screen. Use the following basic capture procedure to take your first capture. 1. Open what you want to capture. 2. Without minimizing what you want to capture, open SnagIt. 3. Select a capture profile from the Basic Capture Profiles. 4. Click Capture. SnagIt disappears and a box with an explanation of how to complete the capture appears. Follow the instructions to complete the capture. When complete, the capture appears in Editor.
Help File PDF SnagIt 9.0 Capture the Entire Screen If you have multiple monitors, Screen captures both monitors. To only capture one monitor, use Capture a Region. Setup Instructions 1. 2. 3. 4. 5. 10 In SnagIt, select Image capture mode. For the Input, select Screen. Select the Output and Effects. Click the Capture button or press the global capture hotkey. The capture is sent to the selected Output. For additional capture options, see Image Capture. www.techsmith.
SnagIt 9.0 Help File PDF Capture a Window Capture a window or an element on the window such as the window frame, scroll bar, open menu, window control button, toolbar, and title. Setup Instructions 1. 2. 3. 4. 5. In SnagIt, select Image capture mode. For the Input, select Window. Select the Output and Effects. Click the Capture button or press the capture hotkey. A red rectangle appears. Move the rectangle to choose a window. Click to complete the capture. The capture is sent to the selected Output. 6.
Help File PDF SnagIt 9.0 Capture a Region Setup Instructions 1. 2. 3. 4. 5. In SnagIt, select Image capture mode. For the Input, select Region Select the Output and Effects. Click the Capture button or press the capture hotkey. Drag the cursor to create a red border around the area to capture. Use the magnifier window to help see the edges of the region. 6. Release the mouse to complete the capture. The capture is sent to the selected Output. For additional capture options, see Image Capture.
SnagIt 9.0 Help File PDF Capture a Fixed Region Capture a preset rectangular area you specify. 1. 2. 3. 4. 5. 6. In SnagIt, select Image capture mode. For the Input, select Fixed Region. In the Fixed Region tab, enter the width and height. Click OK. Select the Output and Effects. Click the Capture button or press the capture hotkey. A red rectangle appears. Move the rectangle to choose a window. Click to complete the capture. The capture is sent to the selected Output.
Help File PDF SnagIt 9.0 Capture an Object Capture a small item on your computer screen such as a toolbar button, icon, etc. Setup Instructions 1. 2. 3. 4. 5. In SnagIt, select Image capture mode. For the Input, select Object. Select the Output and Effects. Click the Capture button or press the capture hotkey. A red rectangle appears. Move the rectangle to choose an object. Click to complete the capture. The capture is sent to the selected Output. For additional capture options, see Image Capture.
SnagIt 9.0 Help File PDF Capture a Menu Capture a drop-down or cascading menu. Setup Instructions 1. In SnagIt, select Image capture mode. 2. For the Input, select Object. 3. Select SnagIt > Options > Timed Capture button. The Timer Setup dialog box appears. 4. In the Delay / Schedule tab, select the Enable delayed / scheduled capture option. 5. Click OK. 6. Select the Output and Effects. 7. Click the Capture button or press the capture hotkey. 8. Open the menu to capture.
Help File PDF SnagIt 9.0 Scrolling Image Capture Setup Instructions 1. 2. 3. 4. 5. 6. 7. In SnagIt, select Image capture mode. For the Input, select Scrolling > Auto Scroll Window. Select Input > Properties > Scrolling tab> Scroll from top of document and Scroll direction: Vertical. Select the Output and Effects. Click the browser window to give it focus. Click the Capture button or press the capture hotkey. A red rectangle appears. Move the rectangle to choose a browser window. Click the mouse.
SnagIt 9.0 Help File PDF Scrolling Text Capture Setup Instructions 1. 2. 3. 4. 5. 6. 7. In SnagIt, select Text capture mode. For the Input, select Scrolling > Auto Scroll Window. Select Input down arrow > Properties > Scrolling tab> Scroll from top of document. Select the Output and Effects. Click the browser window to capture to give it focus. Click the Capture button or press the capture hotkey. A red rectangle appears. Move the rectangle to choose a browser window. Click the mouse.
Help File PDF SnagIt 9.0 Capture a Shape Take a capture using different shapes to define the capture area. Setup Instructions 1. 2. 3. 4. 5. In SnagIt, select Image capture mode. For the Input, select Shape > then the desired shape. Click the Capture button or press the capture hotkey. Drag the cursor over the area to capture. A red border defines the area to capture as you drag. Use the tips below to correctly define the shape and close the capture. Free Hand Capture a closed loop.
SnagIt 9.0 Help File PDF Capture Clipboard Contents Capture the graphic or text contents from the Windows Clipboard. Setup Instructions 1. 2. 3. 4. 5. In SnagIt, select Image or Text capture mode. For the Input, select Advanced > Clipboard. Select the Output and Effects. Click the Capture button or press the capture hotkey. A red rectangle appears. Move the rectangle to choose a region. Click to complete the capture. Click the mouse to complete the capture. The capture is sent to the selected Output.
Help File PDF SnagIt 9.0 Create a Capture Clipboard Chain Enable SnagIt to capture every time you copy something to the Windows Clipboard. Setup Instructions 1. 2. 3. 4. 5. In SnagIt, select Image capture mode. For the Input, select Advanced > Clipboard. Select Input, select Advanced > Clipboard Chain. Select the Output and Effects. Click the Capture button or press the capture hotkey. A confirmation dialog box appears: 6.
SnagIt 9.0 Help File PDF Capture from Program File Capture bitmap images, icons, or cursors contained in an .EXE or .DLL file. Setup Instructions 1. 2. 3. 4. 5. 6. In SnagIt, select Image capture mode. For the Input, select Advanced > Program File. Select the Output and Effects. Click the Capture button or press the capture hotkey. The Open dialog box appears. Browse and select a file with an .EXE or.DLL extension. Click Open. Select an image in the Images area.
Help File PDF SnagIt 9.0 Capture in Full-screen DOS Capture the contents of a full screen MS-DOS session window. SnagIt automatically inverts the colors of the capture. You must press the key to capture the DOS application. Setup Instructions 1. In SnagIt, select Image capture mode. 2. For the Input, select Advanced > Full-screen DOS. This automates two SnagIt parameters: 3. 4. 5. 6. 22 The Clipboard Chain option is turned to “on” allowing SnagIt to capture with the capture hotkey.
SnagIt 9.0 Help File PDF Capture Off-Screen or Window Larger than Screen Select a partially-shown window and capture the full window or capture windows larger than the screen including the window frame. Available on Windows XP and Vista only. Setup Instructions 1. In SnagIt, select Image capture mode. 2. For the Input, select Advanced > Extended Window. 3. Select the Output and Effects. 4. Click the Capture button or press the capture hotkey. 5. A red rectangle appears.
Help File PDF SnagIt 9.0 Capture the Desktop Wallpaper Setup Instructions 1. In SnagIt, select Image capture mode. 2. For the Input, select Advanced > Wallpaper. 3. Select the Output and Effects. 4. Click the Capture button or press the capture hotkey. The capture is sent to the selected Output. For additional capture options, see Image Capture. 24 www.techsmith.
SnagIt 9.0 Help File PDF Capture from a Scanner or Camera Capture images from a connected TWAIN-compliant device such as an optical scanner or digital camera A TWAIN-compliant optical scanner or digital camera must be connected and configured in your computer before selecting this Input. Setup Instructions 1. In SnagIt, select Image capture mode. 2. For the Input, select Advanced > Scanners and Cameras. 3.
Help File PDF SnagIt 9.0 Capture Multiple Areas of the Screen Select multiple areas of the screen to capture. Setup Instructions 1. In SnagIt, select Image capture mode. 2. For the Input, select Window, Region, Fixed Region, or Object. 3. Select Input down arrow > Properties > General tab to select the background color of the completed capture. White is the default color. Click OK. 4. Select the Output and Effects. 5. Click the Multiple Area Capture button in the Options area. 6.
SnagIt 9.0 Help File PDF Include the Cursor in an Image Capture Use the Include Cursor option to capture the mouse pointer in an image capture. To include the cursor, click the Include Cursor button. The image above shows the Include Cursor option selected. To turn off, click the Include Cursor button again. Use the capture timer option or position the cursor and use the hotkey combination to take your capture to make sure the cursor is in the correct position. www.techsmith.
Help File PDF SnagIt 9.0 Preview a Capture in SnagIt Editor Use the Preview in Editor option to open a capture in SnagIt Editor before sending it to the desired Output. In SnagIt Editor make edits, add annotations, apply keywords and flags, or discard the capture. To view your capture in SnagIt Editor, click the Preview in Editor button. The image above shows the Preview in Editor option selected. To turn off, click the Preview in Editor button again. 28 www.techsmith.
SnagIt 9.0 Help File PDF Scrolling, Large, or Oversized Image Captures (Auto Scroll) SnagIt’s Auto Scroll feature captures images too long or wide to see in a window or browser. Different Auto Scroll options help you get exactly the capture you need. Auto Scroll Tip for Success: Look for the Cursor Icon When taking an auto scroll capture, look at the cursor that appears when you click the Capture button and you move around the screen.
Help File PDF SnagIt 9.0 Web Page Longer than Browser Window Setup Instructions 1. In SnagIt, select Image capture mode. 2. For the Input, select Scrolling option > Auto Scroll Window. 3. Select Input down arrow > Properties > Scrolling tab> Scroll from top of document and Scroll direction: Vertical. Click OK. 4. Select the Output and Effects. 5. Click the browser window to give it focus. 6. Click the Capture button or press the capture hotkey. 7. A red rectangle appears.
SnagIt 9.0 Help File PDF Setup Instructions 1. In SnagIt, select Image capture mode. 2. For the Input, select Scrolling option > Auto Scroll Window. 3. Select Input down arrow > Properties > Scrolling tab> Scroll from top of document and Scroll direction: Both. Click OK. 4. Select the Output and Effects. 5. Click the browser window to give it focus. 6. Click the Capture button or press the capture hotkey. 7. A red rectangle appears. Move the rectangle to choose a browser window.
Help File PDF SnagIt 9.0 Region of Web Page Not Visible In Browser Window Setup Instructions 1. In SnagIt, select Image capture mode. 2. For the Input, select Scrolling option > Auto Scroll Window. 3. Select the Input down arrow > Properties > Scrolling tab > Uncheck Scroll from top of document and select Scroll direction: Vertical. Click OK. 4. Select the Output and Effects. 5. Click the browser window to give it focus. Scroll down to the area to capture. 6.
SnagIt 9.0 Help File PDF Setup Instructions 1. In SnagIt, select Image capture mode. 2. For the Input, select Scrolling option > Auto Scroll Window. 3. Select the Input down arrow > Properties > Scrolling tab > Scroll from top of document and Scroll direction: Both. Click OK. 4. Select the Output and Effects. 5. Click the browser window to capture to give it focus. Scroll down to the area to capture. 6. Click the Capture button or press the capture hotkey. 7. A red rectangle appears.
Help File PDF SnagIt 9.0 Setup Instructions 1. 2. 3. 4. In SnagIt, select Image capture mode. For the Input, select Scrolling option > Custom Scroll. Select the Output and Effects. Click the browser window to capture to give it focus. Scroll down to the area to capture. Click the Capture button or press the capture hotkey. 5. Drag the cursor over the area to capture. A red rectangle appears. 6. Click the down arrow on the window’s vertical scrollbar. 7.
SnagIt 9.0 Help File PDF Spreadsheet Longer than the Application Window Setup Instructions 1. 2. 3. 4. 5. 6. In SnagIt, select Image capture mode. For the Input, select Scrolling option > Scrolling Region. Select the Output and Effects. Click the spreadsheet window to capture. Scroll to the area to capture. Click the Capture button or press the capture hotkey. Drag the cursor over the area to capture. A red rectangle appears. Continue to drag the cursor down over the area to capture. 7.
Help File PDF 3. Select the Output and Effects. 4. Click the application window to capture. Scroll to the area to capture. 5. Click the Capture button or press the capture hotkey. 6. Drag the cursor over the area to capture. A red rectangle appears. 7. Click the down arrow on the window’s vertical scrollbar. SnagIt 9.0 8. SnagIt pauses momentarily to configure the capture. The capture area begins to scroll automatically, continuing until the lower edge of the scrolling window is reached.
SnagIt 9.0 Help File PDF Scrolling Pane within an Application Window Setup Instructions 1. In SnagIt, select Image capture mode. 2. For the Input, select Scrolling option > Auto Scroll Window. 3. Select the Input down arrow > Properties > Scrolling tab > Scroll from top of document and Scroll direction: Vertical. Click OK. 4. Select the Output and Effects. 5. Click the application window to capture. 6. Click the Capture button or press the capture hotkey. 7. A red rectangle appears.
Help File PDF SnagIt 9.0 Setup Instructions 1. In SnagIt, select Image capture mode. 2. For the Input, select Scrolling option > Auto Scroll Window. 3. Select the Input down arrow > Properties > Scrolling tab > Scroll from top of document and Scroll direction: Vertical. Click OK. 4. Select the Output and Effects. 5. Click the application window to capture. 6. Click the Capture button or press the capture hotkey. 7. A red rectangle appears. Move the rectangle to choose a window.
SnagIt 9.0 Help File PDF Take a Timed, Delayed, or Scheduled Image Capture Use the SnagIt Capture Timer option to perform unattended captures at intervals that you define. Examples include following stock market tickers, monitoring factory floor equipment, and monitoring remote computer operations. Use the Capture Timer option with the Web Output (FTP) to automatically update a Web site with screen captures, or to automatically send e-mail with the screen capture as an attachment.
Help File PDF SnagIt 9.0 To stop a delayed capture you have started, click the Stop button on the SnagIt toolbar or push the hotkeys. For additional capture options, see Set Up a Time Delayed Capture and Set Up Capture Timer for Intermittent Capturing. Set Up Capture Timer for Intermittent Capturing Capture screens intermittently at predefined times. In timed capture mode, the hide and repeat hotkeys operate.
SnagIt 9.
Help File PDF SnagIt 9.0 3. Select Effects down arrow > Color Depth. From the flyout menu, select the desired option. Or, select Custom Color Depth to create your own Effect using the available settings. Click OK. 4. Click the Capture button or press the capture hotkey. The capture is sent to the selected Output. To disable the Color Depth Effect, select Effects down arrow > Color Depth > None. For additional effects, see Add an Effect during Image Capture.
SnagIt 9.0 Help File PDF Setup Instructions 1. In SnagIt, select Image capture mode. 2. Select the Input and Output. 3. Select Effects down arrow > Color Substitution > Color Substitution. The Color Substitution task pane appears. 4. Use the Old Color tool or the adjacent Color swatch to select the color to remove from the capture. (In example above, white.) 5. Use the New Color tool or the adjacent Color swatch to select the color to replace the old color in the capture. (In example above, green.) 6.
Help File PDF SnagIt 9.0 Setup Instructions 1. In SnagIt, select Image capture mode. 2. Select the desired Input and Output. 3. Select Effects down arrow > Color Substitution > Color Substitution. The Color Substitution task pane appears. 4. Use the Old Color tool or the adjacent Color swatch to select the color to remove in the capture. 5. Use the New Color tool or the adjacent Color swatch to select the color to replace the old color in the capture. 6.
SnagIt 9.0 Help File PDF Setup Instructions 1. 2. 3. 4. In SnagIt, select Image capture mode. Select the Input and Output. Select Effects down arrow > Color Substitution > Invert Colors. Click the Capture button or press the capture hotkey. The capture is sent to the selected Output. To disable the Invert Color effect, select Effects down arrow > Color Depth > None. For additional effects, see Add an Effect during Image Capture.
Help File PDF SnagIt 9.0 Image Resolution Effect Use the Image Resolution Effect to set an image resolution in dots per inch or allow SnagIt to configure the DPI automatically using the default setting. For most captures, the default setting of 96 DPI is sufficient. The Image Resolution can control how other applications display and print SnagIt captured images. Adjusting the image resolution does not affect the way SnagIt displays or prints the image. Setup Instructions 1. 2. 3. 4.
SnagIt 9.0 Help File PDF Setup Instructions 1. 2. 3. 4. 5. In SnagIt, select Image capture mode. Select the Input and Output. Select Effects down arrow > Caption. Create your own Effect using the available settings. Click OK. Click the Capture button or press the capture hotkey. The capture is sent to the selected Output. To disable a Caption effect, select Effects down arrow > Caption. Within the Caption task page, remove the text from the Text field. Click OK.
Help File PDF SnagIt 9.0 4. Click the Enable border option. 5. Create your own Effect using the available settings. Click OK. 6. Click the Capture button or press the capture hotkey. The capture is sent to the selected Output. To disable a Border effect, select Effects down arrow > Border. Disable the Enable border option. Click OK. For additional effects, see Add an Effect during Image Capture.
SnagIt 9.0 Help File PDF Watermark Effect Use the Watermark Effect to add a graphic file to the image during the capture process. Add logos, titles, signatures, banner ads and more. You can also customize the image file with emboss, transparent, and more. Experiment to discover the variety of creative ways you can use the Watermark Effect. Setup Instructions 1. 2. 3. 4. 5. 6. In SnagIt, select Image capture mode. Select the Input and Output. Select Effects down arrow > Watermark.
Help File PDF SnagIt 9.0 The following graphic shows an example of a Custom trim: Setup Instructions 1. 2. 3. 4. 5. In SnagIt, select Image capture mode. Select the Input and Output. Select Effects down arrow > Trim. Select Automatic or customize the Effect using the available settings. Click OK. Click the Capture button or press the capture hotkey. The capture is sent to the selected Output. To disable a Trim effect, select Effects down arrow > Trim. Click the None option. Click OK.
SnagIt 9.0 Help File PDF Text Capture Text mode provides a solution for anyone writing down text from the screen or a dialog box. Text captures include only the text on the screen, not graphics. Text capture includes the following features: Capture text from screens that do not allow copy and paste in Windows. Send Output to a variety of destinations. Annotate and timestamp the captured text. Collect captured text in one file to keep a running log of captured passages.
Help File PDF SnagIt 9.0 Text Longer than a Browser Window Setup Instructions 1. In SnagIt, select Text capture mode. 2. For the Input, select Scrolling option > Auto Scroll Window. 3. Select Input down arrow > Properties > Scrolling tab> Enable: Scroll from top of document and Scroll direction: Vertical 4. Select the Output. 5. Select Effects > Layout to remove blank lines or columns. 6. Click the browser window to capture. 7. Click the Capture button or press the capture hotkey. 8.
SnagIt 9.0 Help File PDF Text from a Dialog Box Setup Instructions 1. 2. 3. 4. 5. 6. 7. In SnagIt, select Text capture mode. For the Input, select Scrolling option > Window. Select the Output. Select Effects > Layout to remove blank lines or columns. Click the dialog box to capture. Click the Capture button or press the capture hotkey. A red rectangle appears. Move the rectangle to choose a browser window. Click to complete the capture. The capture is sent to the selected Output.
Help File PDF SnagIt 9.0 Text in a Scrolling Region Longer Than Window Setup Instructions 1. 2. 3. 4. 5. 6. 7. In SnagIt, select Text capture mode. For the Input, select Scrolling option > Custom Scroll. Select the Output. Select Effects > Layout to remove blank lines or columns. Click the browser window to give it focus. Click the Capture button or press the capture hotkey. Drag the cursor over the area to capture. A red rectangle appears. Click the down arrow on the window’s vertical scrollbar. 8.
SnagIt 9.0 Help File PDF Text from an Object on the Screen Use Object to capture data for objects on the screen. Select what Object data to capture for Object Input while using the Text Capture Mode. Setup Instructions 1. In SnagIt, select Text capture mode. 2. For the Input, select Object. 3. Select Input > Properties > Layout tab to define the object data to capture. Click OK. 4. Select the Output. 5. Select Effects > Layout to remove blank lines or columns. 6.
Help File PDF SnagIt 9.0 Text from a DOS Application Capture the contents of a full screen MS-DOS session window. SnagIt automatically inverts the colors of the capture. You must press the key to capture the DOS application. Setup Instructions 1. In SnagIt, select Text capture mode. 2. For the Input, select Advanced > Full-screen DOS. This will automate two SnagIt parameters: The Clipboard Chain option is turned to “on” allowing SnagIt to capture when you use the capture hotkey.
SnagIt 9.0 Help File PDF Add a Caption Effect to a Text Capture Use the Text Caption Effect to add a caption during the capture process. Captions can include a time/date stamp, system-related data, a title or free text within your capture. You can customize the font, color, and placement of captions. Setup Instructions 1. 2. 3. 4. 5. 6. 7. In SnagIt, select Text capture mode. Select the Input and Output. Select Effects > Layout to remove blank lines or columns. Select Effects down arrow > Caption.
Help File PDF SnagIt 9.0 Video Capture Use Video Capture Mode to create a video recording of your screen. SnagIt records on-screen activity on your Windows desktop. Capture all your mouse movements and application action then, save the video as an AVI file. You can also use SnagIt to create time-lapse video of desktop activity over a period of time. The maximum size of an AVI file produced by SnagIt is 2 GB. If you pass this size limit, the entire capture is lost.
SnagIt 9.0 Help File PDF Record a Video with a Caption Effect Use the Caption Effect to add text, formatted to your specifications, during the capture process. Include a time/date stamp, system-related data, a title or free text. Use the custom settings to change the font, font, size and color, position of the text, and more. Setup Instructions 1. 2. 3. 4. 5. 6. 7. 8. 9. In SnagIt, select Video capture mode. Select the Input and Output. Select Effects down arrow > Caption.
Help File PDF SnagIt 9.0 Record a Video and Upload to the Web via FTP Use the FTP options to send the video directly to a location on the Web. When using FTP Output, you must first configure the properties on the FTP tab. Setup Instructions 1. 2. 3. 4. 5. 6. 7. In SnagIt, select Video capture mode. Select the Input. Select Output > FTP. Select Output down arrow > Properties > FTP tab. Enter the correct FTP information. Click OK. Click the Capture button or press the capture hotkey.
SnagIt 9.0 Help File PDF Video Capture Tips If you are recording more than one video, decide on a standard set of SnagIt options for your organization. For example, will your videos highlight the cursor? Should your videos all be the same size? Will you record with a caption or system stamp? Practice, practice, practice. Overall, how much and how often you practice will be the key to creating professional videos. SnagIt records anything on your screen.
Help File PDF SnagIt 9.0 Capture What You Can Print Use Printer Capture to capture and manipulate the print Output from any application as a digital image. You can create an image file of what the printed material would look like if you had printed it on a printer. SnagIt does not need to be running when you select the SnagIt Printer from within an application; it starts automatically and begins the capture using the Printer Capture settings.
SnagIt 9.0 Help File PDF Customize your Printer Capture You can set up a printer capture to include an Output, Effect, and the destination folder for your captures prior to capturing in an application. 1. Within SnagIt in the Related Tasks pane, click Setup SnagIt printer. 2. The SnagIt Printer Capture Settings dialog box appears. Click the Properties button to setup special print properties such as layout and paper. 3. Click the Output down arrow to select an Output.
Help File PDF SnagIt 9.0 Create a SnagIt Printer Capture Profile You can create several different Printer Capture profiles to use during a printer capture. You can customize the Output, filters, layout, and more and save the configuration with a name that you specify. 1. In SnagIt, select Tools > SnagIt Printer Capture Settings > Input Properties button. The Input Properties dialog box displays. 2. In Printers tab, click the Add a SnagIt Printer button. 3.
SnagIt 9.0 Help File PDF Capture and View a Multiple Page Document with Printer Capture Save a Printer Capture as a multipage file to include all of the pages of the capture within one image file. If you do not save the Printer Capture using the multipage file format, each page of the capture is saved as an individual image file. With the multipage file format, when the capture is complete, it displays in the Editor window where you can use the Multipage viewing tools to page through the capture pages.
Help File PDF SnagIt 9.0 Capture and Save Multiple Page Documents as Individual Image Files From within a host application, you can use Printer Capture to capture multiple pages at one time and save each page as an individual image file. Multipage file capability is only available when you set your Printer Capture Output setting to File and do not specify PDF, SNAG, or TIF format in the Output Properties dialog box. 1. 2. 3. 4. In SnagIt, select Tools > SnagIt Printer Capture Settings > Output > File.
SnagIt 9.0 Help File PDF Web Capture Web capture captures images or other kinds of files from a Web site. Enter the Web site address and select the Web page link depth (the number of links away from the first Web page) to include in the search. With Web capture you can: Specify public Web site URL to capture all images used on the site. Capture image files, for example GIF, JPG, and PNG. Capture audio files, for example MP3, WAV, WMA. Capture video files, for example AVI, MPG, WMV.
Help File PDF SnagIt 9.0 Web Capture Folder and File Naming Conventions SnagIt > Web capture mode > Output > Properties > File tab. Use the File tab to configure the location, folder options, and naming options for files containing Web capture Output. OPTION DESCRIPTION Ask for folder name Enter a new folder name after each capture. Fixed folder name Use the same folder name for each new capture.
SnagIt 9.0 Help File PDF Web Capture Preferences SnagIt > Web capture mode > Input > Properties > Web Capture Preferences tab OPTION DESCRIPTION Work offline Only scans files stored on your computer in the Internet cache (see Windows Control Panel > Internet Options >Temporary Internet Files). HTTP Request Timeout (seconds) Set the number of seconds SnagIt waits until the host you are scanning answers. The default setting is 60 seconds. Primary capture method (requires IE 5.
Help File PDF SnagIt 9.0 Web Capture Proxy Settings Web mode > Input Properties > Web Preferences tab > Secondary capture method > Proxy Settings button OPTION DESCRIPTION Use Web Browser’s Proxy Settings This default option works in most cases. This setting reads your Web browser's proxy settings and uses them for Web capture. It is designed to eliminate the need to configure your connection settings manually in SnagIt. Direct Connection (No Proxy) Select to use a direct connection (No Proxy).
SnagIt 9.0 Help File PDF SnagIt Profiles: A Faster, More Efficient Way to Capture If you had a previous version of SnagIt installed on your computer, profiles are automatically imported into SnagIt during installation. Capturing with SnagIt can be as simple as clicking the Capture button.
Help File PDF SnagIt 9.0 Text Capture to capture the text you see on the screen as editable ASCII text. You can save the text in tab delimited format to import into spreadsheets or database applications. Video Capture to record onscreen activity on your Windows desktop. Capture mouse movements and application action, then save the video as an AVI file. You can also use SnagIt to create time-lapse video of desktop activity over a period of time.
SnagIt 9.0 Help File PDF For more information, see: Profile Context Sensitive Menu Options Create a New Profile Based on an Existing Profile Create a New Profile with the Profile Wizard Profile Hotkeys Organize and Sort the Profiles www.techsmith.
Help File PDF SnagIt 9.0 Profile Context Sensitive Menu Options Right-click on a profile or group of profiles to open the context menu. The options apply to the profile or profile group that you right-clicked on – not the profile or profile group currently selected within the Profiles pane. For more information, see: 74 SnagIt Profiles: A Faster, More Efficient Way to Capture Create a New Profile with the Profile Wizard Create a New Profile Based on an Existing Profile Profile Hotkeys www.
SnagIt 9.0 Help File PDF Create a New Profile Based on an Existing Profile Save new settings as an updated profile, as a new profile, or use the profile settings once and do not save them. When you change profile settings, the profile selected in the Profiles pane has a yellow box around it and an asterisk next to the profile name to indicate you have modified a profile. The following instructions provide a general method for changing your settings followed in parenthesis by a specific example.
Help File PDF SnagIt 9.0 Create a New Profile with the Profile Wizard Use the Add New Profile Wizard to create a new profile rather than modifying and saving an existing capture profile. To access the Add New Profile Wizard, click the Add New Profile Wizard button in SnagIt. Profile Wizard Instructions Follow the instructions on each dialog box, and read the Description fields for additional information as you hover over each option.
SnagIt 9.0 Help File PDF Profile Hotkeys Use a hotkey to quickly take captures without interacting with the SnagIt interface. Customize the hotkey(s) for SnagIt or on a per capture profile basis. Profile hotkeys invoke a specific set of capture commands. Each profile can have its own hotkey. SnagIt OneClick gives you access to your capture profiles while SnagIt is reduced to the system tray.
Help File PDF SnagIt 9.0 Organize and Sort the Profiles Use the Organize Profiles options to change the order of your capture profiles within the Profiles pane and import or export profiles using a .snagprof file. To access the Organize Profiles options: From SnagIt, select File > Organize Profiles. Right-click a profile and select Organize Profiles. Click Organize Profiles in the Related Tasks area of SnagIt.
SnagIt 9.0 Help File PDF Create a New Profile with the Profile Wizard www.techsmith.
Help File PDF SnagIt 9.0 SnagIt OneClick – The Fastest Way to Capture Profiles are automatically synched to SnagIt OneClick. SnagIt OneClick provides a quick and easy way to take a capture from your desktop. OneClick provides access to your capture profiles when SnagIt is minimized to the system tray. To enable and configure OneClick, within SnagIt, in the Related Tasks pane, click Turn on OneClick. OneClick appears on the side of your monitor.
SnagIt 9.0 OPTION Help File PDF DESCRIPTION Click to activate Click on the orange OneClick bar to access OneClick rather than hovering over the orange bar. Hover to activate Hover over the orange OneClick bar to access OneClick rather than clicking on the orange bar. The Hover time (ms) box lets you specify how long you need to hover before OneClick appears. Hotkey setup Select a combination of CTRL, SHIFT, ALT, and a key from the dropdown list to set a hotkey for using OneClick.
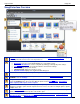
Help File PDF SnagIt 9.0 Welcome to SnagIt Editor Use SnagIt Editor to apply professional, quality finishing touches to your captures. Also share or locate, view, and manage captures and multimedia files. The Open Captures Tray automatically stores captures. Editing options include flip, mirror, shear, rotate, crop, and cut. Adjust the color depth, add text, or view the frames of a video capture.
SnagIt 9.0 Help File PDF Get Familiar with the Editor To open SnagIt Editor, do one of the following: Select Windows Start menu > All Programs > SnagIt 9 > SnagIt 9 Editor Click SnagIt Editor on the Quick Launch pane in SnagIt. Select Tools > SnagIt Editor from the SnagIt menu bar. Click the SnagIt Button to access basic commands such as New, Open, Save, Save As, Send, Print, Delete, and Close. Also select: Convert Images to batch convert images.
Help File PDF SnagIt 9.0 Click the gallery’s More button to see even more style options to choose from. Right-click a modified object on the canvas and select Add to Quick Styles to add it to the gallery. With the Search Pane find and view images, videos and text captures by date, folder, keywords, and more. Click to assign Flags such as Important, Idea, or Personal to captures or media files.
SnagIt 9.0 Help File PDF The Ribbon Tabs The Ribbon helps you quickly find the tools and options you need to complete a task. Tools and options are organized in logical groups that are collected together under specific tabs. Each tab relates to a particular type of activity such as adding annotations with the drawing tools or interactive Hotspots. Tips for interacting with the ribbon follow the table below.
Help File PDF SnagIt 9.0 2. Select Minimize the Ribbon. 3. To use the tools and commands while the Ribbon is minimized, click the name of the tab you want to use. The ribbon will appear. Once the canvas is clicked on, the ribbon will minimized again. To restore the Ribbon, repeat steps 1-2. Minimize or Maximize the Ribbon Using the Tabs 1. To quickly minimize the Ribbon, double-click the name of a tab. 2. Double-click a tab again to restore the Ribbon.
SnagIt 9.0 Help File PDF The Outline, Fill, and Effects options for the selected tool are available in the Styles group. Click the down arrow on an icon to expose the available options. The Arrange group contains the vector object options for arranging and aligning objects. Right-click on an object to view vector object options. The Send group contains Output options. Click the top of the icon to send the contents of the canvas to the output listed.
Help File PDF SnagIt 9.0 Click the gallery’s More button to see even more Edge Effects to choose from. Custom Edge Effects added to the gallery appear in the Quick Styles category. The Styles group contains Border, Effects, and Edge Effects options for a selected tool. Effects include Shadow, Perspective, Shear, and Edges. Click the down arrow on a tool to view the available options. Click Edges to access the Edge Effects customize options.
SnagIt 9.0 Help File PDF a browser. The Editing group contains the following commands: Select all: Select all hotspots on the canvas. Remove Selected: Delete hotspots currently selected. Image File Types that Support Hotspots To use hotspots in your final image, you must e-mail or save your image as one of the following: Web page with image (MHTML file) Adobe PDF (PDF) Macromedia Flash file (SWF) SnagIt Capture File (SNAG) Save as a SnagIt Capture File (SNAG) to open later in SnagIt Editor.
Help File PDF SnagIt 9.0 The Flags group contains icons you can assign to the current capture, capture thumbnails highlighted in the Open Captures Tray, or thumbnails highlighted in the Library. The first three flags assigned to a capture display in the Tray. Use the Tags tab in the Search Pane to find media based on assigned flags.
SnagIt 9.0 Help File PDF Send Tab The Outputs group contains the outputs that are automatically installed with SnagIt. Click an Output to send the current capture or media file to that destination. Use the Output Properties to customize the currently selected Output. The Outputs Accessories group contains Outputs downloaded and installed form the TechSmith Web site. Click on an Output’s down arrow to access the options and Output’s help file.
Help File PDF SnagIt 9.0 Edit Tab (Text Only) The Clipboard group contains the following tools and commands: Copy All, Cut, Copy, Paste. Use the Format group to change the appearance of the text. Font to open the Edit Text dialog box. Use to format the text’s font, size, color, and more. Word Wrap to wrap text lines from line to line, rather than in one continuous long line. 92 www.techsmith.
SnagIt 9.0 Help File PDF The Quick Access Toolbar Customize the Quick Access Toolbar with the tools and commands you use most frequently. Right-click icons and options throughout the ribbon to add to the Quick Access Toolbar. Move the Quick Access Toolbar to the area below the Ribbon. Use More Commands to add tools and options from a list of every available Editor option. Change the Location of the Quick Access Toolbar 1. Click Customize Quick Access Toolbar 2.
Help File PDF SnagIt 9.0 This option is also available from SnagIt Button > Editor Options button > Customize button. To add new tools or commands to the toolbar: 1. From the Choose commands from list, select the category of tools and commands. For a list of all tools and commands, select All Commands. 2. Click to highlight the tool or command to add to the toolbar. 3. Click Add. 4. Use the arrow buttons to move the command or tool to new location on the toolbar.
SnagIt 9.0 Help File PDF Open Captures Tray The Open Captures Tray contains recently taken captures and media files opened via the SnagIt Button > Open or Library. The following is a general overview of how the Tray works. For more specific Tray information, see Open Captures Tray. The Open Captures Tray contains recently taken captures and media files opened via the SnagIt Button > Open option or through the Library. When capturing, the Tray automatically stores the captures for you.
Help File PDF SnagIt 9.0 Where did my captures go? This message appears in the Quick View box when a capture drops from the Tray view. The Tray only stores a certain number of media files before they drop out of view. However, these captures are not deleted. To view unsaved captures and saved files, click Search Pane > Tags tab > Recent captures. The media files appear in the Library as you move through the search results. Right-click a thumbnail to access the context menu.
SnagIt 9.0 Help File PDF How Long do Captures Remain in the Tray? By default, captures and media files remain in the Tray until you accrue 25 captures. Then, as you continue to gather new captures, the older ones begin to drop out of view. However, these captures are not deleted. To view unsaved captures or saved files, click SnagIt Editor > Search Pane > Tags tab > Recent captures. The media files appear in the Library as you move through the search results.
Help File PDF SnagIt 9.0 Drag from the Tray into an Open Capture or Image File Combine captures or image files by dragging a thumbnail from the Tray onto an open capture or file. Open the capture or file that you want to drag into. Then: 1. Click and drag the thumbnail to include onto the canvas… 2. … and drop it there. It is now a vector object. 3. The thumbnail of the open capture updates in the Tray to reflect the changes. Resize the Tray Drag the divider between the Tray and the canvas.
SnagIt 9.0 Help File PDF View a Capture or Media File Double-click a thumbnail to view the full size capture or media file. Change the Thumbnail Display Size Right-click a thumbnail > Thumbnail size > Select Small, Medium, or Large. Delete a Capture or Media File Delete permanently deletes a saved file or a stored capture. You cannot open deleted captures and files at a later time. 1. Right-click a thumbnail > Delete. You are prompted to confirm the delete action. 2. Click Yes to delete.
Help File PDF SnagIt 9.0 The Quick Styles Gallery The Quick Start Gallery is a collection of ready-made styles or effects. To use, select a style from the gallery and drag or click on the canvas. Hover over a gallery item to see the details of an object or effect. For instance, see the color values, shadow size, width, and more. Click the gallery’s More button to see even more style options to choose from.
SnagIt 9.0 Help File PDF SnagIt Editor Hotkeys These keyboard shortcuts cannot be modified.
Help File PDF SnagIt 9.0 Common Editor Tasks This section gives instructions for performing common editing tasks. For more information, see: Make a Selection on the Canvas Copy, Paste, Cut, Crop, and Delete Tasks View and Zoom Tasks Resize Tasks Make a Selection on the Canvas Draw tab > Drawing Tools group. Use the Selection tool to select a portion of the image for copy, cutting, pasting, image effects, etc. Also use the Selection tool to movie selected areas within an image.
SnagIt 9.0 Help File PDF Copy Entire Canvas to the Clipboard (Copy All) Click Copy All to copy the entire canvas to the Windows clipboard for use in other applications. Copy a Selection to the Clipboard 1. Select an area of the canvas using the Selection tool 2. Click Copy . or press . Paste Clipboard Contents as an Opaque or Transparent Object Pasting as a transparent object allows a certain color in the object to become transparent.
Help File PDF SnagIt 9.0 Delete a Selection 1. Select an area of the canvas using the Selection tool 2. Click the Cut tool . or press . Delete an Object 1. Click an object to give it focus. Press to select more than one object. 2. Click the Cut tool or press . Delete all Objects 1. Right-click canvas > Select all objects. 2. Click the Cut tool or press . Delete the Entire Canvas and all of the Objects 1. Right-click canvas > Select all. 2.
SnagIt 9.0 Help File PDF Select from: Cascade to view files in a cascading array. Arrange All to arrange windows in vertical rows. Switch Window to view a particular file or capture. Select the window name from the list. Turn on Gridlines Gridline view gives a pixel by pixel view of the canvas. 1. Click View tab > Show/Hide group > Gridlines. 2. Zoom to 600% or higher to see the gridlines. Return to Original Image Size Click View tab > Zoom tools > 100% icon .
Help File PDF SnagIt 9.0 1. Click Image tab > Canvas group > Resize tool > Resize Image option . You must flatten all vector-based to resize the entire canvas. If there are vector objects on the canvas, you are prompted to flatten objects and continue. 2. The Resize Image task page appears. Make selections and click Close. Enter a new width and height. Select Smooth Scaling to give the capture or image edges a “smooth” appearance.
SnagIt 9.0 Help File PDF . All vector-based must be flattened in order to resize the entire canvas. If there are vector-based on the canvas, you are prompted to flatten objects and continue. 2. The Resize Canvas task page appears. Make selections and click Close. Enter a new width and height. Select image placement. -Or- If necessary, change color of canvas when making the canvas larger than the capture. 1. Grab a handle of the canvas and drag to new size.
Help File PDF SnagIt 9.0 Work with Vector Objects Some SnagIt Editor tools create vector-based objects. Vector objects properties that are advantageous: Float on the canvas so they can be moved, repositioned, aligned, grouped, and more. Can be resized and their properties changed. For example, their overall height and width, outline width, and outline or fill color. Effects such as transparency and shadows can be applied.
SnagIt 9.0 Help File PDF If a printer capture with multiple pages has vector objects, these are automatically flattened when you move to another page. This means that once you switch pages within a capture, the vector object becomes part of the background and you can no longer move the object. Select or Unselect More Than One Vector Object Hold down as you click each object. To unselect one or more of the selected objects, click the object again.
Help File PDF SnagIt 9.0 Flip an Object, a Selection, or the Canvas Vertically or Horizontally Draw tab > Object group > Arrange button > Flip > Horizontal or Vertical. Flip an Object: 1. Click object to give it focus. 2. Click Draw tab > Object group > Arrange button > Flip > Horizontal or Vertical. -OrDraw tab > Canvas group > Rotate button > Flip > Horizontal or Vertical. Flip a Selection: 1. Select an area of the canvas using the Selection tool . 2.
SnagIt 9.0 Help File PDF Transparency The Transparent Color option found in Image tab > Modify group > Color Effects is used to create transparent GIF, ICO, or CUR image files. For more information, see Color Effects. The Transparent Background option allows a defined color in an object or selection to become transparent. The color that becomes transparent is determined by the Canvas Color in the Image tab. In this example, 1. The Canvas Color is set to white. 2.
Help File PDF Click Custom Color to select from a larger palette. SnagIt 9.0 Click Select color from image to use the color picker to select the transparent color from the canvas. Make a Color in a Pasted Object Transparent 1. Paste the contents of the Clipboard on the canvas. (This will not work for pasted vector-based objects created in Editor.) 2. Select Draw tab > Styles group > Effects button > Transparent Background. A checkmark next to the option indicates transparency is turned on. 3.
SnagIt 9.0 Help File PDF Draw Tools and Special Effects Use the drawing tools and special effects to give captures and image files a polished and professional look. Or, add annotations such as callouts and arrows. For more information, see: Callouts Arrows Stamps Freehand Pen Highlight Tool Text Box Lines www.techsmith.
Help File PDF SnagIt 9.0 Callouts Use the Callout tool to create a variety of shapes that include text. Choose from a variety of arrows, balloons, and other shapes in the Quick Style Gallery. Control callout shape, size, color, orientation, drop shadow, and text font, size, style, layout, and color. 1. 2. 3. 4. Select Draw tab > Drawing Tools group > Callout tool. Select a shape from the Styles group. Drag the mouse on the canvas to apply callout. Enter and format the text in the Edit Text dialog box.
SnagIt 9.0 Help File PDF Move, Reshape, or Rotate a Callout 1. To move a callout, click down on the center of the callout and drag to a new location. 2. Use the colored handles to control the following: Yellow: Drag these handles to change the shape and size of the callout pointer. White: Drag these handles to change the height and width of the callout. Green: Grab and drag this handle to rotate the orientation of the callout.
Help File PDF SnagIt 9.0 To add a custom shadow, select Styles group > Effects > Shadow > Click More Shadows. Use the options in the Drop Shadow task pane to create a custom look. Click OK. Add a Custom Callout to the Quick Styles Gallery The Quick Styles Gallery is used to save custom callouts so they can be reused. 1. Click a callout on the canvas to give it focus. 2. Right-click the callout. 3. From the popup menu, click Add to Quick Styles. The callout is now available in the Quick Styles Gallery.
SnagIt 9.0 Help File PDF Arrows Use the Arrow tool or create your own. to create vector-based arrows. Choose from a variety of arrows in the Quick Style Gallery To use this tool: 1. Select Draw tab > Drawing Tools group > Arrow tool. 2. Select a style from the Styles group. 3. Drag the mouse on the canvas to apply arrow. Select a Style from the Quick Style Gallery 1. Select Draw tab > Drawing Tools group > Arrow tool. 2. Select Styles group > More button . 3.
Help File PDF 3. Click and drag the arrow on the canvas. 4. Click and drag again to set the first curve point. 5. Click and drag again to set the second curve point. 6. Drag the white object handles to modify the curves. SnagIt 9.0 Select the Arrow Color from Colors on the Canvas 1. Select Draw tab > Drawing Tools group > Arrow tool. 2. Select Styles group > Outline > Select color from image. 3. Click on the canvas to pick a fill color. 4. Drag cursor on canvas to create arrow. -Or1. 2. 3. 4.
SnagIt 9.0 Help File PDF 1. Click an arrow on the canvas to give it focus. 2. Select Styles group > Effects > Transparency > Select the transparency level or click Custom to enter a specific percentage. Add, Remove, or Customize the Arrow Shadow Click an arrow on the canvas to give it focus. To add a shadow, select Styles group > Effects > Shadow > Select the shadow effect using the icons. To remove a shadow, select Styles group > Effects > Shadow > No Shadow icon.
Help File PDF SnagIt 9.0 Stamps Use SnagIt Stamps to annotate your graphics with vector artwork especially designed for screen captures. Choose from a variety of stamps in the Quick Style Gallery, download more from the TechSmith Website, or create your own. To use this tool: 1. Select Draw tab > Drawing Tools group > Stamp tool 2. Select a stamp from the Styles group. 3. Click the mouse on the canvas to apply stamp. . Move or Resize a Stamp Click a stamp on the canvas to give it focus.
SnagIt 9.0 Help File PDF Download More Stamps from the TechSmith Web Site Download more free stamps from the TechSmith web site. 1. Click a stamp on the canvas to give it focus. 2. Click the Download more… link at the bottom of the Quick Styles Gallery. 3. The TechSmith Web site opens to the stamp download page. Organize Stamps Use the Organize Stamps task pane to add new categories of stamps, delete stamps, add existing graphics as stamps, and more. To access the Organize Stamps task pane: 1.
Help File PDF SnagIt 9.0 Freehand Pen Use the Pen tool to create vector-based, freehand lines. Choose from a variety of pen line in the Quick Style Gallery or create your own. 1. Select Draw tab > Drawing Tools group > Pen tool. 2. Select a style from the Styles group. 3. Drag the mouse on the canvas to apply pen line. Select a Style from the Quick Style Gallery 1. Select Draw tab > Drawing Tools group > Pen tool. 2. Select Styles group > More button . 3.
SnagIt 9.0 Help File PDF 3. Select a color from the Standard or Custom tab. Click OK. 4. Drag cursor on canvas to create pen line. Change the Shape of the Pen Line 1. Click a pen line on the canvas to give it focus. 2. Select Styles group > Outline option > Shape. Select a style from the menu. Change the Pen Width 1. Click a pen line on the canvas to give it focus. 2. Select Styles group > Outline option > Width. Select a width from the menu or click Custom Lines to create a new width.
Help File PDF SnagIt 9.0 Antialiasing for Smooth Lines Antialiasing is a technique used to make lines appear smooth. Without antialiasing being applied, object edges will appear jagged. The antialiasing option is turned to “on” for all of Editor’s vector-based tools. To turn antialiasing on or off: 1. Click a pen line on the canvas to give it focus. 2. Select Styles group > Effects > Antialias. 124 www.techsmith.
SnagIt 9.0 Help File PDF Highlight Tool Use the Highlight tool to highlight a rectangular region of the canvas using a color. To use this tool: 1. Select Draw tab > Drawing Tools group > Highlight tool. 2. Select a color in the Styles group. 3. Click and drag on canvas to apply highlight color. Select a Color from the Quick Style Gallery 1. Select Draw tab > Drawing Tools group > Highlight tool. 2. Select Styles group > More button . 3. Select the color from the dropdown gallery menu.
Help File PDF SnagIt 9.0 Set Fill Transparency Level Control the saturation of the highlight color. The higher the percentage number the less saturated the color. 1. Select Draw tab > Drawing Tools group > Highlight tool. 2. Select Styles group > Effects > Tolerance > Select tolerance percentage. 3. Drag cursor on canvas to create highlight. 126 www.techsmith.
SnagIt 9.0 Help File PDF Text Box Use the Text tool to create vector-based text on the image. Control text font, size, style, layout, drop shadow, antialiasing, color, frame, box style and fill color. To use this tool: 1. 2. 3. 4. 5. Select Draw tab > Drawing Tools group > Text tool. Select a style from the Styles group. Drag the mouse on the canvas to create text box. Enter the text and select the font properties. Click OK. Select a Style from the Quick Style Gallery 1.
Help File PDF 4. Drag the mouse on the canvas to create text box. 5. Enter the text and select the font properties. 6. Click OK. SnagIt 9.0 Move or Resize a Text Box To move a text box, click down on the center of the box and drag to a new location. Use the white handles to change the height and width of the text box. Set the Text Transparency Level Transparency is the ability to see through the text. 1. Click a text box on the canvas to give it focus. 2.
SnagIt 9.0 Help File PDF Lines Use the Line tool create your own. to create vector-based lines. Select from a variety of lines in the Quick Style Gallery or To use this tool: 1. Select Draw tab > Drawing Tools group > Line tool. 2. Select a style from the Styles group. 3. Drag the mouse on the canvas to apply line. Select a Style from the Quick Style Gallery 1. Select Draw tab > Drawing Tools group > Line tool. 2. Select Styles group > More button . 3. Select the arrow from the Quick Styles Gallery.
Help File PDF 3. 4. 5. 6. SnagIt 9.0 Click and drag the line on the canvas. Click and drag again to set the first curve point. Click and drag again to set the second curve point. Drag the white object handles to modify the curves. Select the Line Color from Colors on the Canvas 1. Select Draw tab > Drawing Tools group > Line tool. 2. Select Styles group > Outline > Select color from image. 3. Click on the canvas to pick a fill color. 4. Drag cursor on canvas to create line. -Or1. 2. 3. 4.
SnagIt 9.0 Help File PDF Use the white handles to change the shape and size of the line. Hold down to keep the line straight as you draw a vertical, horizontal, or diagonal line. Set the Transparency Level Transparency is the ability to see through the line. The graphic below shows a sample of effects that can be achieved by controlling the transparency level. 1. Click a line on the canvas to give it focus. 2.
Help File PDF SnagIt 9.0 Geometric Shapes Use the Shape tool to create vector-based objects in the form of geometric shapes. Select from a variety of shapes and styles in the Quick Style Gallery. Control callout shape, size, color, drop shadow, and more. To use this tool: 1. 2. 3. 4. Select Draw tab > Drawing Tools group > Shape tool. Select a shape from the Styles group. Drag the mouse on the canvas to draw the shape. Hold down to draw a perfect circle, rectangle, or square.
SnagIt 9.0 3. 4. 5. 6. Help File PDF Click and drag a line on the canvas. Click and drag again and again to get the desired shape. Double-click the canvas to close the shape. Drag the white object handles to modify the angles. Change the Shape Outline or Color Click a shape on the canvas to give it focus. For Outline changes: Select Styles group > Outline. From here, change the width, outline color, or the general shape of the callout. For Fill color changes: Select Styles group > Fill.
Help File PDF SnagIt 9.0 Antialiasing for Smooth Lines Antialiasing is a technique used to make lines appear smooth. Without antialiasing being applied, object edges will appear jagged. The antialiasing option is turned to “on” for all of Editor’s vector-based tools. To turn antialiasing on or off: 1. Click an arrow on the canvas to give it focus. 2. Select Styles group > Effects > Antialias. 134 www.techsmith.
SnagIt 9.0 Help File PDF Flood Fill an Area with Color Use the Fill tool to flood-fill an enclosed, flattened area using a color. Vector-based objects cannot be flood-filled. To flood-fill a vector object, it must first be flattened. To flatten a vector object, right-click the object and click Flatten. To use this tool: 1. Select Draw tab > Drawing Tools group > Fill tool. 2. Select a color in the Styles group. 3. Click on canvas to apply color. Select a Color from the Quick Style Gallery 1.
Help File PDF SnagIt 9.0 1. Select Draw tab > Drawing Tools group > Fill tool. 2. Select Styles group > Effects > Tolerance > Select tolerance percentage > Click on canvas to apply color. Set Fill Transparency Level Control the saturation of the fill color. The higher the percentage number the less transparent and more saturated the color will be. This option is a build up effect.
SnagIt 9.0 Help File PDF Erase a Portion of the Canvas Use the Eraser tool to freehand erase. Control the color, width, opacity and antialiasing. While using this tool, hold the key and click to use the eyedropper to select a foreground color for this tool. When you release the key, you are able to use the tool with the newly chosen color. To use this tool: 1. Select Draw tab > Drawing Tools group > Erase tool. 2. Select a style from the Styles group. 3.
Help File PDF SnagIt 9.0 Image Effects Border Add a custom border around a selection or the entire canvas. To use this tool: 1. To add a border to a portion of the canvas, use Draw tab > Drawing Tools group > Selection tool and drag a selection on the canvas. -OrTo add a border to the entire canvas, do not make a selection. 2. To select the border color from colors on the canvas, Select Image tab > Image Style group > Border tool > Select color from image.
SnagIt 9.0 Help File PDF To use this tool: 1. Select Image tab > Image Style group > Effects tool > Shear. 2. Select an effect from the menu or click Perspective Shear Options to create a unique look. Edges Use an Edge effect to add a professional, finished look to a selection or the entire canvas. The Edge effects include drop shadow, torn, faded, wave, saw, shark tooth and beveled edge. Customize the effect by adjusting the: Size and location of the effect. Shadow size, location and color.
Help File PDF SnagIt 9.0 To use this tool: 1. To blur a portion of the canvas, use Draw tab > Drawing Tools group > Selection tool and drag a selection on the canvas. -OrTo blur the entire canvas, do not make a selection. 2. Select Image tab > Modify group > Blur tool . 3. Select the blur level or click Custom to enter a specific percentage. Grayscale This effect must be applied to the entire canvas. To use this tool: 1. Select Image tab > Modify group > Grayscale tool .
SnagIt 9.0 Help File PDF 4. Click OK. Spotlight and Magnify Select a portion of the capture and modify it using a magnification effect as well as darkening and blurring effects. To use this tool: 1. Select Draw tab > Drawing Tools group > Selection tool and drag a selection on the canvas. 2. Select Image tab > Modify group > Spotlight & Magnify tool . 3. In the Spotlight and Magnify task pane, customize the effect using the available settings. Click OK. www.techsmith.
Help File PDF SnagIt 9.0 Color Effects Editor > Image tab > Modify group > Color Effects button Use the Color Effects options to apply color conversion and special effects to your image. Color Depth Customize the colors, color order, dithering and palette of an image. This effect must be applied to the entire canvas. To use this tool: 1. Select Image tab > Modify group > Color Effects tool 2. In the Color Depth task pane, make all changes. 3. Click OK. > Color Depth.
SnagIt 9.0 Help File PDF To use this tool: 1. Select Image tab > Modify group > Color Effects tool 2. Create your own effect using the available settings. 3. Click OK. > Color Correction. Invert Colors Use to invert RGB color values for a selection or the entire canvas. To use this tool: 1. To apply effect to a portion of the canvas, drag a selection on the canvas. -OrTo apply the effect to the entire canvas, do not make a selection. 2.
Help File PDF SnagIt 9.0 To use this tool: 1. To apply effect to a portion of the canvas, drag a selection on the canvas. -OrTo apply the effect to the entire canvas, do not make a selection. 2. Select Image tab > Modify group > Color Effects tool > Histo-Contrast. 3. Select effect percentage from the menu or click Custom to create a new look. Halftone Use to apply a dithered black and white effect to the entire canvas. To use this tool: 1.
SnagIt 9.0 Help File PDF Stretch Intensity Use to increase the contrast by centering, maximizing, and proportioning the range of intensity values. Apply to a selection or the entire canvas. To use this tool: 1. To apply effect to a portion of the canvas, drag a selection on the canvas. -OrTo apply the effect to the entire canvas, do not make a selection. 2. Select Image tab > Modify group > Color Effects tool > Stretch Intensity.
Help File PDF 2. Use the slide control to achieve desired look. 3. Click Close. 146 SnagIt 9.0 www.techsmith.
SnagIt 9.0 Help File PDF Filters Editor > Image tab > Modify group > Filters button Use the Filter options to apply special effects to modify your captures in many different ways. Use one alone, or combine them to get exactly the right look. Remove Noise Remove pixels to reduce the detail creating a smoother texture. Apply to a selection or the entire canvas. To use this tool: 1. To apply effect to a portion of the canvas, drag a selection on the canvas.
Help File PDF SnagIt 9.0 Posterize Apply a poster effect, reducing the number of bits per color channel. This decreases the number of colors and levels of lightness in the image or selection. The result is a flatter-looking image with bands of color rather than smooth gradients. Apply to a selection or the entire canvas. To use this tool: 1. To apply effect to a portion of the canvas, drag a selection on the canvas. -OrTo apply the effect to the entire canvas, do not make a selection. 2.
SnagIt 9.0 Help File PDF Solarize This effect mimics the accidental exposure of photographic film to light, but lets you control the threshold level. Apply to a selection or the entire canvas. To use this tool: 1. To apply effect to a portion of the canvas, drag a selection on the canvas. -OrTo apply the effect to the entire canvas, do not make a selection. 2. Select Image tab > Modify group > Filters tool > Solarize. 3. Select the level of planes from the menu or click Custom to create a new look.
Help File PDF 1. To apply effect to a portion of the canvas, drag a selection on the canvas. -OrTo apply the effect to the entire canvas, do not make a selection. 2. Select Image tab > Modify group > Filters tool 3. Repeat for a more intense effect. SnagIt 9.0 > Edge Detect. Add Noise Reduce the detail and add a grainy texture. Adding a small percentage of noise to an image can reduce the appearance of scratches and other imperfections. Apply to a selection or the entire canvas. To use this tool: 1.
SnagIt 9.0 Help File PDF To use this tool: 1. To apply effect to a portion of the canvas, drag a selection on the canvas. -OrTo apply the effect to the entire canvas, do not make a selection. 2. Select Image tab > Modify group > Filters tool > Edge Detect. 3. Select the Edge filter and Filter subtype to achieve the desired look. 4. Click Close. Change Image Resolution Set an image resolution in dots per inch. This option can be used to control how other applications display and print SnagIt images.
Help File PDF SnagIt 9.0 SnagIt Editor Options SnagIt Editor > SnagIt button > Editor Options button The SnagIt Editor Options give access to Editors’ program preferences, the Open Captures Tray settings, the Quick Access Toolbar options, and more. General Screen SnagIt Editor > SnagIt button > Editor Options button > General button.
SnagIt 9.0 Help File PDF Advanced Settings Screen SnagIt Editor > SnagIt button > Editor Options button > Advanced button. Set the default preferences for the number of items that show in the Recent File list, make changes to the way the Open Captures Tray stores captures, and more. A checkmark lets you know an option is enabled or “turned on”. Customize SnagIt Editor > SnagIt button > Editor Options button > Customize button.
Help File PDF SnagIt 9.0 Check for program updates, contact technical support, connect to the SnagIt Learning Center on the TechSmith Web site, and find the about SnagIt information that includes the version number. 154 www.techsmith.
SnagIt 9.0 Help File PDF Editor Library Use the Library to locate, view, and manage captures and multimedia files. Select multiple files to save, convert file formats, print, and e-mail in batches. To Open the Library In SnagIt > Quick Launch pane > Organize Images.
Help File PDF SnagIt 9.0 Get Familiar with the Library The Library view displays captures and media files in either thumbnail view or list view. By default, Recent Captures in the Tags tab is selected. To change the view, click the List View or Thumbnail View icons. To open a capture or media file, double-click a thumbnail. While viewing the file in Editor, click the Library button again to return to the previous search results.
SnagIt 9.0 Help File PDF Use the Search Pane to find captures and media files. Search by date, folder, keywords, or even by application or Web site. To expand or collapse the Search Pane, click the toggle button. Only the first two flags assigned to a capture or media file display in the Tray. The ellipse symbol know more flags are assigned.
Help File PDF SnagIt 9.0 Change the Size of the Thumbnails Use the Zoom Slider to change the view for the thumbnails in Library view. Assign Flags Assign Flags such as Important, Idea, or Personal to captures or media files. Apply multiple flags to each capture or media file. All assigned flags display in color in the vertical flag row of the Search Pane when the pane is collapsed or, at the bottom of the Search Pane when the pane is expanded. Search by Flags in the Search Pane > Tags tab.
SnagIt 9.0 Help File PDF 2. Select Send tab > Outputs groups > click FTP. The Send with FTP dialog box appears. Enter the FTP server information. Click OK. www.techsmith.
Help File PDF SnagIt 9.0 Search in the Library Search Pane You must manage Media files with keywords and flags assigned within Editor or you will lose the keywords and flags. For example, to move files with keywords and/or flags from one folder to another, you must use the Folder tab within the Search Pane. If you use Windows Explorer or another method to move these files, all keywords and flags will be permanently lost.
SnagIt 9.0 Help File PDF The following characters are ignored in the search: . ! ; , ( ) ? < > [ ] / \ + =" @ $ % & * Search by File Name When searching by file name, do not use a file extension (.jpg, .bmp, .png) in the Keyword Search field. 1. In the Keyword Search field click the Refresh button if available. 2. Begin to type the file name. As you type, the search results continually update and sort into categories in the Search Pane. 3.
Help File PDF SnagIt 9.0 Search Using Folders 1. Select Search Pane > Folder tab. 2. Browse for files. Media files supported by Editor appear in the Library as you browse. 162 www.techsmith.
SnagIt 9.0 Help File PDF Manage Captures, Files, and Folders within the Library You must manage Media files with keywords and flags assigned within Editor or you will lose the keywords and flags. For example, to move files with keywords and/or flags from one folder to another, you must use the Folder tab within the Search Pane. If you use Windows Explorer or another method to move these files, all keywords and flags will be permanently lost. Open a Capture or Media File in another Application 1.
Help File PDF 4. The new folder appears. Type a new name. SnagIt 9.0 Rename a Folder 1. 2. 3. 4. Select Search Pane > Folder tab. Browse to a folder. Right-click > Rename. Type a new name. Delete a Folder 1. Select Search Pane > Folder tab. 2. Browse to a folder to delete. 3. Right-click > Delete. Move a Folder 1. 2. 3. 4. 5. 164 Select Search Pane > Folder tab. Browse to a folder to cut. Right-click > Cut. Browse to a drive or folder. Right-click > Paste. www.techsmith.
SnagIt 9.0 Help File PDF Apply Effects and Modifications to Multiple Files (Batch Conversion) Apply SnagIt image editing filters to multiple captures in batch processing mode. Convert one or more graphic image files from one format to another. For example, select six BMP files to convert to GIF and store them in another directory for inclusion on Internet Web Pages. Open the Batch Conversion Wizard To open the Batch Conversion Wizard: In Editor > SnagIt button > Convert Images.
Help File PDF SnagIt 9.0 Print from the Library Quick Print One or More Captures of Media Files 1. Highlight a capture or media file in the Library. Press to select more than one or to select all thumbnails. 2. Press or right-click thumbnail > Print. 3. The Print dialog box appears. Select a printer if different from default. 4. Click the Page Setup button to select layout and paper options. 5. Click Print. Print File Names at Bottom of Printed Page 1.
SnagIt 9.0 Help File PDF Automatically fit image: Editor automatically scales the images. Keep aspect ratio: Enable for scaled images to have undistorted height and width Manual fixed scale: Manually set scaling percentages. 4. 5. 6. 7. Default: Change settings to the defaults. The default settings are Top, Bottom, and Left Margins are printer dependent. Image location is Upper Left, and Image Scale is set to Fit Image on a Single Page.
Help File PDF SnagIt 9.0 Create an Image Gallery Web Page There are many options for publishing an Image Gallery Web page to the Internet. A good place to look for help is the www.HTMLGoodies.com main site. Additionally, here is a link to an informative article entitled Where do I put my Website? Use the Create a Web Page feature to create an HTML thumbnail sheet that links to full sized images. This is a quick way to display digital photographs, screen captures, artwork, and other graphics.
SnagIt 9.0 Double Vision List Navigator www.techsmith.com Help File PDF Font colors. Link colors. Design: View of two thumbnail images side-by-side in a horizontal frame at the top of the page. Click a thumbnail to view the full size image within a separate browser window. Use the browser’s Back button to return to the gallery page. Previous and Next link system for accessing the next or previous page of images: Example: Prev|Next.
Help File PDF Slide Show Stripes SnagIt 9.0 Design: Automated slide show of all images in the gallery. Customize: Add a transition that plays when the gallery is opened or when moving back to the gallery after an image is viewed in a separate browser window. Internet Explorer required for transitions. Frame width and height. Duration of pause between each image. Color or texture background for the main page.
SnagIt 9.0 Help File PDF SnagIt Technical Reference Guide This section contains information pertaining to options found in SnagIt dialog boxes and tabs. Refer to the following reference information: Capture Modes and Input Capture Modes and Output Image File Format Types and Options Video Capture Output Properties SnagIt Command Line Options SnagIt Program Preferences Where is it now? Help for SnagIt 8 Users www.techsmith.
Help File PDF SnagIt 9.0 Capture Modes and Input While there are actually five capture modes, this topic only describes Image, Text, Video, and Web Capture modes. For more information on Printer Capture, see SnagIt Printer Capture.
SnagIt 9.0 Help File PDF Record Audio Fixed Address Prompt for Address www.techsmith.
Help File PDF SnagIt 9.0 Capture Input Properties Input drop-down menu > Properties. Use the Input Properties options to customize a capture. First, select the capture Mode and the capture Input. Select Input Properties to change any options. For example, enter the dimensions for a fixed region capture or change the scroll direction from horizontal to vertical for an auto scroll capture.
SnagIt 9.0 Help File PDF Fixed Address Web Enter a default URL to use for a Web Capture. Web Capture Preferences Web See Web Capture Preferences. Printer Capture Preferences Options Printer Define where to store temporary printer capture files. Choose to close SnagIt after the Printer Capture. Input General Tab Input drop-down menu > Properties > General tab. Options apply to Image capture mode.
Help File PDF Define Auto Scroll options for Window, Active Window, Region and Fixed Region captures. SnagIt 9.0 Options apply to Image and Text capture mode. OPTION AVAILABLE IN THIS CAPTURE MODE DESCRIPTION Foreground the scrolling window Image Text The Foreground the Scrolling Window option brings a selected scrolling window into view during a capture. Scroll delay Image Text Try specifying a Scroll Delay if scrolling capture fails.
SnagIt 9.0 Help File PDF Input Links / Hotspots Tab Input drop-down menu > Properties > Links/Hotspots tab. Select the type of links and hotspots to keep. OPTION DESCRIPTION Links only Keep only links in the capture. All clickable objects Keep links and hotspots for all clickable objects (buttons, checkboxes, radio buttons, text fields, etc.) in the capture. Input Object Tab Input drop-down menu > Properties > Object tab. Select what items to include in a Text capture.
Help File PDF SnagIt 9.0 Capture Modes and Output The following table describes the types of output you can select in combination with the various modes. OUTPUT IMAGE CAPTURE TEXT CAPTURE VIDEO CAPTURE WEB CAPTURE No Output Printer Clipboard File Send by E-mail SnagIt Editor FTP Program Excel Word PowerPoint Multiple Outputs See also Printer Capture. 178 www.techsmith.
SnagIt 9.0 Help File PDF Capture Output Properties Output drop-down menu > Properties. Output Properties options give you even more control over your capture output. Select your capture mode and capture Output, then define Output Properties if needed. AVAILABLE IN CAPTURE MODE OUTPUT TAB DESCRIPTION Print Image Text Printer Select the Default Windows Printer or a Specific Printer. You can save specific printer properties for future SnagIt captures.
Help File PDF SnagIt 9.0 and automatically update a capture file. Automatic file name SnagIt automatically names a series of captures for you. Use if you want to automate the capture process to run unattended. See Automatic File Name Options. Output folder Select an Output Folder for your captures.
SnagIt 9.0 Help File PDF Output Program Tab Output drop-down menu > Properties > Program tab. Printer Capture mode: Tools > SnagIt Printer Capture Settings > Program tab. Define preferences for SnagIt output when you send directly to an external program or software application. Options apply to Image, Text, Video, and Printer capture mode. OPTION DESCRIPTION Select the program to output to Select the program to send the captures.
Help File PDF SnagIt 9.0 Display name The application name displays in this field. You can change the name of the application. Parameters Command line options for the selected program to run properly. You must have the "" parameter since it tells the selected program what file to open when the program is executed. Example: “-min -a -ex “c:\temp\test.zip” “” This is an example of the parameters for WinZip. This command adds a new capture to a zip file named test.zip.
SnagIt 9.0 Help File PDF Annotate captures Add a caption to the text capture output. Caption prefix Enter text that appears before each text caption. Append to file Add each text capture to the end of a single file. Ask for file name Enter a file name for each capture. Fixed file name Assign the same file name to each text capture. Use to continually and automatically update the same output file. Name Enter the file name if using a Fixed file name.
Help File PDF SnagIt 9.0 information. Output Page Setup Options Output drop-down menu > Properties > Print tab > Page Setup button. Printer Capture mode: Tools > SnagIt Printer Capture Settings > Properties button > Print tab > Page Setup button. Use the tabbed Page Setup dialog box to set up how your printed prints on the page. Use the Layout tab options to size scrolling captures or large captures over multiple pages.
SnagIt 9.0 Help File PDF Image File Format Types and Options SnagIt provides 28 different file formats to use for Image and Printer captures Select the Show advanced types checkbox to view all 28 file or uncheck to view an abbreviated list of the most common types. Select the file format for image captures. Select Remember last used format to use the same type of file format as the previous capture. Select Always use this file format to select a file type for every capture.
Help File PDF SnagIt 9.0 MHTML is similar to an HTML Web page, except that the HTML and images are combined into a single file. MHT is useful for quickly sharing an image along with simple links/hotspots with just one file and is most useful in e-mail, where the Web page, complete with images, is inserted directly into the body of the e-mail in Outlook and Outlook Express.
SnagIt 9.0 Help File PDF Subfile Type Select from available subfile types. Depending on the current Colors selection, various Subfile Types are available. Progressive JPG files are the same as regular JPG files, but the image displays at full size as quickly as possible, and clarifies as it is loaded. TIFF is a tag-based file format designed to promote universal interchanges of digital image data. There are many versions of TIFF. SnagIt supports the standard TIFF formats.
Help File PDF SnagIt 9.0 PDF Page Setup Options Output drop-down menu > Properties > Image File tab > PDF file output > Options button > File Format Options dialog box > PDF Page Setup button. Define how your PDF appears on the page. OPTION DESCRIPTION Page size Select the size of page for the PDF. Use the dropdown menu to select a preset size or select Custom and manually enter the height and width of the page in inches. Margins Select the size of the margins for the PDF in inches.
SnagIt 9.0 Help File PDF Video Capture Output Properties Use the Video Capture Properties options to control SnagIt applicaton preferences as they relate to video capture. For more information see: Video Input Capture Preferences Properties Video Output File Tab Video Capture Frame Rate (Time-Lapse) Setup Video Capture Audio Format Setup Video Input Capture Preferences Properties Input drop-down menu > Properties > Video Capture Preferences tab.
Help File PDF SnagIt 9.0 Audio capture device Select the audio capture device that you will be using for Video Capture. Ask for file name Enter a file name before saving the capture output. Fixed file name Assign the same file name to each capture. This is useful for continually and automatically updating the same output file. Name Enter the file name for the Fixed File Name option. Automatic file name Automatically assign your capture a file name and location.
SnagIt 9.0 Help File PDF SnagIt Command Line Options SnagIt Program Command Line Options OPTION DESCRIPTION /h Hides the SnagIt window at startup. /n Disables keyboard input to SnagIt (For use with DDE programs.) /i Starts SnagIt as a minimized icon. /S Causes SnagIt to do a capture using current settings and close when finished or canceled. This option runs SnagIt hidden with hotkeys disabled.
Help File PDF SnagIt 9.0 SnagIt Program Preferences SnagIt > Tools menu > Program Preferences. Set up and change preferences for general SnagIt hotkeys, program options, notifications, and update options. For more information see: SnagIt Hotkeys Tab SnagIt Program Options Tab SnagIt Notifications Tab SnagIt Update Options Tab SnagIt Hotkeys Tab SnagIt > Tools menu > Program Preferences > Hotkeys tab. Use the Hotkeys tab options to set and change general SnagIt hotkeys.
SnagIt 9.0 Help File PDF When capturing images from DirectX programs, deselect this option. Paste Images as HTML for Outlook Express SnagIt pastes images into Outlook Express using HTML. This allows the image to display correctly. Each time you copy or paste, this option leaves files on your computer. Embed images when sending e-mail (Outlook/Outlook Express only) SnagIt inserts images directly into an e-mail message. If you would rather have images attached to e-mail as files, turn this option off.
Help File PDF OPTION SnagIt 9.0 DESCRIPTION Enabled automated update checking SnagIt automatically checks for program updates on the SnagIt Web site. Default setting. Days between checks Select the number of days between checking for updates. The default entry is 14 days. Prompt before update check SnagIt will prompt for Internet access information before checking for an update. Typically, if you are on a dial-up connection, you need to sign on to your Internet provider in order to access the Web.
SnagIt 9.0 Help File PDF Where is it now? Help for SnagIt 8 Users This section provides a list of tools and options from SnagIt 8 Preview Window and Editor and shows where to find the same tool or option in SnagIt 9 Editor.
Help File PDF SnagIt 9.0 SnagIt 8 Preview Window and Editor File Menu (Image Capture) ICON MENU OPTION SNAGIT EDITOR LOCATION New Image SnagIt button > New Open SnagIt button > Open NEW EDITOR ICON Quick Access Toolbar > Open Save SnagIt button > Save As Quick Access Toolbar > Undo Save As SnagIt button > Save As Save Selection As Right-click selection > Save Selection As Insert Image No longer available.
SnagIt 9.0 Help File PDF Send E-Mail SnagIt button > Send > E-mail Send tab > Outputs group > E-mail Save in Catalog No longer available. Send with FTP SnagIt button > Send > FTP Send tab > Outputs group > FTP Send in Instant Message No longer available. Send to Program SnagIt button > Send > Program Send tab > Outputs group > Program www.techsmith.com Finish Output Send tab > Finish group > Finish Cancel Capture No longer available. Done No longer available.
Help File PDF SnagIt 9.0 SnagIt 8 Preview Window and Editor File Menu (Video Capture) The following table lists each of the Preview Window / SnagIt Editor > File menu options along with their description and use. ICON MENU OPTION SNAGIT EDITOR LOCATION Save As SnagIt button > Save As > Save Frame As Control tab > Output group > Save Frame Send E-Mail SnagIt button > Send > E-mail NEW EDITOR ICON Send tab > Outputs group > E-mail Save in Catalog No longer available.
SnagIt 9.0 Help File PDF Done www.techsmith.com No longer available.
Help File PDF SnagIt 9.0 SnagIt 8 Preview Window and Editor File Menu (Text Capture) ICON MENU OPTION SNAGIT EDITOR LOCATION Save As SnagIt button > Save As Print SnagIt button > Print Print Preview SnagIt button > Print > Print Preview Copy to Clipboard Edit tab > Clipboard group > Copy NEW EDITOR ICON Edit tab > Clipboard group > Copy All Send E-Mail SnagIt button > Send > E-mail Send tab > Outputs group > E-mail Save in Catalog No longer available.
SnagIt 9.0 www.techsmith.com Help File PDF Cancel Capture No longer available. Done No longer available.
Help File PDF SnagIt 9.0 SnagIt 8 Preview Window and Editor File Menu (Web Capture) ICON 202 MENU OPTION SNAGIT EDITOR LOCATION Finish Output Send tab > Finish group > Finish Cancel Capture No longer available. Done No longer available. NEW EDITOR ICON www.techsmith.
SnagIt 9.
Help File PDF SnagIt 9.0 SnagIt 8 Preview Window and Editor Edit Menu (Text Capture) ICON MENU OPTION SNAGIT EDITOR LOCATION Undo Quick Access Toolbar > Undo Keyboard shortcut Cut Quick Access Toolbar > Redo Keyboard shortcut Copy Draw tab > Clipboard group > Cut Paste Draw tab > Clipboard group > Copy NEW EDITOR ICON Draw tab > Clipboard group > Copy All Select All Draw tab > Clipboard group > Paste Restore No longer available.
SnagIt 9.0 Help File PDF SnagIt 8 Preview Window and Editor View Menu (Image Capture) ICON MENU OPTION SNAGIT EDITOR LOCATION Previous No longer available. Next No longer available. First Page No longer available. Previous Page View tab > Mutipage group > Next Page Next Page View tab > Mutipage group > Previous Page Last Page No longer available. Go to Page No longer available. Large Icons No longer available. Show Paint Tools No longer available. Show Task Pane No longer available.
Help File PDF SnagIt 9.0 SnagIt 8 Preview Window and Editor View Menu (Video Capture) ICON MENU OPTION SNAGIT EDITOR LOCATION Large Icons No longer available. Autosize Window to Image No longer available. NEW EDITOR ICON Zoom In No longer available. Zoom Out No longer available.
SnagIt 9.0 Help File PDF SnagIt 8 Preview Window and Editor View Menu (Text Capture) ICON MENU OPTION SNAGIT EDITOR LOCATION Large Icons No longer available. Set Font Edit tab > Format group > Font Word Wrap Edit tab > Format group > Word Wrap www.techsmith.
Help File PDF SnagIt 9.0 SnagIt 8 Preview Window and Editor View Menu (Web Capture) ICON 208 MENU OPTION SNAGIT EDITOR LOCATION Large Icons No longer available. Modify Web Filters No longer available. Rescan Website No longer available. NEW EDITOR ICON www.techsmith.
SnagIt 9.
Help File PDF SnagIt 9.
SnagIt 9.0 Help File PDF SnagIt 8 Preview Window and Editor Effects Menu (Image Capture) ICON MENU ITEM NAME NEW SNAGIT EDITOR LOCATION Caption No longer available. Border Custom border effects are no longer available.
Help File PDF 212 SnagIt 9.0 Underlay No longer available. Solarize Image tab > Modify group > Filters > Solarize Edge Detection Image tab > Modify group > Filters > Edge Detect Edge Enhance Image tab > Modify group > Filters > Edge Enhance www.techsmith.
SnagIt 9.
Help File PDF SnagIt 9.0 Eraser 214 Draw tab > Drawing Tools group > Eraser www.techsmith.
SnagIt 9.
Help File PDF Overview, 80 Open Captures Overview, 95 Tips, 96 Output Overview, 72 Preview in Editor, 28 Printer Capture Create profile, 64 Multiple page document, 65 Overview, 62 Profile Wizard, 76 Profiles Context sensitive menu, 74 Create new, 75 Create new with Profile, 76 Organize and sort, 78 Overview, 71 Quick Styles Overview, 100 Search pane Overview, 160 SnagIt Hotkeys, 8 Image Capture, 9 Overview, 6 Program preferences, 192 216 SnagIt 9.