Getting Started Guide © 2012 TechSmith Corporation. All rights reserved.
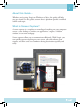
1 About this Guide… Whether you’re using Snagit on Windows or Mac, this guide will help you get started! In this guide, content that is platform-specific is marked within each topic. What is Screen Capture? A screen capture is a snapshot or recording of anything on your computer screen—your desktop, a window, an application, a region, a hidden window, or an entire webpage. Screen captures allow you to communicate efficiently.
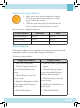
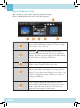
2 All-in-One Capture® All-in-One Capture® allows you to capture images, video, and text (Windows) from an entire screen, region, window, or scrolling window. To initiate an All-in-One Image Capture: Snagit on Windows Snagit on Mac 1. Select the Image profile. 1. Click the Image Capture Mode button. 2. Click the Capture button or press the default hotkey, the Print Screen key. 2. Click the Capture button or press the All-in-One keyboard shortcut, Shift-Control-C.
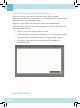
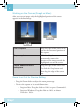
3 Capture a Scrolling Window 1. Move your cursor over the window to capture. If Snagit can capture the scrolling area, arrows appear within the window. 2. Click the arrow that points in the direction you wish to scroll (vertical, horizontal, or both).
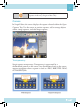
4 Tips for Selecting the Recording Area: If you are sharing your video to a location that requires specific dimensions for the size of your video, it is recommended to record at these dimensions or at the same aspect ratio. Snagit has video guides that show the standard or recommended dimensions for common video sharing destinations such as YouTube, the web, and mobile devices. 1. Press G to turn the video guides on or off. 2. Click and drag to select the recording area.
5 Action Snagit on Windows Snagit on Mac Start or Pause Recording SHIFT+F9 Option-ShiftCommand-S Stop Recording SHIFT+F10 Shift-Control-V The capture opens in Snagit Editor for you to preview and share. To edit the video, import the capture into Camtasia Studio or Camtasia for Mac (sold separately). Move or Hide the Capture Window (Snagit on Mac) The Capture window appears on the right side of the screen by default. To move the window, drag the Capture window to any location on the screen.
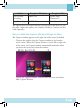
6 Open Captures Tray The tray shows your recent captures and open images. Select a thumbnail in the tray to edit that capture. After saving a capture, the file format appears on the bottom of the thumbnail in the tray. To save an image, choose File > Save or Save As. Click the to remove the capture from the tray. Removing a capture from the tray does not delete the capture. You can reopen the capture by double-clicking it in the Library on Snagit on Windows. The selected capture appears on the canvas.
7 Click the left or right arrows to navigate between captures in the tray (Snagit on Mac only). Canvas In Snagit Editor, the canvas displays the capture selected within the Open Captures Tray. Use the canvas to preview captures, add or arrange objects within image captures, and edit image captures. Transparency Snagit captures transparency. Transparency is represented by a checkerboard pattern on the canvas.
8 Working on the Canvas (Snagit on Mac): After you save an image, only the highlighted portion of the canvas appears in the final image. Trim a capture Drag the edges of the canvas in to cut out the unwanted portions of the capture. Crop a capture Click the Crop button to permanently remove the portions of the image outside the highlighted area on the canvas. Create additional blank workspace Drag the edges of the canvas out. Or, click the Crop button and then drag the edge of the canvas out.
9 SNAG (Snagit on Windows) and SNAGPROJ (Snagit on Mac) File Formats If you want to edit your capture again later, save a copy as a SNAG or SNAGPROJ file. These file formats save all the information about your capture so you can move or change elements such as callout text, tool properties, etc. These file formats can only be opened in Snagit. Drawing Tools Snagit offers several drawing and annotation tools to enhance your image capture.
10 Add a Callout 1. Select the Callout tool. 2. Click to select a callout from the style gallery or adjust the properties to create your own callout style. 3. Click and drag on the desired location on the canvas to add the callout. 4. Double-click within the callout and enter text. 5. To move the callout, click and drag within the callout. 6. To resize the callout, click to select the callout and drag a handle. 7. To add another tail, Control-click on the callout and select Add Tail (Snagit on Mac only).
11 Style Gallery The Style Gallery is a collection of ready-made styles or effects for image captures. Apply a Style from the Gallery 1. On the Draw tab, select a drawing tool. The styles available appear in the Styles group to the right of the tools. 2. Select a style from the gallery. 3. Depending on the tool selected, click or click and drag on a location on the canvas to add the style. Snagit on Mac: 1. On the Tools tab, select the desired tool. 2. The styles available appear below the tools.
12 Add a Customized Style to the Gallery Snagit on Windows: Right-click on an object on the canvas and choose Add to Quick Styles. Snagit on Mac: 1. Select the desired tool or effect(s) and edit the properties. 2. As you edit, the customized style appears in the Style Gallery. 3. Click the Add Style button to permanently add the style to the gallery. Snagit on Windows Effects Add an effect to a selection or to the entire canvas to enhance your capture. Make a Selection Choose Draw tab > Selection tool.
13 Snagit on Mac Effects Add an effect to the entire canvas to enhance your image capture. About Effects: Effects can only be applied to the entire capture, not to a selection on the canvas. You can apply multiple effects to a capture. Applying the Perspective Effect flattens the capture. Click the to view and edit the effect’s properties. You can save the customized effects to the style gallery for future use. Apply an Effect: 1. Click the Effects tab. 2.
14 Share Your Captures Snagit on Windows: Snagit can automatically send your captures to various destinations called outputs. Select one of the following methods to share your captures: 1. Select the share location in the Profile Settings pane. In Snagit Editor, click the Finish Profile button on the Share tab to send the capture to the selected share location. 2. In Snagit Editor, click an output from the Share tab.
15 Snagit on Mac: The output buttons in Snagit Editor allow you to quickly share to popular destinations such as Microsoft Outlook or Entourage, Mail, Screencast.com, Camtasia, YouTube, Twitter, Facebook, Evernote, and FTP. The output buttons are located above the tray. 1. Click to select a capture in the tray. 2. Click an output button or select an option from the Share menu. Snagit disables any outputs that do not support the file format of the selected capture.
16 More Resources Free Training and Support The TechSmith website offers a range of help including video, written, phone, online, and in-product assistance. And it’s FREE! Online Tutorials www.techsmith.com/tutorial.html – Go from novice to expert in no time flat with our library of product-specific training videos and documentation. Technical Support support.techsmith.com – A friendly, knowledgeable voice is just a phone call away. U.S. and Canada – 1.800.517.3001 Outside of U.S. and Canada – +1.517.381.
17
www.techsmith.com | Phone: +1.517.381.2300 2405 Woodlake Drive | Okemos, MI 48864-5910 People everywhere use TechSmith’s screen capture and recording software to communicate clearly and creatively, deliver engaging multimedia presentations, and analyze product usability and customer experience. For over 20 years, we’ve helped people communicate visually and look great doing it.