Morae 3.
TechSmith License Agreement TechSmith Corporation provides this manual "as is", makes no representations or warranties with respect to its contents or use, and specifically disclaims any expressed or implied warranties of merchantability or fitness for any particular purpose. TechSmith Corporation reserves the right to make changes to the content of this manual, at any time, without obligation to notify any person or entity of such changes.
Morae Recorder Help PDF Welcome to Morae Morae is the premier software for deeply understanding customer experiences…and sharing those insights clearly and powerfully. From usability testing to focus groups and beyond, Morae helps you transform designs and marketing to make things people love. Want to test your design? Morae makes it easy to pinpoint usability problems in software applications, websites, prototypes, or mobile devices.
Morae Recorder Page 2 Help PDF www.techsmith.
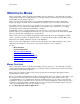
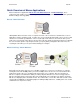
Morae Recorder Help PDF Quick Overview of Morae Applications Morae includes three applications: Morae Recorder, Morae Observer, and Morae Manager. These components work together to provide an easy-to-use, total recording system based on TechSmith’s patented Rich Recording Technology (RRT).
Morae Recorder Help PDF Analyze, Graph, and Share – Morae Manager Within Morae Manager, you can start new projects and edit existing projects, configure Recorder settings, open and analyze recordings, create graphs of your analysis and metrics and create a presentation video. Rich Recording Technology automatically indexes the screen and video recordings collected by Recorder, allowing you to easily search through recordings in Morae Manager.
Morae Recorder Help PDF Getting Help with Morae Several resources are available to help when you run into questions or problems with Morae. Morae Help Files Each of the Morae components has its own Help File. Recorder, Observer, and Manager’s Help files contain detailed information describing how to use Morae. Access the Help files through the Help menu or Help buttons found in the user interface. To open a help topic for the screen or area you are currently using,, press on your keyboard.
Morae Recorder Help PDF Welcome to Morae Recorder Install Morae Recorder on a computer to record a participant’s experience, including audio comments, screen video, and/or camera video. When recording the computer screen, Recorder also captures all system activity, including mouse clicks, web page changes, and other application information. Recorder automatically synchronizes the video and the data, creating a complete digital record of the user experience.
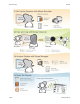
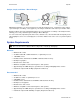
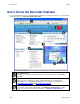
Morae Recorder Help PDF Get to Know the Recorder Interface Use the following figure to become familiar with the main parts of the Recorder interface. To get started recording a session, see How to Use Morae Recorder. Recorder Toolbar Quickly access common Recorder functions. For more information, see Recorder Toolbar. Record Button Click to start a recording. Recorder provides flexible options to start Recorder depending on your equipment and participant set up.
Morae Recorder Help PDF Video and Audio Sources View and select the sources for the main video, Picture-in-Picture (PiP) video, and audio. For more information, see Video and Audio Sources. Audio Monitor View and adjust the audio level. For more information, see Adjust Audio Level. Study Details Study Details define the study including the study name, session instructions, tasks, markers, and surveys. For more information, see Define Study Details.
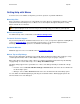
Morae Recorder Help PDF Welcome to Morae Recorder Dialog Box File > New Study Configuration The Welcome to Morae Recorder dialog box allows you to create or open a configuration. See also: • Get to Know the Recorder Interface • Recorder Toolbar • Create a Test Recording • Recording Details • Study Details • Video and Audio Sources • Recorder Preferences • How to Use Morae Recorder Page 9 www.techsmith.
Morae Recorder Help PDF Recorder Toolbar RECORDER TOOLBAR BUTTON DESCRIPTION Creates a new study configuration file. For more information, see Study Configurations. Opens a previously saved study configuration file. Saves the current study configuration in a file. Creates a 15 second test recording, allowing you to preview the audio and video to be captured. For more information, see Create a Test Recording. Opens the Batch Process Recordings dialog box.
Morae Recorder Help PDF To Run a Test Recording 1. Click the Test Recording button in the Recorder toolbar. 2. A dialog box appears asking if you want to continue with the test recording. Click Yes. 3. The Recorder UI minimizes to a tray icon. The test recording begins immediately and proceeds for 15 seconds. 4. The Recording in progress message appears in the Camera Preview pane and the status bar confirms a recording is being made. 5.
Morae Recorder Help PDF See also: • Define Recording Details • Get to Know the Recorder Interface • Welcome to Morae Recorder Dialog Box • Recorder Toolbar • Create a Test Recording • Study Details • Video and Audio Sources • Recorder Preferences • How to Use Morae Recorder Study Details Study Details define the study information, including study name, tasks, markers, and surveys.
Morae Recorder Help PDF Video and Audio Sources Video and Audio Sources show the selected video and audio sources. There is also an audio monitor and video preview to help you set up your session. Video and Audio Sources are affected by the hardware connected to the computer when Recorder is opened.
Morae Recorder Help PDF Recorder Preferences The Preferences dialog box in Recorder contains settings for Recorder preferences. These settings are “global,” and apply to every recording. In Preferences dialog box, designate the following options. Use the following figure to become familiar with the Recorder Preference options. Default output folder Defines where to store recording files. This is a global setting for Recorder, all recording files are saved in this folder. By default, the folder is C:\\...
Morae Recorder Help PDF Recorder hotkeys Defines the hotkey combination to start and stop Recorder and to deliver a survey to participants from the keyboard • Start/stop Recorder hotkey: Choose any combination of Ctrl, Alt, Shift and any of the keys available in the dropdown menu to create a custom hotkey to start and stop Recorder. The default hotkey combination is .
Morae Recorder Help PDF How to Use Morae Recorder Use Morae Recorder to set up study configurations and record sessions. The general process of using Recorder is: 1. Create or open a study configuration. A study configuration defines a group of related recordings. Recordings in a study share the same Study Details including tasks, markers, and surveys. 2. Verify Recording Details. 3. Start recording. 4. Record session. 5.
Morae Recorder Help PDF Study Configurations The ideas of the study and the study configuration are important to understand when working with Morae. For information on working with study configurations, see Template Study Configurations, Create a Study Configuration, and Modify a Study Configuration. What Is a Study? A study involves recording, observing, and logging multiple user research sessions, analyzing the results, and sharing the results with stakeholders.
Morae Recorder Help PDF Template Study Configurations Recorder includes template study configurations to help you define Study Details and Recording Details for different kinds of studies. Templates contain sample tasks, markers, and surveys, along with Recording Details pre-configured for different types of user research. TEMPLATE STUDY CONFIGURATION DESCRIPTION Default study configuration Contains only basic task and marker settings. Records the screen and a PiP video of the participant.
Morae Recorder 6. 7. 8. 9. Help PDF In the Study Details dialog box, define the study details and click OK. Click Modify Recording Details to open the Recording Details dialog box. In the Recording Details dialog box, define the recording details and click OK. Choose File > Save Study Configuration to save the study configuration. See also: • Template Study Configurations • Modify a Study Configuration Modify a Study Configuration 1. Open Recorder. The Welcome to Morae Recorder dialog box opens. 2.
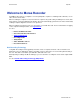
Morae Recorder Help PDF Define Recording Details Recorder > Modify Recording Details button Recording Details define how to record a session with Morae. In the Recording Details dialog box, define the following: • File Details • Capture Options • AutoPilot Settings • Task Logger Settings • Recording Start Settings • Recorder Stop Settings • Observer Settings Recording Details apply to a specific test environment or participant set up.
Morae Recorder Help PDF File Details Recorder > Modify Recording Details button > File Details The fields in the Recording File Details settings of the Recording Details dialog box define the recording name, folder, and description, along with the file processing options. See also: • Capture Options • AutoPilot Settings • Task Logger Settings • Recording Start Settings • Recorder Stop Settings • Observer Settings Recording Name, Recording Folder, and Description Each recording (.
Morae Recorder Help PDF Define File Details after Recording the recording is finished, the Recording File Details dialog box appears. Put information in these fields to name the recording file, define the folder to save the recording, and describe details about the recording (optional.) You can also choose processing options in this dialog box.
Morae Recorder Help PDF Prompt for File Details When Recording Stops You cannot save a recording without a name. You can lose the data from a recording if the test participant, or anyone else, closes the dialog prompting for these details after the recording stops. Enable the Prompt for file details when recording stops checkbox if you do not want to define the file name, folder, and description prior to recording. At the end of recording, Recorder prompts you to Define File Details after Recording.
Morae Recorder Help PDF Defer Processing of Recordings If you defer the final processing, your date is not at an increased risk of being lost or damaged if a crash occurs. Recorded data is written to disk immediately during recording whether you choose to defer final processing or not. Final processing involves compressing the files into an archive. By default, Recorder writes out and verifies each recording (.rdg) file immediately after a recording is completed.
Morae Recorder Help PDF Capture Options Recorder > Modify Recording Details button > Capture Options In Capture Options, define the main video source, Picture-in-Picture option, mouse video effects, and the data to capture during recording. The fields in the Capture Options of the Recording Details dialog box define the data you want Recorder to include in the recording. Use this data later in Manager for analysis and graphs.
Morae Recorder Help PDF Mouse Video Effects Define which, if any, mouse video effects to include in the recordings. Mouse video effects help clarify mouse when you analyze recordings in Manager. The mouse video effects do not appear on the participant’s screen or in the Observer during recording. The effects appear when you import the recording in Manager. See also: • Main Video Source and Picture-in-Picture • Data Data Define which kinds of data you record.
Morae Recorder Help PDF AutoPilot Settings Recorder > Modify Recording Details button > AutoPilot The checkboxes in the AutoPilot Settings of the Recording Details dialog box define if and how you want to use AutoPilot. See also: • AutoPilot • File Details • Capture Options • Task Logger Settings • Recording Start Settings • Recorder Stop Settings • Observer Settings Page 27 www.techsmith.
Morae Recorder Help PDF Enable AutoPilot Enable this checkbox to turn on AutoPilot. When you choose to use AutoPilot, the Task Logger, Recording Start, and Recording Stop change to AutoPilot to provide the recommended configuration. At End of Recording Enable the Start a new AutoPilot recording automatically checkbox to set up AutoPilot for a new recording as soon as one recording ends. Timeout Options If you use AutoPilot to run an unmoderated test, someone may not finish a session.
Morae Recorder Help PDF Who Should Be The Task Logger? When defining the task logger, choose one of the following options. • First Observer connected Use this option if you only have one Observer or everyone connecting to the session could log tasks. If the task logger disconnects Observer from the session, intentionally or not, the next Observer who connects automatically becomes the task logger. • Designated Observer Use this option if you know exactly who you want to log the tasks.
Morae Recorder Help PDF Designate the Task Logger Recorder > Modify Recording Details button > Task Logger To designate a specific task logger by name: 1. 2. 3. 4. Enable the Observer checkbox. Select Designate the task logger. Enter the name of the task logger. Click OK. When the task logger connects to Recorder, the Observer name must match the name designated in Recorder. See also: • Task Logger Settings • Who Should Be The Task Logger? Page 30 www.techsmith.
Morae Recorder Help PDF Recording Start Settings Recorder > Modify Recording Details button > Recording Start Recorder provides flexible options to start Recorder depending on your equipment and participant set up. The following table describes the available options to start a recording. START OPTION DESCRIPTION Manually Recording starts when you click the Start button or use the hotkey combination . Based on an event Recording starts when a certain event occurs.
Morae Recorder Help PDF START OPTION Using Observer DESCRIPTION START BUTTON Recording starts when an Observer clicks Start the recording button on Observer’s toolbar. Click the Start button in Recorder to wait for the start signal from Observer. If you leave the Observer name field blank, any Observer can start Recorder. You need to return to the Recorder computer between recordings to click Start. To avoid this additional interaction with Recorder, see Automatically Restart Recorder.
Morae Recorder Help PDF 5. Disable the Prompt for details when recording stops checkbox. This prevents the Recording file details dialog from appearing after each recording. 6. Enable the Defer processing of recordings checkbox. This places the recording files in a queue for later processing. When you are finished with a series of automated recordings, go back to Recorder and batch process the recording files (File > Process Deferred Recordings). For more information, see Batch Process Recording Files .
Morae Recorder Help PDF STOP RECORDER OPTION Time based DESCRIPTION STOP BUTTON Recording stops at a particular date and time. • Leave the date field disabled to stop the recording at the specified time today. • If this time has already passed for today, the recording stops at the specified time tomorrow. • A time-based stop only occurs one time. After that recording is complete, you must click the Start button again to set Recorder to wait for the next time-based start.
Morae Recorder Help PDF Observer Settings Recorder > Modify Recording Details > Observers With Morae, you can allow one or multiple computers to connect over a network to a computer running Recorder. All observers can view the recording and log markers during a session. This flexibility allows your entire team to observe the screen and camera video and hear the audio of the user, streaming from the Recorder computer. To allow Observers to connect to Recorder: 1. Enable the Allow Observer checkbox. 2.
Morae Recorder Help PDF Define Study Details Recorder > Modify Study Details Study Details define the study including the study name, session instructions, tasks, markers, and surveys.
Morae Recorder Help PDF Define the Study Description Recorder main interface > Modify Study Details > Description tab File > New or Open > Study Configuration > Modify Study Details > Description tab The fields in the Description tab of the Study Details dialog box define the study name, description, and instructions. You can open the configuration in the Morae Add-In for Microsoft Office Word and drop the study details into a Word file to create handouts for participants.
Morae Recorder Help PDF Define the Study Tasks Recorder > Modify Study Details > Task Definitions tab The fields in the Task Definitions tab of the Study Details dialog box define the task names, descriptions, instructions, and success scores. You can open the configuration in the Morae Add-In for Microsoft Office Word and drop the task definitions and instructions into a Word file to create handouts for participants. See Create Session Handouts for more information.
Morae Recorder Help PDF Task Name and Description The task name and description appear when observing a session. If you are the task logger, once you enter a Start task marker, you choose the task from a dropdown list. Put information in these fields to give the task logger enough information to quickly select the correct choice when entering a Start task marker. After importing recordings into Manager, tasks become the basis for graphs created in Manager.
Morae Recorder Help PDF Modify Task and Success Score Definitions Once you save a study configuration, adding or modifying anything on this tab changes your study configuration. You will need to merge recordings if you want them in the same study in Manager. See the Morae Manager Help. In the Task Definitions tab, use the following icons to modify the tasks and success scores. BUTTON USE Click Add to create a new task or success definition.
Morae Recorder Help PDF Define the Study Markers Recorder > Modify Study Details > Marker Definitions tab The fields in the Marker Definitions tab of the Study Details dialog box define the marker colors, types, definitions, and scores. Markers allow you to flag important points in a recording including errors, quotes, and the start and end of tasks.
Morae Recorder Help PDF Marker Color, Type, and Definition The marker color, type, and definition appear when observing a session. People observing with Morae Observer can enter markers and add notes to these markers during the recording. By adding markers and notes during a session, you can save time analyzing and automatically create graphs after importing the recordings into Morae Manager. If you cannot add markers and notes during a session, you can do so in Manager.
Morae Recorder Help PDF Modify Marker and Marker Score Definitions Once you save a study configuration, adding or modifying anything on this tab changes your study configuration. You will need to merge recordings if you want them in the same study in Manager. See the Morae Manager Help. In the Marker Definitions tab, use the following icons to modify the markers and score scores. BUTTON USE Click Add to create a new marker or marker score definition.
Morae Recorder Help PDF Define the Study Surveys Recorder > Modify Study Details > Survey Definitions tab Survey Definitions tab of the Study Details dialog box lists the surveys available in a study and associates a survey with a point in the session, such as the end of the task. You can either Create a Survey Using Custom Questions or Create a Survey Using System Usability Scale Questions. Morae includes the ability to deliver multiple surveys during a session.
Morae Recorder Help PDF Survey Association Choose to associate surveys with session events. Session events include the beginning and end of the recording, as well as the end of each defined task. By associating a survey with a session event, it is “linked” to that event. • AutoPilot automatically displays surveys when the associated session event occurs. • Observer readies the survey associated with the current session event. Click Send Survey to display the survey. Page 45 www.techsmith.
Morae Recorder Help PDF Create a Survey Using Custom Questions Recorder > Modify Study Details > Survey Definitions tab > Add To create a new survey: 1. In the Survey Definitions tab, click Add. The Survey Definition dialog box opens. 2. Enter the Survey Details. You can modify survey names and associations in the Survey Definitions tab. 3. Select Custom Questions. For information on creating a survey using the SUS questions, see Create a Survey Using System Usability Scale Questions. 4.
Morae Recorder Help PDF Create a Survey Using System Usability Scale Questions Recorder main interface > Modify Study Details > Survey Definitions tab > Add The System Usability Scale (SUS) is freely available for use in usability assessment and is used for a variety of research projects; the only prerequisite for its use is that any published report must acknowledge the source of the measure.
Morae Recorder Help PDF 4. Click OK to close the Survey Definition dialog box. See also: • Create a Survey Using Custom Questions • Survey Question Types Survey Question Types Recorder > Modify Study Details > Survey Definitions tab > Survey Definition > Add Create custom questions or use the System Usability Scale (SUS) questions to populate your surveys. You can use the SUS questions only once in a study.
Morae Recorder Help PDF Scale Question For a Scale question in a custom survey, you can define the question, the scale from 1-10, the labels for each end of the scale and you can include a freeform comment. You can add a freeform answer to the Scale custom questions. Page 49 www.techsmith.
Morae Recorder Help PDF Select One Question For a Select One question in a custom survey, you can define the question, the answers where participants can only select one answer and if you want to include a freeform comment. You can add a freeform answer to the Select one custom question. Page 50 www.techsmith.
Morae Recorder Help PDF Select One or More Question For a Select One or More question in a custom survey, you can define the question, the answers where participants can select one or more of the answers and if you want to include a freeform comment. You can add a freeform answer to the Select one or more answers custom questions. Page 51 www.techsmith.
Morae Recorder Help PDF Freeform Question For a Freeform question in a custom survey, you can define the question and have the participants enter a text answer or ask for participant comments. Page 52 www.techsmith.
Morae Recorder Help PDF Video and Audio Sources The Video and Audio Sources pane allows you to view and select the sources for the main video, Picture-inPicture (PiP) video, and audio. You can also adjust the audio level and preview the selected video sources. Video and Audio Sources are affected by the hardware connected to the computer when Recorder opens. Always verify the selected sources prior to recording start. Page 53 www.techsmith.
Morae Recorder Help PDF Quick Tips for Setting Video and Audio Sources • Record from the screen, camera, screen and camera, or two cameras. For more on the video options, see Choose Video Sources. • You can flip your camera video, both vertically and horizontally, so you can set up your camera out of the way of the participant. To flip camera video, click Modify camera settings . • If the audio is going into the red in the Audio monitor, move the audio slider to the left.
Morae Recorder Help PDF For the main video source, select from screen or camera. You have the following options: • Screen (Primary Monitor): Record the desktop of the monitor set as the primary monitor. You can set the primary monitor in Start > Control > Display > Settings tab. • Screen (Entire Desktop): Record the desktop of all monitors connected to the computer. The more monitors you record, the larger the recording file size. • Screen (Region): Select and record a portion of the desktop.
Morae Recorder Help PDF Examples The following show example configurations as seen in the Preview Window. See also: • Choose Video Sources • Select a Region • Choose Audio Source • Modify Video Settings • Camera Video Settings Page 56 www.techsmith.
Morae Recorder Help PDF Select a Region To record only a portion of the full computer desktop, choose to record any rectangular Region of the desktop. You may want to record a region for any of the following reasons: • You want to capture one monitor that is not the primary monitor. • You want to capture an area that spans more than one monitor but do not want to record the entire desktop. • You are only interested in what happens in one area of the desktop, possibly in one application.
Morae Recorder Help PDF See also: • Choose Video Sources • Examples • Choose Audio Source • Modify Video Settings • Camera Video Settings Choose Audio Source Use the dropdown list to select from the various audio sources or choose not to record audio. You can also use the Adjust Audio Level to view and adjust the audio level. Use the dropdown list to select the audio source. You have the following options: • None: Do not record audio.
Morae Recorder Help PDF Adjust Audio Level Use the Audio Monitor to view and adjust the audio level. Use the following to help you adjust the audio level. Before each recording, create a test recording to verify audio levels. Good Audio Level Low Audio Level High Audio Level Modify Video Settings Click Modify screen video settings or Modify camera settings exact settings available depend on the video sources you select. to adjust the video settings.
Morae Recorder Help PDF Screen Video Settings In the Screen Video dialog box, choose the compression and performance options that match your recording situation. The Screen Video options apply to the capture of screen video only and not to the video input from a camera. The following are the settings available when you use screen as the main video source. OPTION DESCRIPTION AND USE Lossless video (recommended) Provides the best quality video recording for most situations.
Morae Recorder Help PDF Screen Video Compression Setup Options In the Video Compression Setup dialog box, you can change your screen video codec selection and adjust compression quality and key frame rate. Additional configuration options for the codec may be available by clicking the Configure button in the Video Compression Setup dialog box. For more information on codecs, see Codecs in Morae.
Morae Recorder Help PDF Configure Video Compression Setup The Configure button in the Video Compression Setup dialog box allows you to customize the compression settings for the video codec. This table describes the TSCC codec. Each codec has its own unique configuration options. For information on each of those options, consult the manufacturer's documentation.
Morae Recorder Help PDF The following are the settings available when you use a camera as either the main or PiP video source. CAMERA TAB OPTION DESCRIPTION AND USE Flip Flip the video vertically, horizontally, or both. Camera Properties Opens the Camera Properties dialog box to adjust various aspects of video quality, such as brightness, contrast, sharpness, RGB values, etc. For more information, see Camera Properties Options.
Morae Recorder Help PDF OPTION Video Size DESCRIPTION AND USE Use the default sizes or lower the size for smaller video and file size. The dimensions given with the Video Size slider are approximate and actually video size may vary depending on your camera properties. Framerate Select the framerate for the camera. The value of Max depends on your camera properties. If your captured video is choppy, try lowering the framerate setting.
Morae Recorder Help PDF The following table describes the Video Compression Setup dialog box. OPTION DESCRIPTION Compressor Select the codec from the dropdown list. Compression quality Configures the codec to compress at a lower image quality and create a smaller file size, or compress at a higher image quality, resulting in a larger file size. Adjust the compression quality using the slider bar. For higher quality, move the bar to the right. For lower quality, move the bar to the left.
Morae Recorder Help PDF AutoPilot Morae AutoPilot presents study and task instructions along with surveys right on the computer running Recorder. By default, AutoPilot logs the start and end of tasks automatically, while Observers can still connect and log markers. Uses of AutoPilot There are many reasons to use AutoPilot. Here are some examples: • You do not have someone to log tasks with Observer. • You want to conduct unmoderated sessions. • You want to log tasks automatically.
Morae Recorder Help PDF Use the Unmoderated Usability Study Template 1. Open Recorder. The Welcome to Morae Recorder dialog box opens. 2. Select Create a new study configuration based on. 3. Select the Unmoderated Usability Study template from the dropdown list. 4. Click OK. The template study configuration opens in Recorder. 5. Click Modify Study Details to open the Study Details dialog box. 6.
Morae Recorder Help PDF File > Save Study Configuration or click the Save Configuration icon. Add AutoPilot to a Study Configuration 1. Click Modify Recording Details to open the Recording Details dialog box. 1. In the Recording Details dialog box, click AutoPilot. 2. Select to Enable AutoPilot. 3. When you enable AutoPilot, all other settings needed to run an AutoPilot session automatically change to provide the recommended configuration. 4. Modify any other recording details and click OK. 5.
Morae Recorder Help PDF Run an AutoPilot Session The following is the step by step of how an AutoPilot session works. 1. 2. 3. 4. Open Recorder. The Welcome to Morae Recorder dialog box opens. Select Open a saved study configuration and open your saved AutoPilot study configuration. Click the Record button. AutoPilot starts and displays the study instructions. The participant clicks Start. 5. The first task displays. The participant reads the task and clicks Start.
Morae Recorder Help PDF 10. The next task displays. This process continues until the participant reaches the end of the test. 11. After the participant clicks End Task for the final task, if there is a survey associated with the end of the test, it displays. 12. When the final survey is complete, a thank you message appears. The participant clicks OK to end the test. Page 70 www.techsmith.
Morae Recorder Help PDF With the help of the Morae Add-In for Word, you can use a study configuration to create paper handouts for your sessions. To create session handouts from a study configuration: 1. In Recorder, create a study configuration, making sure to enter the Study Instructions and Task Instructions in the Study Details dialog box. 2. Save the study configuration. 3. Open Microsoft Word and the Morae Task Pane.
Morae Recorder Help PDF Study Components Available in the Morae Add-In for Microsoft Word Page 72 www.techsmith.
Morae Recorder Help PDF Log a Session When recording only camera video, you are able to log on the computer running Recorder. You can log markers, marker scores, and add text notes to save with the recording file. You can set up the Study Configuration to allow the person logging with Recorder or an Observer to logs tasks and task scores. At the end of a session, the tasks and task scores are saved with the recording.
Morae Recorder Help PDF Get to Know the Log When logging, Recorder includes a Log displayed like a spreadsheet with rows and columns. The Log displays all markers entered in Observer during the recording. If you are the logging tasks, the Log also displays the tasks.The Log also displays the surveys, if applicable. Quick Tips for Logging a Session • There are several different ways to log markers and tasks. Review Different Ways to Log a Marker.
Morae Recorder Help PDF Markers Use markers to quickly log important points in a recording. During analysis, you can quickly find and review the markers to identify points of interest. You can set an unlimited number of markers in a recording. Markers are recording-specific (defined in the study configuration) and all observers for a recording use the same set of pre-defined markers to work with. During recording, you can go back and edit previously logged markers and tasks.
Morae Recorder Help PDF Tasks While each observer can log markers, marker scores, and text notes, only the designated task logger can log tasks and task scores. The task logger is defined in the study configuration. For more information, see Define Task Logger Options. The task logger logs tasks by entering start and end markers at the beginning and end of the tasks the participant performs during the recording. If you enter a start or end marker too early, you can enter another start or end marker.
Morae Recorder Help PDF See also: • Get to Know the Log • Quick Tips for Logging a Session • Markers • Surveys • View Recording Details Surveys You can open (deliver) surveys anytime during the recording. While logging, read the survey questions to the participant and enter the answers in the open survey, or have the participant fill out the surveys on the computer running Recorder. You can later graph the answers in Manager. You can have multiple surveys.
Morae Recorder Help PDF Quick Tips for Surveys Surveys are available at the top of the Log and in the Recording Control menu. • Surveys appear in the order they are entered into the study configuration. • If linked to a session event, a survey is selected in the survey dropdown list when that session event occurs. For example, at the end of Task 1, the survey associated with the end of Task 1 is selected in the survey dropdown list.
Morae Recorder Help PDF View Recording Details View > Recording Details The Recording Details dialog box displays data about the current recording session. See also: • Get to Know the Log • Quick Tips for Logging a Session • Markers • Tasks • Surveys Page 79 www.techsmith.
Morae Recorder Help PDF View Your Notes and Markers Right After a Session After observing and logging a session, you may want quick access to the notes and markers created during the session. Use the following procedures to save and view your markers and notes. • Save Your Notes and Markers • View Your Notes and Markers Save Your Notes and Markers 1. Prior to a session, open Observer and enable Marker > Prompt to save copy of log. 2. Proceed with the session, logging markers and notes. 3.
Morae Recorder Help PDF 5. Follow the steps in the Text Import wizard. The log opens in Excel. Page 81 www.techsmith.
Morae Recorder Help PDF Customize Logging for the Session To help you view the recording more easily, Morae allows you to customize how you view and log a session. See the following topics for more information about the various ways to customize the interface: • Adjust the View of the Recording Session • Picture in Picture (PiP) • Marker Definitions Window Adjust the View of the Recording Session To make it easier to view the recording, you may need to adjust the way the video appears.
Morae Recorder Help PDF Full Screen View The Full Screen view fills the entire screen with the recording and a floating toolbar appears. To toggle the Full Screen view on/off, do one of the following: • Click the Full Screen button • Use the hotkey. • Choose View > Full Screen. Page 83 . www.techsmith.
Morae Recorder Help PDF Scale to Fit View If the recording is larger than the Viewing window, choose the Scale to Fit view. This view fits the entire recording into the Viewing window. This option is available in both Normal and Full Screen view. To toggle the Scale to Fit option on or off, do one of the following: • Click the Toggle Scale-to-Fit button • Use the hotkey. • Choose View > Scale to Fit. .
Morae Recorder Help PDF Picture in Picture (PiP) When recording begins, a window containing the Picture in Picture (PiP) camera video appears by default in the lower right-hand corner of the Viewing window. You can move and resize the PiP window in the Viewing window. PiP is best viewed with the Scale to Fit option turned on. If you can’t find the PiP window, choose View > Scale to Fit and the PIP window appears in the lower right-hand corner.
Morae Recorder Help PDF Marker Definitions Window The Marker Definitions window displays the markers defined in the study configuration that you can use to log events and tasks during the recording. To log a marker, click a button in the Type column. The Marker Definitions window is visible by default. To hide the marker definitions, choose View > Marker Definitions. See also: • Adjust the View of the Recording Session • Picture in Picture (PiP) Page 86 www.techsmith.
Morae Recorder Help PDF Change the Communication Port In some cases, Recorder and Observer cannot connect on the default communication port (5555). In this case, the study configuration in Recorder and the communication port in Observer must be set to an alternative port number. If you change the post in Recorder, all observers must set the same port to connect. Make sure to give the port number to all potential observers. To use an alternative port: 1.
Morae Recorder Help PDF 5. Click OK to apply the selected port and return to the Connect to Recorder dialog box. If you have any problems with connecting on an alternative port, please contact the person who set up the session and your system administrator. Page 88 www.techsmith.
Morae Recorder Help PDF Troubleshoot Observer to Recorder Connection Issues Trouble connecting to Recorder? Here are some answers to common questions: • I cannot establish a connection between Observer and Recorder. What should I do? • I got disconnected during a session. What should I do? • My video is lagging behind the test. Can I make the video play in Observer in real-time? I cannot establish a connection between Observer and Recorder.
Morae Recorder Help PDF Tips and Reference Information This section contains additional information based on some frequently asked user questions.
Morae Recorder Help PDF Prompt before checking for upgrade - Morae displays a dialog asking whether you want to check for available upgrades. If you disable this option, the Check for Upgrade runs silently in the background (without prompting you). • • Restore Default - Returns the settings in this dialog to the default values.
Morae Recorder Help PDF Morae Player System Requirements To run Morae Player, your system must meet the following requirements: • Microsoft Windows 98, Me, NT, 2000, XP or later version. • Windows-compatible sound card and speakers (recommended) • 360 KB of hard-disk space for program installation • Basic Windows multimedia and AVI file support must be installed. This is normally installed by default with Windows. • The standard Windows MCI Microsoft Video for Windows must be installed.
Morae Recorder Help PDF Morae Player Command Line Options The following table describes all of the command line options available for Morae Player. COMMAND LINE OPTION DESCRIPTION /A Launches with “Always on top” option. /BC RGB(255,0,255) Sets background color; the default is black. For more information, see Change the Morae Player Background Colors from the Command Line. /D Launches without allowing “dragging” by the video area. /E Exits after playing the video.
Morae Recorder Help PDF Change the Morae Player Background Colors from the Command Line You can change the background color for the video files displayed in Morae Player. The background color only shows when the video playing does not fill the entire frame. For example, if the player is maximized while a 360x240 video is playing, the background color fills in around the edges of the video. By default, the background is black.
Morae Recorder Help PDF If Recorder finds data that might be recoverable If Recorder’s file recovery process finds data that may be recoverable after a crash, a dialog appears with the following options: • If you want Recorder to attempt to recover the recording data immediately, select Recover the data now. • If you want Recorder to place the data in the batch processing queue for processing later, select Recover the data later.
Morae Recorder Help PDF Commonly Used Codecs TSCC is optimized for desktop screen video, where video quality is important. There are many codecs designed to compress real-world, or full motion video. Morae can take advantage of any standard codec. TechSmith Screen Capture Codec (TSCC) The TechSmith Screen Capture Codec (TSCC) is the default codec used for recording screen video.
Morae Recorder Help PDF DivX DivX is an advanced codec created and distributed by www.divxmovies.com. DivX provides excellent compression with great quality, comparable and often better than Mpeg 4 V2. For general information on this codec, please visit: http://www.divxmovies.com/codec/ DivX is an excellent alternative to those who do not have Microsoft Mpeg 4 V2. DivX is not supported for the Web cam recording in Morae. DivX can only be used for the screen recording.
Morae Recorder Help PDF Lossless Video Default Settings Recorder: Machine Settings button Manager: Present tab > File > Produce Highlight Video. The Lossless video option is the best choice for recordings and videos that contain primarily typical officestyle application content. The Lossless video option uses the TSCC codec to compress screen video. TSCC compression is lossless and provides the highest quality and smallest file sizes for low-complexity screen content.
Morae Recorder Help PDF OPTION DESCRIPTION Compressor Select the codec from the dropdown list. Compression quality Configures the codec to compress at a lower image quality and create a smaller file size, or compress at a higher image quality, resulting in a larger file size. Adjust the compression quality using the slider bar. For higher quality, move the bar to the right. For lower quality, move the bar to the left. Key frame every (n) frames Specify how often a key frame is recorded.
Morae Recorder Help PDF Morae Recorder COM Server Morae Recorder supports an out-of-process COM server that gives you access to many of its powerful recording features. This functionality can be accessed though any programming environment that supports COM. These include Visual Basic, Visual C/C++, Visual Studio.Net, Delphi and C++ Builder. The COM Server is built into Morae Recorder. To start using it: 1. Install Recorder. This automatically makes the COM server available to other applications. 2.
Morae Recorder Help PDF Record Silently from the Command Line You can use a command line option to “silently” launch the Recorder application, load a study configuration and begin recording. When you use the command line option, the interface for Recorder never appears. The order of command line arguments is: “[path to Recorder.exe]” “[path to the configuration file]” -start For example: “C:\Program Files\TechSmith\Morae\MoraeRecorder.exe” “C:\Morae\myconfig.
Morae Recorder Help PDF Morae File Types The following table describes files types used with Morae. FILE EXTENSION RDG DESCRIPTION Save a recording created in Morae Recorder to create a file with an .rdg extension. Create one recording per participant. The recording (.rdg) file includes video (camera and screen), logged markers and tasks, selected event streams (camera, microphone, keystrokes, screen text and mouse clicks) and study configuration information.
Morae Recorder Page 103 Help PDF www.techsmith.
Morae Recorder Help PDF Morae File Sizes The following topics provide information about Morae file sizes and moving Recorder files. Morae Recorder File Size As a general rule, you can expect to use 10 to 15 MB per minute in a recording (.rdg) file. However, various factors determine file size and the actual content being recorded is the biggest factor.
Morae Recorder Help PDF Morae Highlight Video File Size The file size of highlight videos can vary greatly depending on the video format selected for production. AVI highlight videos are generally much larger than WMV files, with higher-quality. Morae WMV files are often around 3 to 4MB per minute. If you need to distribute your highlight videos over the web, via email or through other limited space or low bandwidth mediums, we recommend using WMV. Page 105 www.techsmith.
Morae Recorder Help PDF Managing Recording Files After a recording is complete, Recorder creates one recording (.rdg) file. The .rdg file for the current recording is stored in the Folder location defined in the study configuration. If you did not specify a folder in the study configuration, recording files are saved in a default output folder on the Recorder computer. To view or change the default output folder location, choose Record > Machine Settings > Preferences tab.