
Operation Manual


Camtasia Studio Version 8 Help
www.techsmith.com - 62 -
Editing Dimensions
To access these options, in Editor click the Editing Dimensions icon on the Preview Window or choose
View menu > Project > Editing Dimensions.
Editing Dimensions Overview
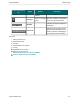
The Editing Dimensions dialog box appears the first time you add a clip to the timeline. The editing dimensions
allow you to edit your video at the size you want your final video to be.
For the best results, select editing dimensions that match the size you want your final video to be.
For full screen recordings or recordings made from standard or wide screen presets, the default setting
works best.
To change the editing dimensions to a standard size preset, click on the dimensions and choose the
preset from the menu.
To enter a custom width and height for the editing dimensions, enter dimensions (in pixels) into the
Width and Height fields.
Editing dimensions of at least 640 x 480 are required for any video that will have a table of contents
(TOC) or quiz.
Choose editing dimensions smaller than the original recording to automatically add SmartFocus zoom
animations to the timeline.
See also
Welcome Window
Clip Bin
Import Media into Clip Bin
Library
Add Media to the Library
Manage Library Content
Export Library Assets as a ZIP File (LIBZIP)
_________________________________________________________________________________________________________