www. super-remodel. com o / Lgl SUPER-E is a new brand from Tech one Hobby. It focus on the design and manufacture of electrical molded models. Innovation and concentration is our principle. SUPER-E will develop more electrical molded models to you all and give you brand-new flying experience. Features: It's like a gust of wind a scream a beeline an enjoyment 1.Wing fences on the leading edge make the flying mare stable. 2.
www. technophobe. com & Po Do not fly under the conditions below Wind strong enough to make the trees rustle. A street with many trees or street lamps. Close to high voltage electrical wires. High Population density areas. Cautions for flying Front lawns and parks make excellent flying areas. Make sure you have permission to fly and follow safety guidelines set by local authorities. The calmer the wind, the better! Note for Storage Please disconnect the lip packs when finished flying.
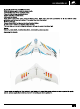
www. super-remodel. com o / Lgl Foam parts Included In the packing: ei i:Fuselage . Left wing . Right wing . Right Rudder Left Rudder EDF cabin . Air outlet . Equipment cabin canopy . Nose cover 10.Left wing fence 11.Right wing fence Parts included in the packing CONDOR AWN 42. Right push rod 13. Hermaphroditus 14. Wings connecting carbon tubs 6*4*408mm 15. Magnet D10MM 16. Iron slice D10mm 17.EDF fixing reinforcements PCs 18.Battery fixing board 19.EDF fixing frame PCs 20.
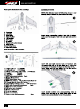
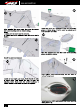
www. technophobe. com & Po Install the EDF with motor: pass the 3 motor wires Glue the two wing fences on ‘corresponding slots'of through the hole on the fuselage, then through the both wings. hole on the bottom equipment cabin, finally into equipment cabin. i o a Install the air outlet on fuselage with slug. And install the nose cover on the nose with glue. ng place of Press the EDF fixing reinforcements on the sides of EDF, then use PCs EDF fixing screws to fix. Make sure the EDF is fixed firmly.
F927 a a hte Install the servo arm protectors onto corresponding places of both wings. They're used to protect servo arms and also as a skid. After installed the servo arms, then glue the servos into corresponding slots on bottom wings. Note: 1. Make sure the servo arm is centered. 2. Please use servo extension once the servo wire is limited. Glue the magnet and iron slice onto corresponding places as picture shown. Install the push rod adjuster.
££ www. technophobe. com After test, you can cover the equipment cabin canopy as picture shown. Recommended Flying Setup Max servo travel of aileron: 25 degrees up and degrees down (30mm) Max servo travel of elevator:25 degrees up and 25 degrees down (30mm) Setting the correct control surface travels is important if you wish the model to respond to the control commands in a balanced manner. The travels should always be measured at the widest part of the control surface.
www. super-remodel. com o / Lgl Hand-launching Please don't try powered test-glides with this model — the result is invariably a damaged air frame. The Neptune should be hand-launched with the motor running at half-throttle, and always pointing directly into wind. Ask an experienced modeler to hand-launch your aircraft for you. The launcher should run forward for two or three paces, then give the machine a powerful straight launch, with the wings and fuselage level.
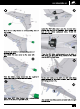
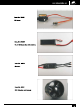
Neptune Red: 08200R Neptune Blue: 08200B Item.No: 08201 Left and right wing Item.No: 08202 Middle fuselage tem. No: 08203 Double rudders www. technophobe.
duper-€ www. spurs-emodel. com A gy Item.No: 08204 Equipment cabin canopy Item.No: 08205 Plastic parts Item.No: 08206 Self-adhesive color labels Item.