
Operation Manual


4
How to Install a New Satellite(Fixed Non-Motorized System)
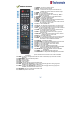
Press the MENU button on the remote and press the OK button on Installation setup.
Press OK on satellite to display a Satellite List. To add a satellite, press the YELLOW( ) button
on the remote. Press the EXIT button on the remote to exit the list.
When the quality bar is at its highest level, press the RED( )button on the remote to scan the
satellite. You can see Search popup menu. Press OK button to search channels.
If you scan multi-satellites, Go to Auto Navigation menu.
How to Setup a Monoblock or DiSEqC Switch(Up to 4 LNBs / Dishes)
Press the MENU button on the remote and press the OK button on Installation setup.
Press OK on satellite to display a Satellite List. Select a Satellite(e.g. Hotbird 13E and Astra 19.2E)
and press the YELLOW( ) button on the remote for each Satellite to save, Press the EXIT button
on the remote to exit the list.
Go to DISEQC 1.0 for 4 DiSEqC Switch or DISEQC 1.1 for over 4 DiSEqC Switch.
(e.g. Hotbird 13E as Number 1 and Astra 19.2E as Number 2).
When the quality bar is at its highest level, press the RED( )button on the remote to scan the
satellite. You can see Search popup menu. Press OK button to search channels.
If the above installation was not successful, change the DiSEqC Switching number.
(e.g. Hotbird 13E as Number 2, Astra 19.2E as Number 1).
How to Setup a DiSEqC 1.2 Motorized System.
Press the MENU button on the remote and press the OK button on Installation setup.
Press OK on satellite to display a Satellite List. Select a Satellite(e.g. Hotbird 13E and Astra 19.2E)
and press the YELLOW button on the remote for each Satellite to save, Press the EXIT button on
the remote to exit the list.
Press the EXIT button again. Press OK on Motorized Setup. Press OK again to display a Satellite
List. Select a Satellite and press OK. Go to the Third line(DiSEqC Motor) and use the Left/Right
buttons on the remote to select DiSEqC 1.2.
Go to Move and press and hold the Left/Right buttons on the remote until you get a Signal Quality
of more than 40%. Go to Command type and select Save Position and press OK to save.
Press the RED( ) button on the remote to scan. Repeat the above for more satellites.
How to Setup a USALS Motorized System.
Press the MENU button on the remote and press the OK button on Installation setup.
Press OK on satellite to display a Satellite List. Select a Satellite(e.g. Hotbird 13E and Astra 19.2E)
and press the YELLOW( ) button on the remote for each Satellite to save, Press the EXIT button
on the remote to exit the list.
Press the EXIT button again. Press OK on Motorized Setup.
Press OK again to display a Satellite List. Select a Satellite and press OK.
Go to the Third line(DiSEqC Motor) and use the Left/Right buttons on the remote to select USALS.
Go to Position Setting and press OK. Then go to Longitude and Latitude and enter the coordinates
of where you live.(London's Longitude is 00.1 West, South of UK's Latitude is 51.5 North).
Press the EXIT button on the remote. Go to Command Type and select Go To Position and press
OK. Wait until the Signal Quality is more than 40% in the progress bar.
Press the RED( ) button on the remote to scan.
If the Signal Quality is below 40%, then the settings are incorrect and the Longitude needs to be
adjusted, for example : 00.2, 00.3, 00.4, 5/6/7/8/9 West or East.
The Latitude may also need to be adjusted. If you still have not got a signal, then the external
installation(dish,etc) needs to be adjusted.