WT 197 INSTRUCTION MANUAL RADIO CONTROLLED ALARM CLOCK WITH TEMPERATURE AND CALENDAR P.
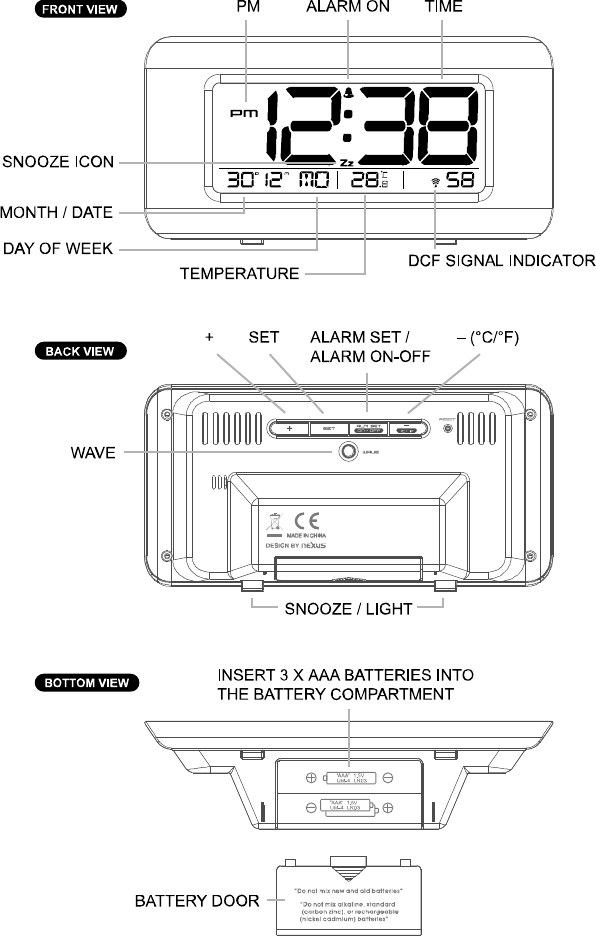
INSTALLATION For best reception of radio controlled signal, keep your clock close to a window and away from metal surfaces, electrical appliances and magnetic fields. BATTERY INSTALLATION 1. Slide open the battery cover at the bottom of your unit. 2. Insert 3 x AAA batteries into the battery compartment by observing the correct + / - polarity signs inside the battery compartment. 3. Replace the battery cover. Your clock is ready to work you.
TO SET CALENDAR, 12/24 TIME AND TIME 1. Press and hold SET for 2 seconds, time digits change to “24 Hr” and flash, press +/- to select “12 Hr” time format or “24 Hr” time format. When 12HR is selected, AM or PM will be displayed. 2. Then press SET once again, time digits change to “00”and flash. Press +/- button to select time zone: “00” = GMT +1 hour (e.g. Germany) “01” = GMT +2 hours (e.g. Finland) “-01” = GMT 00 hour (e.g. U.K.) 3. Then press SET once again, hour digits flash.
2) To stop the alarm, press ALM SET / ON-OFF once, the alarm beep will stop and the become static, alarm will beep again same time next day. icon Alarm Duration: 2 minutes TO DISPLAY TEMPERATURE IN DEGREE °C OR °F Simply press – (°C/°F) to display temperature in degree °C or degree °F. TROUBLE SHOOTING In case your clock shows irrelevant information or digits, it maybe affected by electrostatic discharge or interferences from other devices. Press the RESET button on the top of your clock.
Words in the figure: ENGLISH Figure 1: FRONT VIEW PM ALARM ON TIME DCF SIGNAL INDICATOR TEMPERATURE DAY OF WEEK MONTH / DATE SNOOZE ICON OTHER LANGUAGE BACK VIEW + SET ALARM SET / ALARM ON-OFF – (°C/°F) SNOOZE / LIGHT WAVE BOTTOM VIEW INSERT 3 X AAA BATTERIES INTO THE BATTERY COMPARTMENT BATTERY DOOR P.