WIRELESS 433 MHz TEMPERATURE STATION Instruction Manual INTRODUCTION: Congratulations on purchasing this revolutionary 433MHz temperature Station which provides advanced data-logging and data-analysis functions for up to three outdoor temperature readings. The temperature station is connectable to PC by the COM port and data importing to PC is allowed. By applying the smart software provided, user may perform data analysis and statistics conveniently in PC.
DCF radio controlled time with manual setting option Time zone option ±12 hours Indoor and outdoor temperature display with MIN/MAX records and time of reception Indoor and outdoor humidity display as RH% with MIN/MAX records Data logging function – can store up to 3000 sets of Temperature/Humidity data Connectable to PC (Com port) – data can be transferred to PC with the software (in CD ROM) provided Can receive up to 3 outdoor transmitters Time reception ON/OFF selectable Dew point temperature displayed T
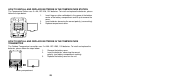
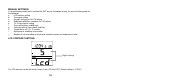
HOW TO INSTALL AND REPLACE BATTERIES IN THE TEMPERATURE STATION The Temperature Station uses 3 x AA, IEC LR6, 1.5V batteries. To install and replace the batteries, please follow the steps below: 1. Insert finger or other solid object in the space at the bottom center of the battery compartment and lift up to remove the cover. 2. Insert batteries observing the correct polarity (see marking). 3. Replace compartment cover.
BATTERY CHANGE: User shall replace batteries of the temperature station when the battery low indicator is displayed at the LCD. If user does not replace batteries, working error may be resulted. Note: After changing batteries in temperature station, there is no need for user to reset the temperature station. In fact, the temperature station can remember all transmitter information and sequence as per the pervious set-up.
SETTING UP 1. Insert batteries into the Temperature station (see “How to install and replace batteries in the Temperature” above). Once the batteries are in place, all segments of the LCD will light up briefly. Then the indoor temperature and humidity will be displayed. The time will be shown 0:00 and the date as 1.1.04. Note: If the indoor temperature and humidity are not displayed after 15 seconds, remove the batteries and wait for at least 2 minutes before reinserting them.
DCF-77 RADIO CONTROLLED TIME The time base for the radio controlled time is a Cesium Atomic Clock operated by the Physikalisch Technische Bundesanstalt Braunschweig which has a time deviation of less than one second in one million years. The time is coded and transmitted from Mainflingen near Frankfurt via frequency signal DCF-77 (77.5 kHz) and has a transmitting range of approximately 1,500 km.
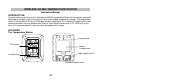
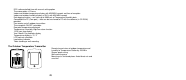
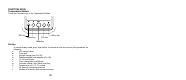
FUNCTION KEYS: Temperature Station: There are 5 function keys in the Temperature Station: Minus key SET key Alarm key Plus key Mode key Set key In normal display mode, press and hold for 3 seconds to enter the manual setting mode for the following: a. LCD contrast level b. Time zone c. Daylight saving time (On/ Off) d. Radio-controlled time reception (On/ Off) e. 12/ 24 hour Display f. Time setting (Hour and Minute) g. Calendar setting (Year, Month and Day) h. Temperature unit (°C/ °F) setting i.
In view mode or alarm mode, press to go back to normal display mode Plus (+) and Minus (–) key In normal display mode, press to select a channel (the indoor sensor or one of the outdoor transmitters) Press to make adjustment (increase or decrease) in different manual settings and alarm setting Mode key (MODE) In normal display mode, press to toggle between the following view mode: a.
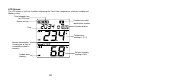
LCD Screen: The LCD screen is split into 4 sections displaying the Time/ Date, temperature, relatively humidity and Memory status. Time reception icon (for DCF time) Outdoor transmitter identification number Buzzer-on icon Calendar display Time Temperature reading in ºC/ ºF Memory data display (showing no.
MANUAL SETTINGS: In normal display mode, press and hold the SET key for 3 seconds to enter the manual setting mode for the following: a. LCD contrast setting b. Time zone setting c. Daylight saving time On/ Off setting d. Radio-controlled time reception On/ Off setting e. 12/ 24 hour format setting f. Time setting (Hour and Minute) g. Calendar setting (Year, Month and Day) h. Temperature unit (°C/ °F) setting i. Relearning or removing a transmitter j.
1. 2. 3. In normal display, press and hold the SET key until the digits “Lcd” starts flashing. Use the Plus (+) and Minus (–) key to view all levels of contrast. Select the desired LCD contrast. Confirm with the mode or Alarm (AL) key to go back to the normal display mode. TIME ZONE SETTING: Digits flashing The time zone default of the Temperature Station is “0”. To set a different time zone: 1. Press and hold the SET key until the digits “Lcd” starts flashing. 2.
DAYLIGHT SAVING TIME ON/OFF SETTING Note: The function of day night time saving on/off is only applicable to specific area in United states using WWVB time sources. It is not applicable for DCF-77 signal in European countries. User may skip doing this setting for this European version temperature station. Setting of “dS On” or “dS off” will have no effects on the reception time.
TIME RECEPTION ON/OFF SETTING: Digits flashing In area where reception of the DCF time is not possible, the DCF time reception function can be turned OFF. The clock will then work as a normal Quartz clock. (Default setting is ON). 1. Press and hold the SET key until the digits “Lcd” starts flashing. 2. Press and release the SET key three times to enter the time reception time setting. The digit “rEc” will be flashing. 3. Use the Plus and Minus key to set the time reception function to on or off mode. 4.
12/24-HOUR FORMAT SETTING: Digits flashing The time display can be selected to show hours in 12-hour or 24-hour settings. (Default 24-Hour) 1. Press and hold the SET key until the digits “Lcd” starts flashing. 2. Press and release the SET key four times to enter the time format setting. The digit “24h” will be flashing. 3. Use the Plus and Minus key to set the time shown in 12-hour or 24-hour format. 4. Press the Mode or Alarm key to confirm and go back to the normal display mode.
MANUAL TIME SETTING: In case the Temperature Station cannot detect the DCF-signal (for example due to disturbances, transmitting distance, etc.), the time can be manually set. The clock will then work as a normal Quartz clock. Minutes flashing Hour flashing 1. 2. 3. 4. 5. 6. Press and hold the SET key until the digits “Lcd” starts flashing. Press and release the SET key five times to enter the hour setting. The hour digit in the time LCD will be flashing. Use the Plus and Minus key to set the hour.
DCF tower icon will flash. If reception has been unsuccessful, then the DCF tower icon will not appear but reception will still be attempted the following hour. CALENDAR SETTING: Date Month Year The date default of the Temperature Station is 1. 1. in the year 2004. Once the radio-controlled time signals are received, the date is automatically updated. However, if the signals are not received, the date can also be set manually. 1. Press and hold the SET key until the digits “Lcd” starts flashing. 2.
6. 7. 8. Press the SET key one more time to confirm the month and advance to the day setting. The day digit will be flashing. Use the Plus and Minus key to set the day. Press the Mode or Alarm key to confirm and go back to the normal display mode. TEMPERATURE UNIT SETTING (°C/ °F): Digit flashing The temperature display can be selected to show temperature data in °C or °F (Default °C). 1. Press and hold the SET key until the digits “Lcd” starts flashing. 2.
LEARNING/ REMOVING A TRANSMITTER (CHANNEL) After replacement of batteries of a particular transmitter, it is necessary to learn the transmitter again in the learning mode. On the other hand, when user want to decrease the number of transmitters to be applied, he may remove the transmitter so that the data from this channel will not be displayed in the temperature station. The below procedures describe how to “re-learn” or “remove” a channel: 1.
THE NUMBER OF OUTDOOR TRANSMITTERS TO BE SAVED INTO THE SYSTEM MEMORY Digits flashing Up to 3 outdoor transmitters can be received by the temperature station. User may decide the number of transmitter data to be saved to the permanent memory of the temperature station. For instant, user may apply 3 transmitters but set to save the data only from particular 2 transmitters. To set the number of transmitters whose data are to be saved in the system memory: 1.
On the other hand, if user has initially applied 3 transmitters but then remove the Channel 2, the temperature station will thereafter display “--.-“ for Channel 2. And if the user has chosen “Enr = 2, then data from Channel 1 to 2 will be stored in the memory, instead of Channel 1 and 3. The data stored in the memory for Channel 2 will be “--.-“. After the “Enr” number has been changed, the history data will be cleared and “mem” will be reset to “0000”.
VIEWING VARIOUS TYPE OF TEMP/HUMDITY READINGS OF A SELECTED CHANNEL: After a particular channel (the indoor sensor or one of the outdoor transmitters) has been selected by pressing the Plus or Minus key, the following modes of data may be viewed by user: a. The Max temperature and Max humidity Max icon flashing In normal display mode, press the mode key once. The maximum temperature and maximum humidity measured by the channel, and the date and time of the maximum temperature recorded will be displayed.
b. The Min temperature and Min humidity Min icon flashing In normal display mode, press the mode key two times. The minimum temperature and humidity measured by the channel, and the date and time of the minimum temperature recorded will be displayed. The “min” icon will be flashing.
c. The average value of the last 100 sets reading Average icon flashing In normal display mode, press the mode key three times. The average temperature and humidity value of the data which have been saved in the system memory will be displayed. The “avg” icon will be flashing. If the channel is not set to be saved in the system memory, no average value will be estimated and “--.-“ will be shown.
d. The dew point temperature Dew point temperature icon In normal display mode, press the mode key four times. The dew point temperature will be displayed next to the flashing “td” icon.
e. The history data sets of temperature and humidity History data icon flashing In normal display mode, press the mode key five times. The “hist” icon will be flashing and the last recorded temperature and humidity reading with the time of record will be displayed. By pressing the Minus key, the previous sets of readings which were measured at the userselected recording intervals may be viewed. If the channel is not set to be saved in the system memory, no history values will be displayed and “--.
To set the high humidity alarm: 1. 2. 3. In normal display, press the Plus or Minus key to select a channel (the sensor at the temperature station or one of the outdoor transmitters) Press and hold the Alarm key for about 3 second to enter high humidity alarm setting. The humidity digits, high limit icon and the alarm icon will start flashing. Press the Mode key to select to “activate” or “deactivate” the high humidity alarm.
To set the low humidity alarm: 1. 2. In normal display, press the Plus or Minus key to select a channel (the sensor at the temperature station or one of the outdoor transmitters) Press and hold the Alarm key for about 3 second to enter high humidity alarm setting. Then press the Alarm key shortly one more time to enter the low humidity alarm setting. The humidity digits, low limit icon and the alarm icon will start flashing. Low limit icon 3. 4. 5.
To set the high temperature alarm: 1. 2. In normal display, press the Plus or Minus key to select a channel (the sensor at the temperature station or one of the outdoor transmitters) Press and hold the al key for about 3 second to enter high humidity alarm setting. Then press shortly the Alarm key two more times to enter the high temperature alarm setting. The temperature digits, high limit icon and the alarm icon will start flashing. High limit icon Temperature digits flashing 3. 4. 5.
2. Press and hold the Alarm key for about 3 second to enter high humidity alarm setting. Then press shortly the Alarm key three more times to enter the low temperature Alarm setting. The temperature digits, low limit icon and the alarm icon will start flashing. Low limit icon Temperature digits flashing 3. 4. 5. Press the Mode key to select to “activate” or “deactivate” the low temperature alarm.
key is pressed, the buzzer will beep for two minutes yet the alarm signal icon will still be flashing until the temperature or humidity is within the pre-set range again. Once an alarm is triggered, the display switches to the latest triggered channel. In addition, the high/ low limit icon and IN/ OUT icon is flashing as long as the alarm condition is met.
MEMORY CAPACITY The temperature station provides data-logging function. The temperature and humidity data are saved into the Memory of the temperature station at 5-minute intervals (recording one data set at every five minute). The number of sets of data stored is shown at the ''mem'' display. The data-storing capacity for different number of transmitters used are listed below: No. of transmitters adopted Max No.
CLEARING ALL STORED TEMPERATURE AND HUMIDITY DATA (FROM TEMPORARY MEMORY OF THE TEMPERATURE STATION) The on-going temperature and humidity data are stored at the ring buffer memory (a temporary memory area where the latest data will displace the oldest data once the memory capacity is reached). To clear this memory, the following step shall be performed: 1. Press both the Plus key and SET key and hold for about 2 seconds.
Press and hold SET key first 3. Immediately press these 3 keys at the same time. Then hold the 4 keys together for about 3 seconds. The running digits will be displayed for about 6 minutes, followed by the full segment display. User is then required to remove and re-insert batteries to complete the restart the unit.
The display will show some running digits when the temperature station is reset. Full segment will be displayed- user need to remove and re-insert batteries to restart the temperature station.
After batteries are re-inserted, the station will automatically launch the learn mode. The signal receipt indicator will be displayed. User needs to set again the temperature station for the desired application. (See ”SETTING UP” in previous clause) Note: If the battery level is low, the digits “No EPr” may be displayed on LCD after resetting, indicating that the power is too low for the temperature station to function normally. In this case, the batteries shall be replaced.
CHECKING FOR 433MHz RECEPTION If the outdoor temperature data is not being received within three minutes after setting up (or outdoor display show “- -. -” in the outdoor section of the Temperature Station after 3 failed attempts during normal operation), please check the following points: 1. The distance of the Temperature Station or transmitters should be at least 2 meters away from any interfering sources such as computer monitors or TV sets. 2.
POSITIONING THE TEMPERATURE STATION: The Temperature Station provides the option of table standing or wall mounting the unit. Before wall mounting, please check that the outdoor temperature(s) can be received from the desired location(s). To wall mount: 1. Fix a screw (not supplied) into the desired wall, leaving the head extended out by about 5mm. 2. away from the base and hang the station onto the screw. Remember to ensure that it locks into place before releasing.
The mounting surface can affect the transmission range. If e.g. the unit is attached to a piece of metal, it may either reduce or increase the transmitting range. For this reason, we recommend not placing the unit on any metal surfaces or in any position where a large metal or highly polished surface is in the immediate proximity (garage doors, double glazing etc.).
SPECIFICATIONS: Temperature measuring range: Indoor : -9.9ºC to +59.9ºC with 0.1°C resolution +14ºF to +139.8ºF with 0.2ºF resolution (“- -” displayed if outside this range) Outdoor : -29.9ºC to +69.9ºC with 0.1°C resolution -21.8ºF to +157.8ºF with 0.
LIABILITY DISCLAIMER: The electrical and electronic wastes contain hazardous substances. Disposal of electronic waste in wild country and/or in unauthorized grounds strongly damages the environment. Please contact your local or/and regional authorities to retrieve the addresses of legal dumping grounds with selective collection. All electronic instruments must from now on be recycled. User shall take an active part in the reuse, recycling and recovery of the electrical and electronic waste.
R&TTE Directive 1999/5/EC Summary of the Declaration of Conformity : We hereby declare that this wireless transmission device does comply with the essential requirements of R&TTE Directive 1999/5/EC.