
Instruction manual


P. 3
ENVIRONMENTAL RECEPTION EFFECTS
Your radio controlled clock obtains the accurate time with wireless technology. Same as
all wireless devices, the receiving ability maybe affected by, but not limited to the following
circumstances:
Long transmitting distance
Nearby mountains and valleys
Among tall buildings
Near railway, high voltage cable etc.
Near freeway, airport, etc
Near construction site
Inside concrete buildings
Near electrical appliances
Near computers and TV’s
Inside moving vehicles
Near metallic structures
Place your clock at a location with optimal signal, i.e. close to a window and away from metal
surfaces or electrical appliances.
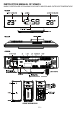
QUICK SETUP
Step 1 Keep your weather station and wireless sensor next to each other. Slide open the battery
cover at the back of your wireless outdoor sensor, make sure the channel selector is set at position
1 (top position), then insert 2 x AAA batteries (not included) into the outdoor sensor by observing the
correct “+/-“ polarity signs inside the battery compartment. Replace the battery door.
Step 2 Insert the AC/DC adaptor to any 230V AC household outlet. Then insert the DC jack to the
back case of your weather station.
Step 3 Slide open the battery cover at the back of your clock, then insert 1 x CR2032 Lithium battery
(not included) to the battery compartment. Make sure “+” - polarity of the battery is facing up. Then
replace the battery cover.
Your weather station will receive data signal from the outdoor sensor in few seconds. Then place
your outdoor sensor in a dry and shaded area outdoor.
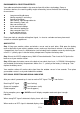
DCF SIGNAL RECEPTION AND SIGNAL INDICATOR
After your clock is powered up, it starts to receive DCF signal. The icon flashes.
Receiving DCF signal ( icon flashing)
Successful reception ( icon becomes static)
Failed reception ( icon disappear)
During reception, press / WAVE once will display reception mode and signal strength
indication:
When strong DCF signal is detected, display shows with 3 bars
When weak or no DCF signal is detected, display shows or