
Operation Manual

This weather station is equipped with outdoor temperature and humidity display. The
weather station is capable of synchronizing with up to 3 external sensors. 1 external is
included with this weather station. Contact your local authorized re-sellers to purchase
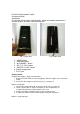
additional external sensors. RST 1 RTS 3 RTS 4
RTS 2
Fig. 4 Back View Fig. 5 Back view - open
RTS 1. Hang hole
RTS 2. Battery compartment screws
RTS 3. “RESET” button
RTS 4. “Channel 1 2 3” switch
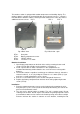
Batteries installation
1. Open battery compartment on the back of the unit by removing the two small
screws (RTS 2) with a Philips head screwdriver. (see figure 4)
2. Install / replace with 2x “AAA” size batteries in the compartment. It is
recommended that only alkaline batteries are used. Do not use rechargeable
batteries.
3. The weather station is capable of receiving up to 3 different channels. Select the
channel number (1, 2, or 3) by sliding the “Channel 1 2 3” switch (RTS 4). If you
only have 1 remote temperature sensor, select 1.
4. Press the “reset” button (RTS 3) once and the red light will flash once.
5. Replace the battery compartment on the back of the unit by tightening the two
screws (RTS 2).
Installation
1. Place the remote temperature sensor at a desired place by mounting the unit’s
hang hole (RTS 1) on a screw (screw not included). Alternatively, the unit can be
place on a flat horizontal surface.
2. The unit can be placed indoor or outdoor. The unit is weather proof. Do not
submerge unit in water. Do not expose unit to water for prolonged periods. Avoid
accumulation of water and or snow on unit. Avoid exposing unit to direct sunlight.
Remove unit from the exterior in extreme or harsh weather, including but not