
User's Manual

TECHNISONIC INDUSTRIES LIMITED
www.til.ca
TFM-550 Installation & Operating Instructions TiL 99RE262 Rev A Issue 8
2-6
2.8 KEYBOARD LOCKOUT FUNCTION
The keyboard can be locked out so that accidental pressing of keys does not change frequency,
etc., unknowingly to the operator. To lock the keyboard, press FUNC then LOCK. This will disable
all keyboard functions (except keyboard unlock) in the receive mode. The DTMF function during
transmit will not be affected. To unlock the keyboard, press and hold the LOCK key for two
seconds until the display indicates "UNLOCK".
2.9 VARIABLE FREQUENCY MODE FUNCTION
To enter variable frequency mode, press RCL, 0,0,0, then ENTER or enter a frequency in the
direct entry mode described above. The memory channel that you were just in will still be valid,
but now you can manually adjust the frequency with the M.UP, M.DN, UP and DN keys. The UP
and DN keys will make the frequency count up or down in steps of 2.5 kHz. The M.UP and M.DN
keys will make the frequency count up or down in steps of 1 MHz. You can not change the label.
The frequency in this mode cannot be stored in memory. To exit this mode, recall one of the 200
memory channels. (Example: RCL, 0,0,1). Variable frequency mode is disabled when the internal
entry disable jumper is removed.
2.10 LED DISPLAY VARIABLE DIMMING MODE
1. With the transceiver in normal operating mode press the UP or DN keys to increase or
decrease the intensity of the LED display.
2. Once maximum intensity of the display is achieved, the UP key no longer functions. Conversely
once minimum intensity is reached, the DN key ceases to function.
2.11 90 SECOND TRANSMITTER TIME OUT FEATURE
A selectable 90 second transmitter time out feature is provided to prevent accidental continuous
transmission in the event of a faulty PTT switch. With this feature enabled the transceiver will stop
transmitting after the PTT is engaged continuously for 90 seconds. The timer is reset by releasing
then re-engaging the PTT switch.
Press the FUNC then the M.UP key. Use the M.UP and M.DN keys to select 90 SEC, which
enables the feature, or NONE which disables it.
2.12 PROGRAMMING CTCSS TONES/DPL CODES
CTCSS tones (PL tones) or Digital DPL codes can be assigned to each memory channel on any
of the three operating bands. To program a tone/code to a memory channel:
1. Select the desired band on the band select switch.
2. Use the M.UP and M.DN keys to select the memory channel that you want to assign a
CTCSS tone or DPL code.
3. Press the FUNC key then the TONE key. The display will show "RX TONE:" and the current
tone number, as well as the tone frequency in Hz.
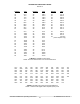
4. Use the M.UP and M.DN keys to select the tone number you require. See Table 2-1 for a list
of the available CTCSS tones.
5. Press ENTER. "TX TONE" appears on the display. Repeat step 3.
6. The display will now show "RX DPL:" and the current 3 digit DPL code. If no DPL code is
required "000" should be entered. Please note that if a DPL code is to be programmed a
CTCSS tone should not be enabled.
7. Use the keypad to enter the required octal 3-digit DPL (Digital Coded Squelch or DCS) code.
See Table 2-2 for a list of all usable and unique octal 3 digit DPL/DCS codes.
8. Press ENTER. "TX DPL" appears on the display. Repeat step 6.